How to Submit Homework Like a Boss
When turning in homework (or any other assignment) online, you want to make things as easy as possible for the grader. Therefore, it’s vital that you create a single, legible PDF containing everything in one file. It’s easier than you think, I promise.
– a guide by Dominic
Why should I bother?
If for no other reason, it’s because it might help your grade!
This guide is written with the University of Wisconsin-Madison in mind, where we use Canvas for student submissions, and grading is done using an app in Canvas called SpeedGrader. SpeedGrader allows TAs to go through submissions quickly directly in Canvas, but it can make improperly formatted PDF files appear huge. This requires the TA to scroll vertically and horizontally to see what you’ve written and makes it so they can’t see everything at once. In short, it makes grading difficult. It’s tougher to give partial credit when you can’t see all of a student’s work at once! It’s also a lot easier to miss something you wrote if it’s off screen.
Having legible text is also very important. Being able to explain yourself both clearly and succinctly is an immensely important skill. The easier it is to understand your work, the more likely you are to get that prestigious fellowship or job, to be published in that famous journal, or to convince your parents-in-law that your work is actually useful and important and you aren’t just taking up space. It could even be a legal matter: if your intellectual property, patent, or other work is easy to understand, it can be easier to claim credit or royalties when your work is used.
Of course, submitting beautiful homework is also just a nice thing to do for your grader. They will appreciate your effort, I assure you.
So what’s the scoop?
We’re going to break down assignment submission into two parts: preparing files and creating a PDF. Both parts are equally important if you want to submit good-looking work, so be sure not to skip either!
File Preparation
Getting the homework from paper to computer.
If you have handwritten work that you need to digitize, there are three methods that we recommend, depending on what hardware is available to you:
- If you have access to a smartphone, either Android or iPhone, we recommend the free app “CamScanner”. See details below.
- If you don’t have access to a smartphone but do have a scanner, you can use that, although it can be a bit more finicky. See details below.
- If you don’t have either, but you do have a digital camera or camera phone, we can make that work, although it’s the most difficult option. See details below.
Once you have digitized your work, we’ll move on to preparing files themselves before creating our PDF. Specifically, we’ll deal with three types:
- Image files, including those created by the above methods. See details below.
- Microsoft Excel spreadsheets, for work you need to graph or perform complicated calculations on. See details below.
- Microsoft Word documents, for work that’s easier to type out. See details below.
Handwritten Work
CamScanner
Left-click here for how to use CamScanner.
CamScanner is a free app for Android or iPhone that allows you to take photos of your work and save it on your computer as if you had scanned it in. We prefer this method because it gives reliable results that are easy to read, if you use it correctly.
Important!
While CamScanner works great, sometimes it works too great. If not used correctly, it can create HUGE files that don’t play well with SpeedGrader. Use this guide so that things will end up legible!
On to the show…
First, you’ll need to download and install CamScanner. It’s available from both the Android Play Store and the Apple App Store.
Once you’ve got it installed, watch the tutorial to get some basic advice on how to use the program, but be sure to follow the instructions below when you’re preparing your work for submission.
Whenever you use the program you’ll be greeted by a nag screen asking you to upgrade to premium. You do not need to upgrade to premium for our purposes, so just tap the X to dismiss this screen.
 |
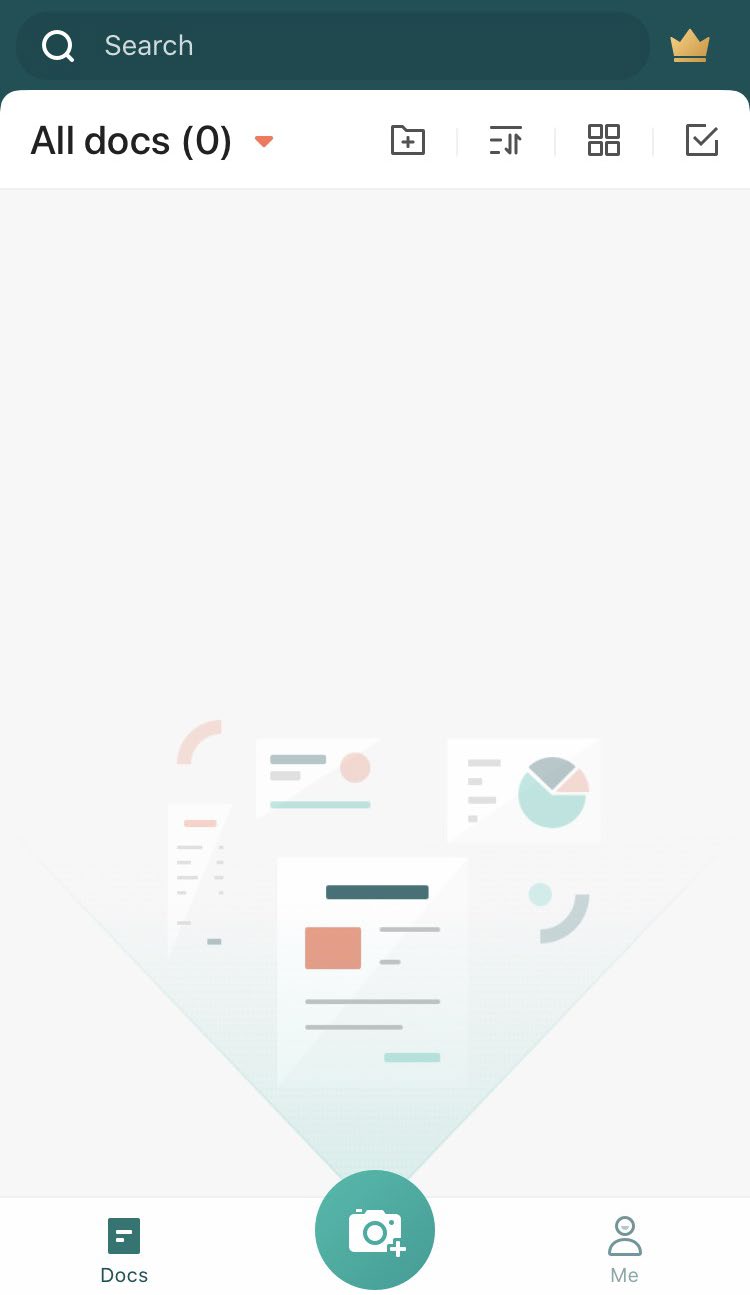 |
The first time you use CamScanner, the first screen is empty, but as you make scans it will fill up with all of your documents. To take a scan, just tap the green camera icon  or or  near the bottom. near the bottom. |
|
 |
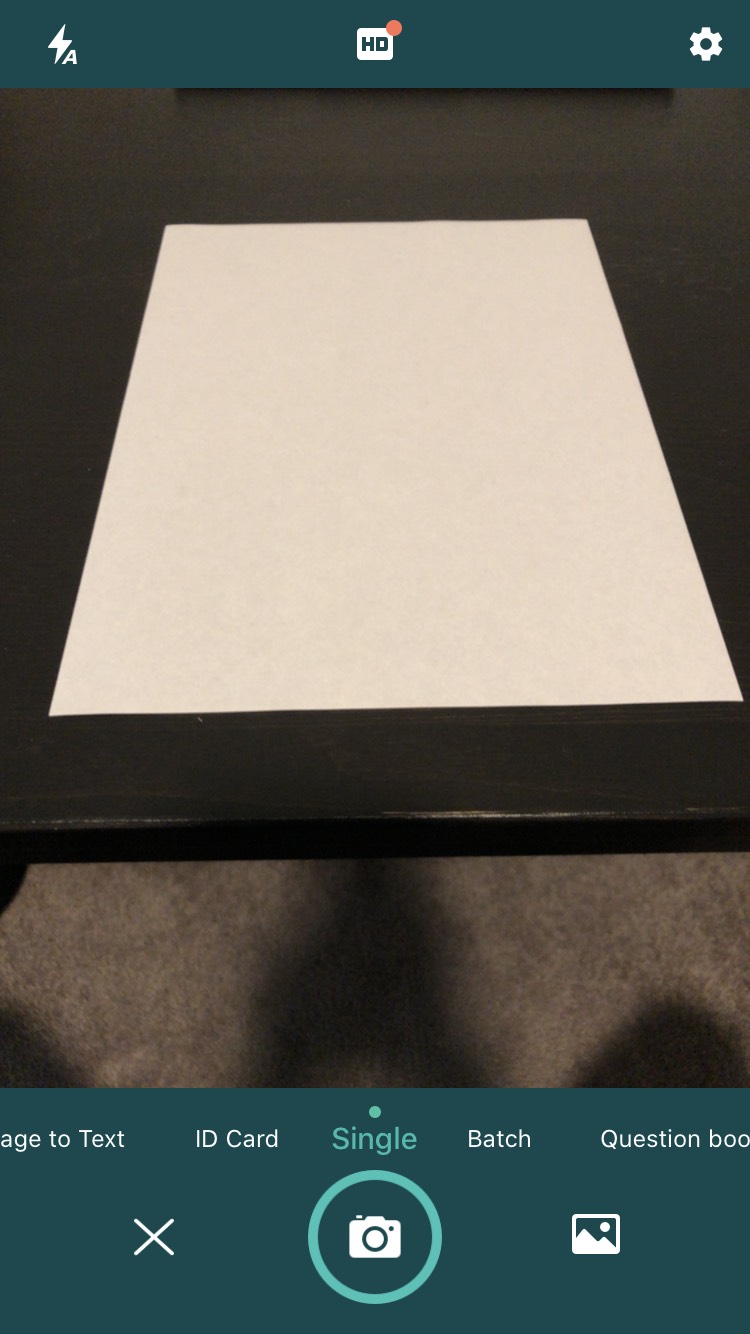 |
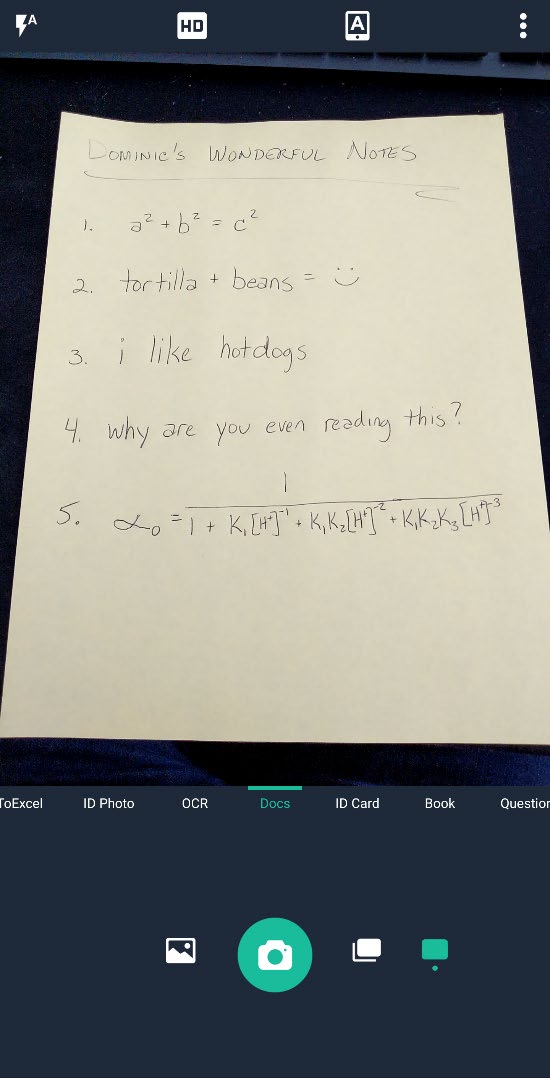
| The photo screen looks like almost any other camera app. If you have more than one page of homework, tap the batch button. If you have only one, tap the single button. | |
|
Note: on iPhone, the batch button might not appear. Instead, you’ll notice that you can select “Single” or “Batch” right under the photo. |
| You’ll notice a lot of options for your picture on screen, we’ll ignore all of them except for one: be sure to turn your flash to “automatic”, When you’re ready, position your homework so that the entire page is visible, and then tap the green camera button, If you’re in batch mode, you can position your next page and tap the camera icon to take the next photo. Continue as such until you get through all your pages. When you’re done, tap the square icon of your homework to move on. |
|
 Single Shot Mode Single Shot Mode |
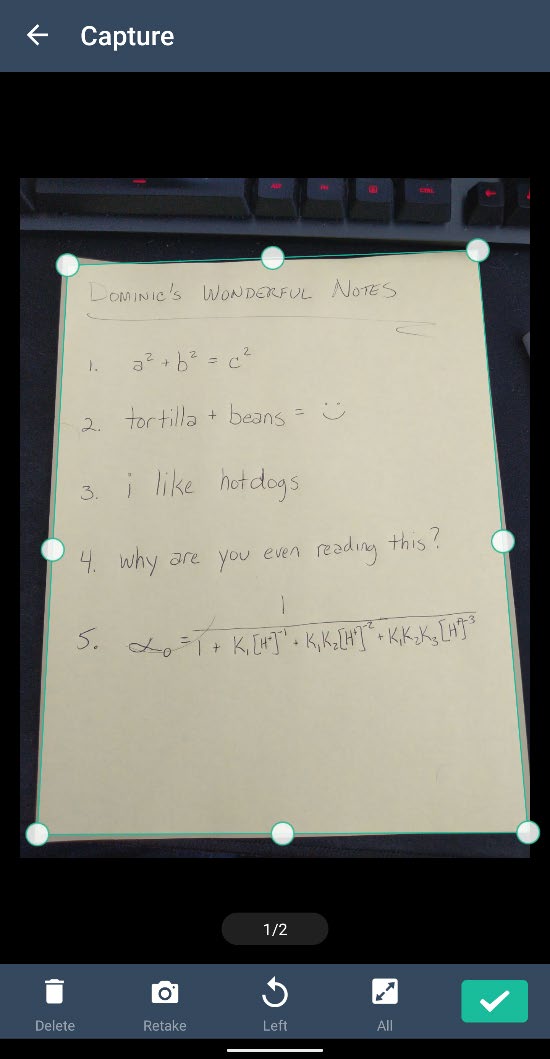 Batch Shot Mode Batch Shot Mode |
| On the next screen, CamScanner will try to identify your page with these dots. You can drag them around if they don’t outline the page correctly. In batch mode, drag left or right to scroll through all the pages to be sure they’re properly outlined. CamScanner will use this outline to stretch your page and make it look as if it was scanned properly.
If any of your pages ended up sideways, use the rotation buttons, Now is also a great time to check that the page came out clearly. In batch mode, you can use the “retake” button, Click either “Next”, |
|
| CamScanner will “process” the image on the next page. If you were in batch mode, it’ll dump you onto a page full of today’s scans.
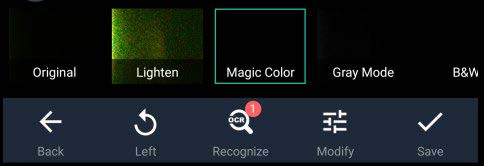
If you were in single mode, it will bring up lots of options to modify the image. In general, you don’t need to use any of them. Magic color will generally fix up the image so that it looks beautiful and legible.
You can just click the “save” button and move on, |
|
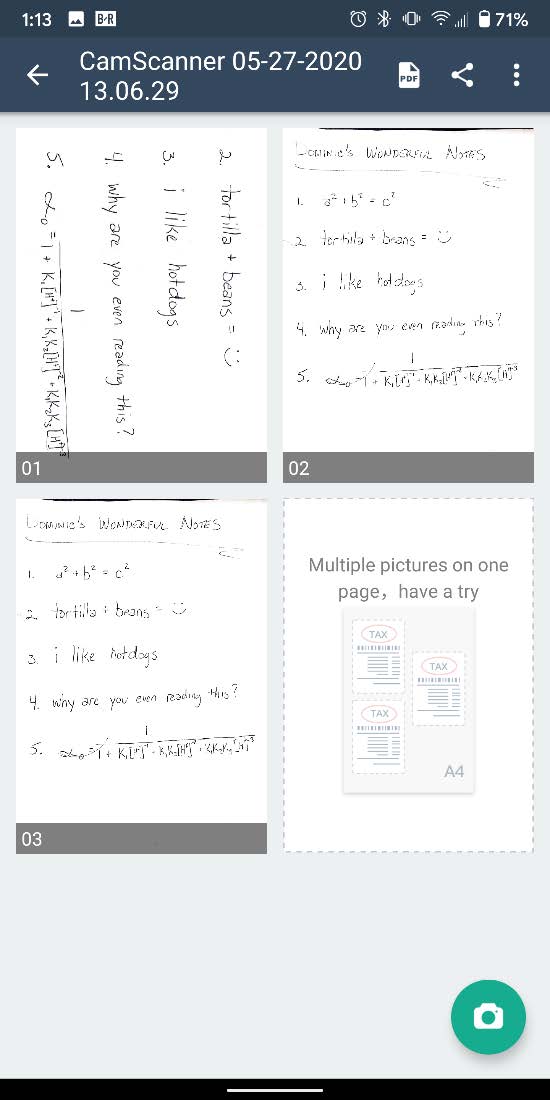 You’re now on the collection of today’s scans. It’s a good opportunity to check and be sure everything looks fine. I’ve scanned the same page several times, and you can see that my first attempt resulted in a sideways image. You can tap any images that don’t look right to edit them again if you like. |
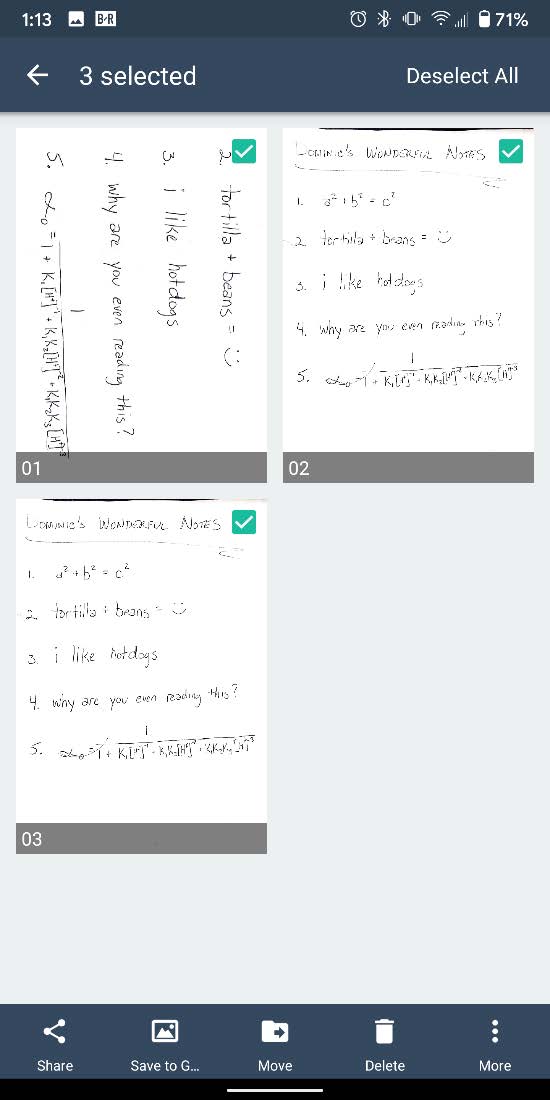 If you’re happy with everything, long press on any image that you want to save. The screen will change slightly to show a checkmark by each page. Tap each box so that there’s a check next to each image you want to save. In our case, we’ll assume we’re exporting all three pictures. |
When everything is selected, click the share button,  or or  . . |
|
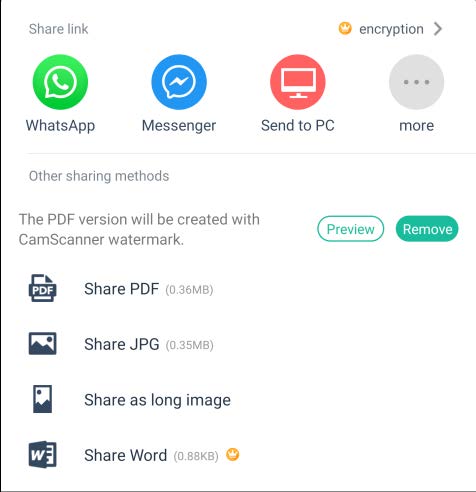
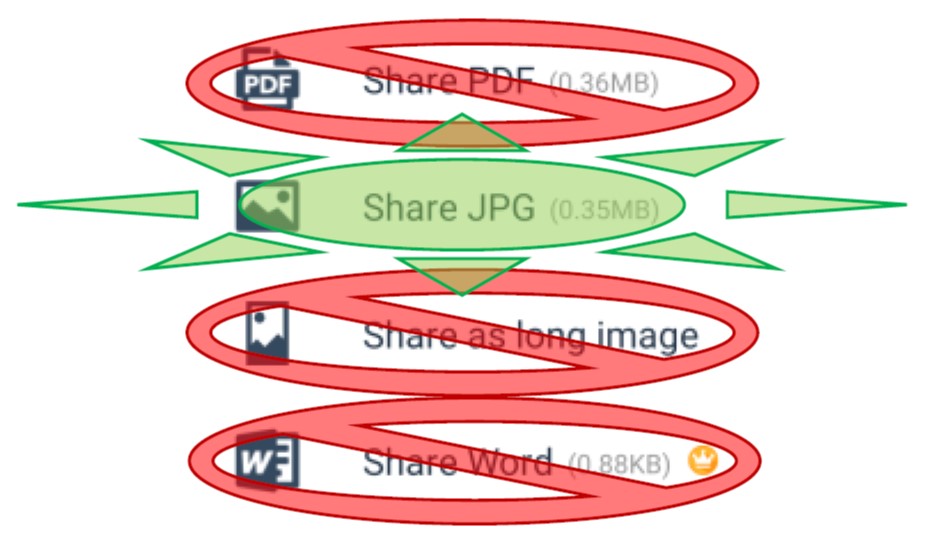
The share screen in CamScanner has lots of options. Even though we eventually want to create a PDF, we want to share all these pages as JPG. Click that option and your phone’s normal share window will pop up. You can then email the images to yourself to get them onto your computer. That’s it! Move down to the “Image Files” section below to learn how to process images into your PDF! |
|
Scanning
Left-click here for how to use scanners.
All scanners are different, so if you choose this method, you should read the manual to your scanner on your own. Here are some tips for making your document come out perfectly:
- Scan the page as an image
- Your document is handwritten, so don’t turn on any fancy text recognition or anything. Scanners also have a tendency to make PDF files that don’t play well with SpeedGrader, so don’t use your scanner’s built-in PDF maker.
- Set the DPI to 300
- This will make sure the image is readable without making the image too gigantic.
- Switch to black and white and adjust the contrast
- Switching to black and white sometimes makes text show up better, but it can also sometimes miss things your written lightly (especially if you used a pencil). Most scanners let you adjust the contrast so that none of the text is missing.
- If you use color mode, be sure everything you’ve written is dark enough to read
- This is especially important if you used a pencil or different colors of ink.
- Finish with the image file
- Check the “Image Files” section to process the image and get it ready.
Plain Ol’ Picture Phone
Left-click here for how to use cameras.
If you don’t have a smartphone that can run CamScanner and you don’t have a physical scanner, that’s okay. You can still handwrite your homework if you have an older picture phone or a digital camera. You’ll have to take pictures, then transfer them to your computer using a cable connection or the memory card on you phone/camera.
Follow these tips to make sure your pictures come out great. When you’ve taken your pictures, check out the “Image Files” section below to prepare them for the PDF.
- Make sure the area is brightly lit
- Use the flash on your camera if you can. If you can’t, take the photo in the brightest light you can.
- Take the photo one sheet at a time
- Take a picture of each sheet separately so that you can fill the picture. This will make text much easier to read.
- Check the legibility
- If your handwriting is very small or your camera has a poor resolution, you might need to take pictures of half a page at a time. If you can’t read the text on your computer, your grader won’t be able to read it either.
- Don’t use image compression
- If your camera has an option to compress photos (usually so it can save more pictures on a single memory card), turn it off. Compression can make text very hard to read.
Digital Files
Image Files
Left-click here for working with image files.
Once you’ve created your images using one of the above methods, you’ll need to make sure they look good.
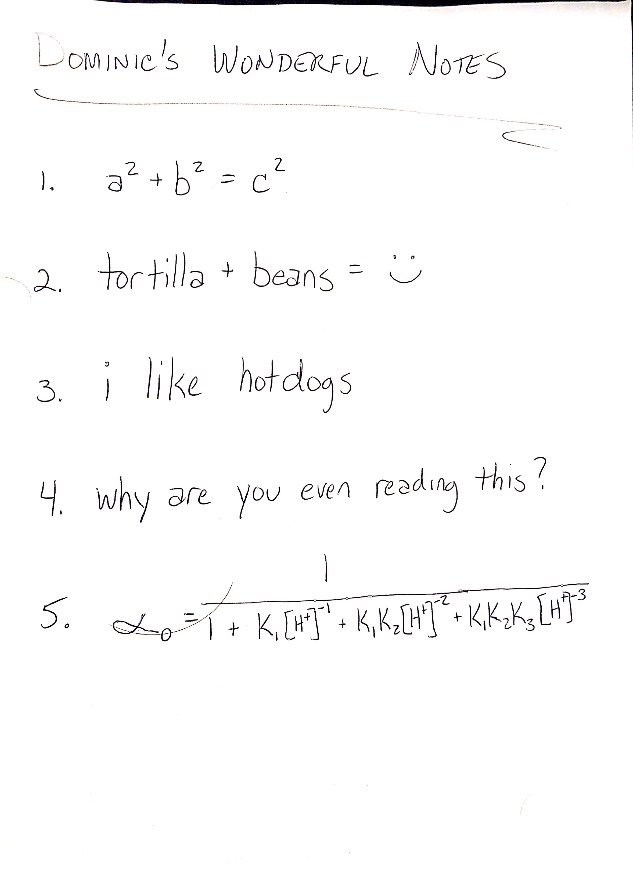 |
 |
Above are two examples of images that you might want to load into a PDF for homework. When looking at your images, consider the following:
Is the image right side up? Is the text legible? Are any important details missing?
If the image isn’t right side up, most photo viewers can rotate the picture for you. In your image viewer, look for an icon that looks like a circular arrow. For example, the rotation button in Windows 10 Photos app looks like this: ![]()
If your image isn’t legible or if it isn’t clear, consider re-taking your photo. It stinks, but sometimes you need to re-write your work, too, especially if your handwriting is sloppy or small. Don’t be afraid to use multiple sheets in exchange for writing largely, and remember that you can type up written answers, too.
If you find yourself having trouble taking clear photos of your work, check in with your TA or other support staff immediately. You can always contact DoIT at https://it.wisc.edu/help/ to get help directly.
Excel Spreadsheets
Left-click here for working with Excel.
If you’ve done work in Excel, you might be in one of several situations. Check the assignment carefully to be sure you’re submitting exactly what the grader will expect, nothing more nor less.
Sometimes the spreadsheet you’re working on will contain pages and pages of data. It is generally not necessary to submit all of this. Use the tips below to shift the important parts to the first “page” of your spreadsheet in preparation for submission.
In general, you’ll need to show the following:
- The data you entered into the spreadsheet (masses, volumes, etc)
- The equations that you used (see “Add Equations As Necessary” below)
- The results that you obtained, in the form of graphs or individual values.
Eliminate extra data
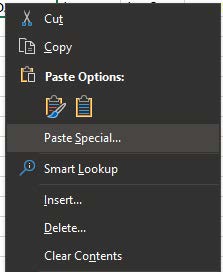
The easiest way to eliminate the unneeded stuff is to copy and paste what you need to submit into a new document. Highlight all of the data that you want to copy, right click, and select “Copy”. Then, in a new document, click inside the top-right-most cell, A1, and select Paste Special:
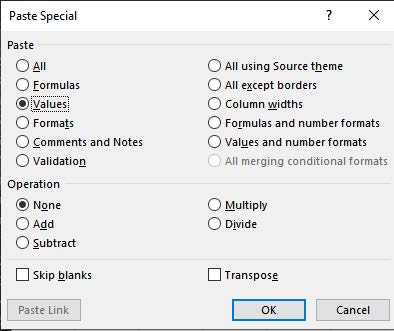
When the Paste Special dialog opens, select “Values” and click OK. This will make sure that you only paste the numbers in each cell, not their formulas, so that everything appears correctly. Pasting in the first cell will keep blank space from filling up your eventual PDF.
You can repeat this process to collect information from multiple places within your spreadsheet or across multiple spreadsheets, too.
Once you’ve got everything together, you can save the spreadsheet and move on to the PDF creation section.
Copy graphs and charts
If you need to make a graph or chart of your work, it’s not a good idea to take a screenshot. Instead, paste the graph or chart alone in a new Excel spreadsheet and save it on its own. While a screenshot can become blurry or illegible or otherwise ugly when pasting into a PDF, pasting a chart or graph directly into Word or Powerpoint will always look beautiful.
If you are pasting your graph into a new Excel spreadsheet, remember to move the graph or chart into the upper left corner of the spreadsheet so that it isn’t surrounded by empty space in the PDF. If you are pasting your graph into a Word document, be sure to paste it on its own line at the appropriate spot in the text.
This is also a great time to check that the graph has a title, axis labels, and units. Add them if they aren’t already there.
Add equations as necessary
Often, you’ll need to show the equations you used to produce certain numbers. To display an equation in Excel without obtaining the answer, type a single apostrophe as the first character in the cell.
For example, 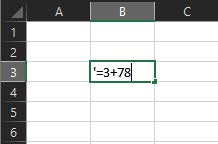 displays as
 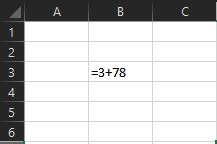 .
.
The apostrophe itself won’t appear on the spreadsheet, but the equation will. This will allow you to display the exact equations you use to your grader.
I recommend adding the equations you use to column along the side of your actual work. You can add a label, too, to make things easy to read.
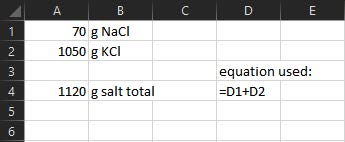
With particularly complicated equations, you’ll be tempted to simply copy and paste. To prevent any errors, add the apostrophe first, then copy and paste, and then go back and remove the apostrophe from the original cell. This will keep Excel from updating the formula in any way during the copying process.
Word Documents
Left-click here for working with Word.
Word documents convert very well into PDFs. You only need to follow a couple guidelines to keep things nice:
- Keep the page normal
- If you’re typing homework into Word, don’t change the page size or the margins. This will make the eventual PDF easier to read in SpeedGrader.
- Don’t use a tiny or huge font
- Keep your font size about 11- or 12-point. A font that’s too big or too small will require the grader to zoom in or out to read. Trust me when I say that this gets tiring very fast.
- Don’t be afraid to handwrite things or use the equation editor
- Microsoft Word includes an equation editor that is extremely useful to any scientist, but there is a slight learning curve to using it. Learning it now can prove very useful if you have poor handwriting, it’s definitely something you can learn on your own. To get started, just switch to the Insert ribbon in Word and select the “Equation” button.

- On the other hand, if you’re confident in the legibility of your handwritten work, go for it. Use the methods outlined above to take pictures of your work and insert them directly into the document.
- Just be sure to combine the files together, which leads us to…
- Microsoft Word includes an equation editor that is extremely useful to any scientist, but there is a slight learning curve to using it. Learning it now can prove very useful if you have poor handwriting, it’s definitely something you can learn on your own. To get started, just switch to the Insert ribbon in Word and select the “Equation” button.
- Make each problem a separate document.
- If you’re combining handwritten work with typed answers, give each problem its own Word document. When you combine the files together into a PDF later, this will allow you to arrange the work for each problem together. If all your work for problem #3 is together, the grader will have a much easier time.
- Don’t use Comic Sans
- It’s the worst font. Never use it. Ever. The best font is Lucida Console. Debate me IRL.
PDF Creation
Getting everything together for submission
Okay, so you’ve got everything onto the computer, and we’re pretty sure it looks good. Now what?
There are lots of options when it comes to PDF creation. The easiest option you probably have available is simply using Microsoft Word. Check the first section below to learn how to paste everything into a Word document and convert it to PDF.
If you own a copy of Adobe Acrobat, you can use that, as well. Instructions are in the second section below.
Making a PDF in Microsoft Word
In this tutorial, we’ll start with a regular Word document, then add data from a small Excel file and a photograph.
Remember that if you have a large Excel file to submit, you’re better off submitting it directly as a separate upload.
Left-click here for how to create pdf using Word.
First, create your document like normal in Word.
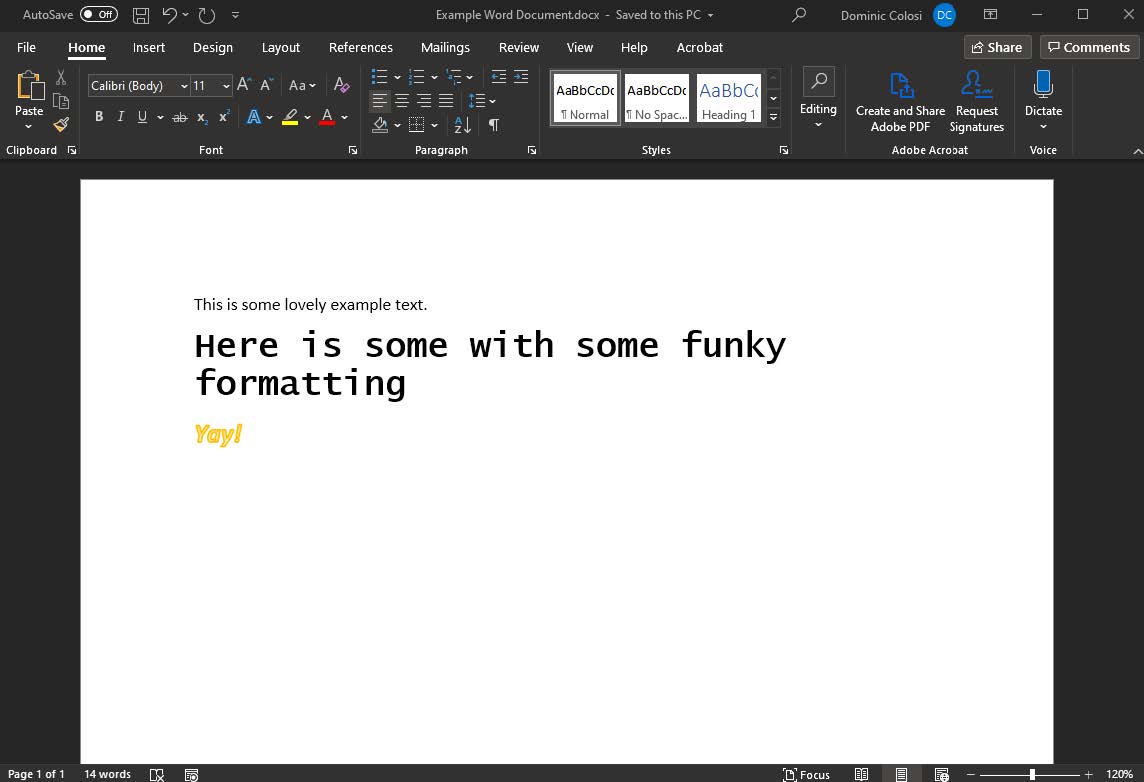
Adding Excel Data
Begin by switching to the insert tab. In the section labeled “Text”, click the “Object” button
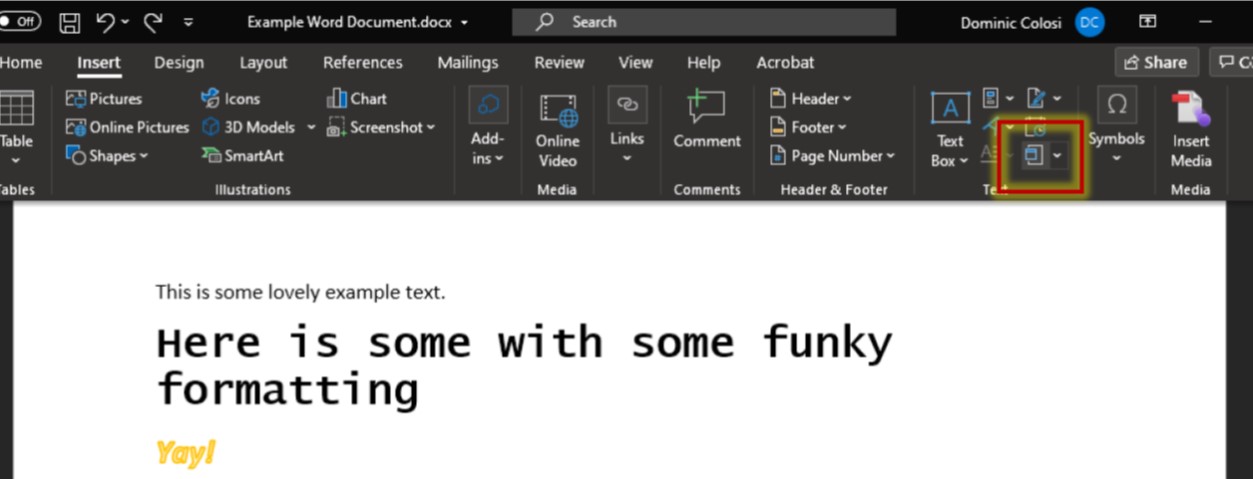
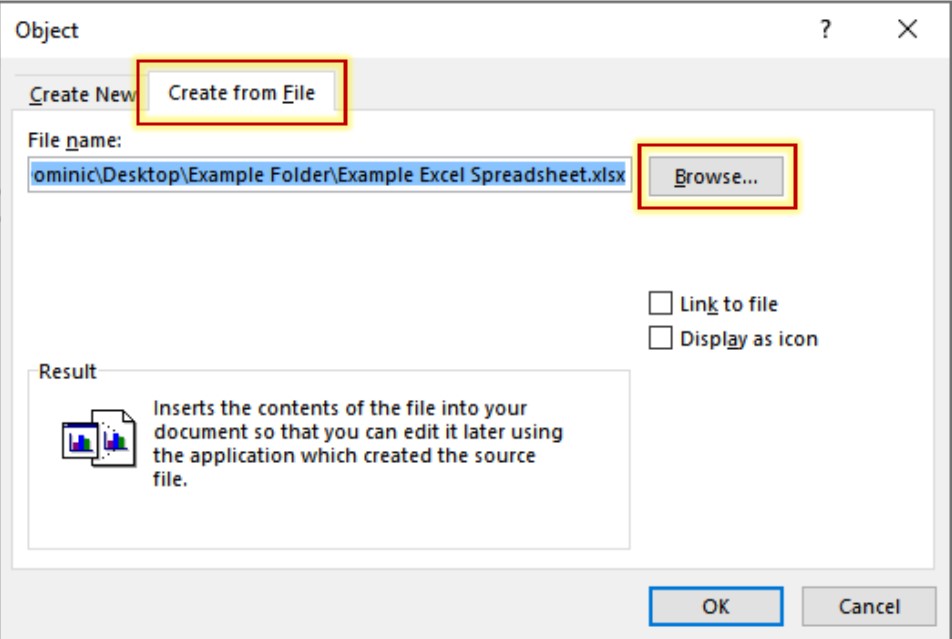
In the dialog box that appears, change to the “Create from File” tab. Then click “Browse” and select your Excel file. Then simply hit “OK”.
Word will paste all cells with data into the document.
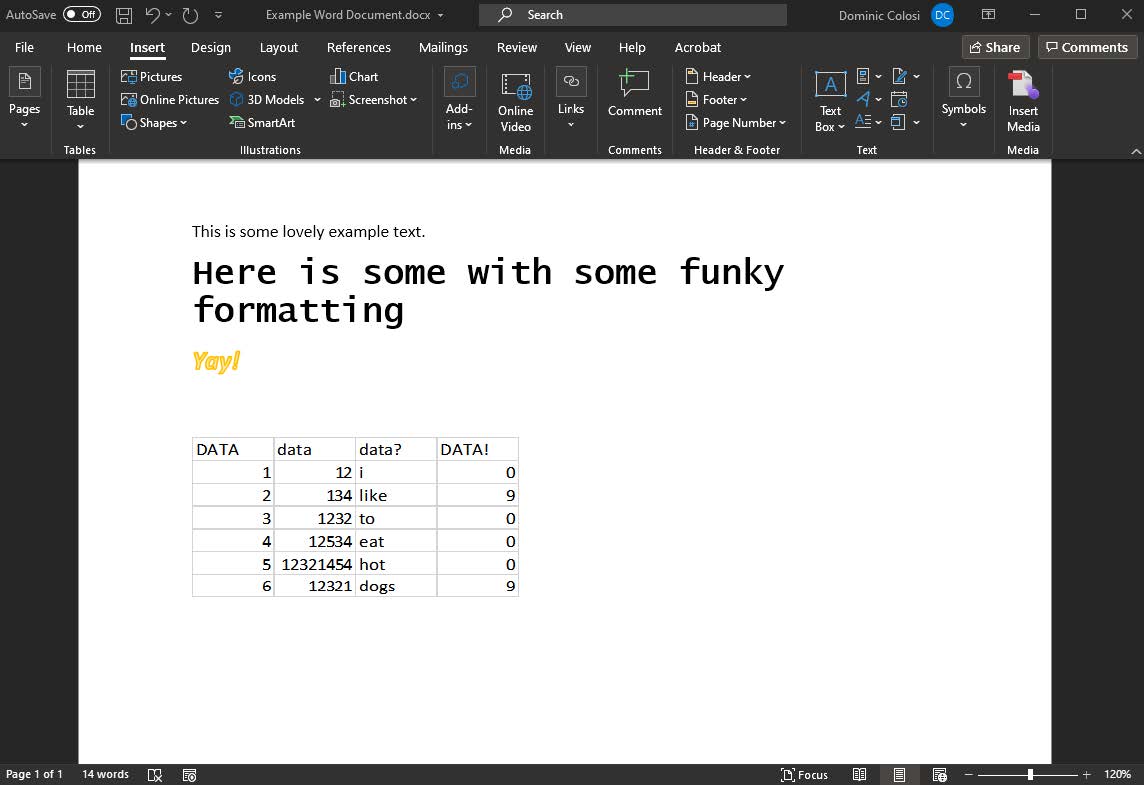
Note that if your Excel file has a lot of data, you may want to first copy only the relevant data into a new Excel file. Then you can add just that new spreadsheet to the Word document.
Adding Images
Adding a picture works much the same way. Again we’ll use the Insert tab, but this time we’ll click “Pictures”.
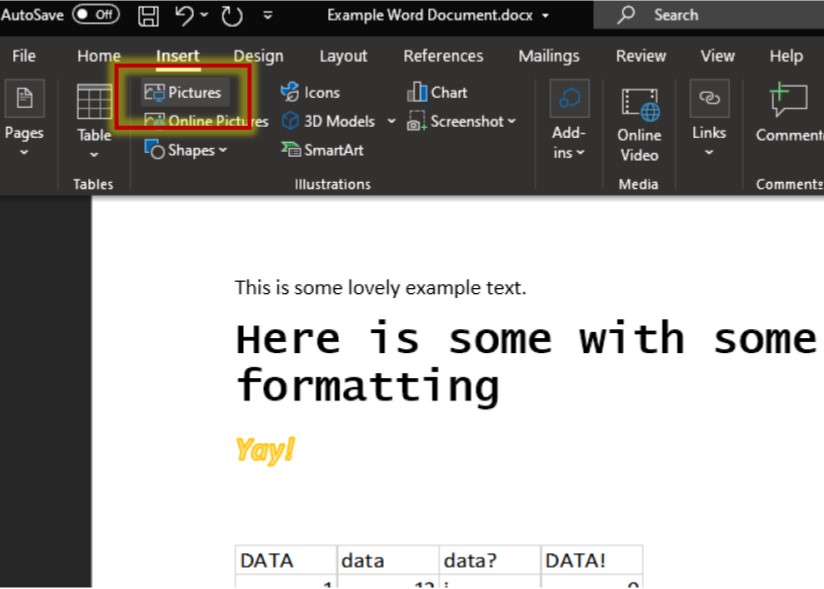
This will directly bring up a file browser. You can simply browse to your image and select it.
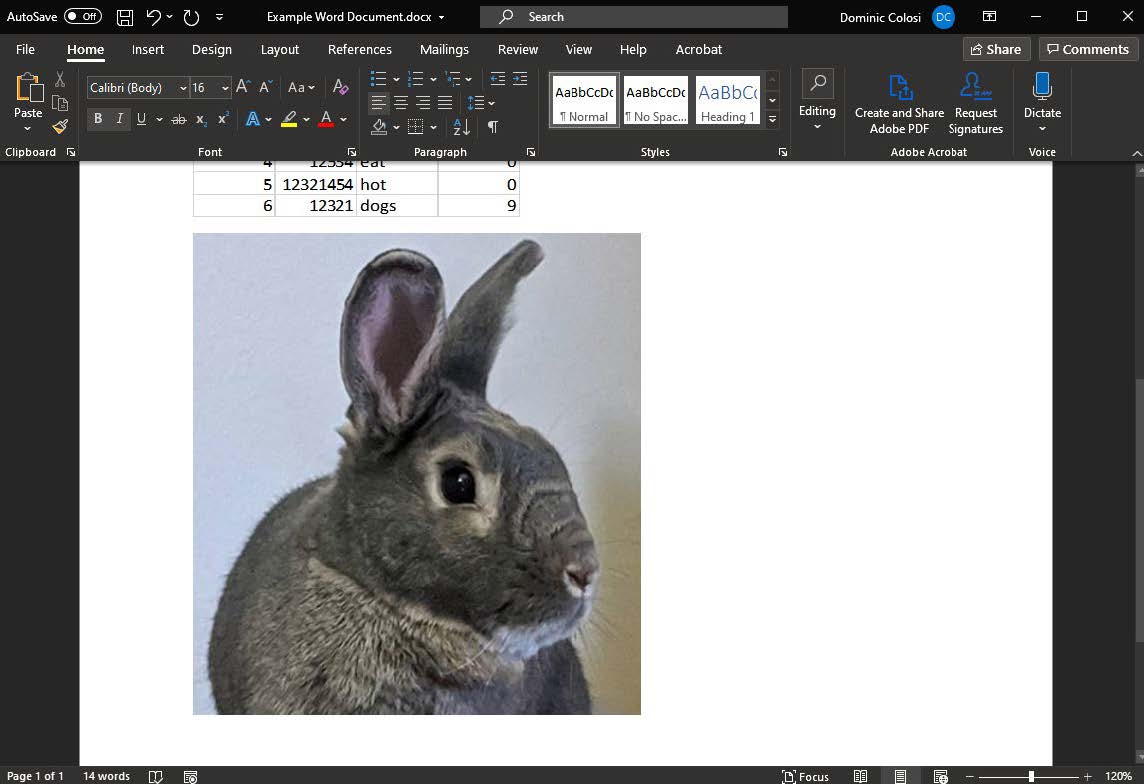
You’ll want to make sure the image is an appropriate size at this point. In this photo of our lovely lab assistant, the default size is perfect, but if your image has text in it that needs to be read, you’ll want to make sure it’s large enough. For example, if you have a full sheet of handwritten work, you should probably expand it to cover an entire Word document page. Likewise, if the image is stretched beyond the bounds of the page, it won’t show up on the PDF, so shrink it down if you have to.
If the text in your image isn’t legible, you might have to retake your photos. Go back to the appropriate section above and follow the directions. Don’t be afraid to take a picture of smaller sections (rather than a whole page at once) or to rewrite your work if that’s what it takes. A grader cannot grade illegible work!
Finally, we can click “File” in the upper left, then “Save as Adobe PDF” along the side. Word will bring up a save dialog for you to save your new PDF.
Important: Be sure to name your file descriptively. Include the document type, your name, and your section number. It should look like “PrelabWorksheet_DominicColosi_301.pdf”.

That’s it!
Open the PDF file that you’ve saved and make sure everything looks good before submitting it. You can also save the document in DOCX format so that you can edit it later.
Making a PDF in Adobe Acrobat
First, you’ll need Adobe Acrobat. You’ll have to purchase an Adobe license yourself. Adobe offers multiple price points, including discounts for students, but the most economical choice may be to switch to Microsoft Word.
Download and install Adobe Creative Cloud, and then install Adobe Acrobat. This process might vary based on your specific computer or situation.
Left-click here for how to create pdf using Acrobat.
Combine files into a PDF
For this example, let’s say we have a Word document with some written answers, an Excel document with some data, and a photo, and they all need to be submitted together as a homework assignment.
Open Acrobat and you should see something like this:
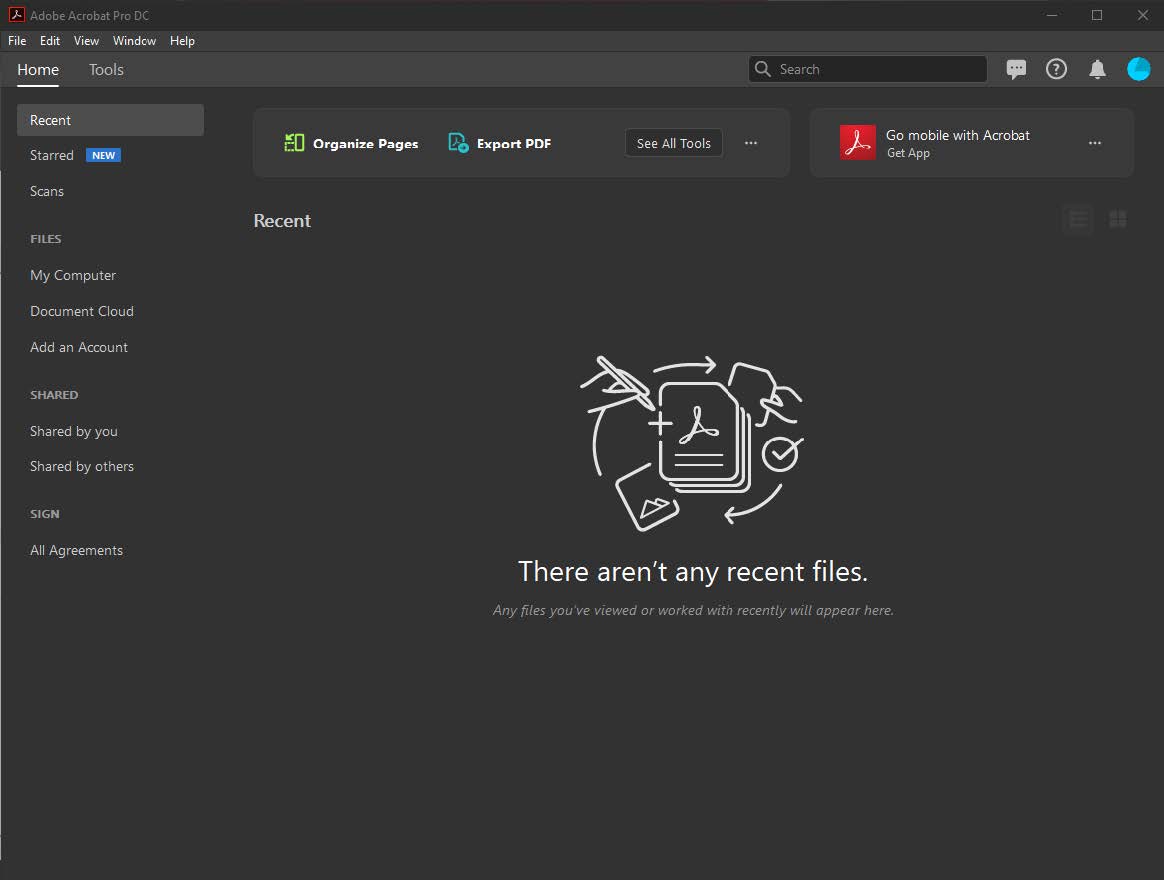
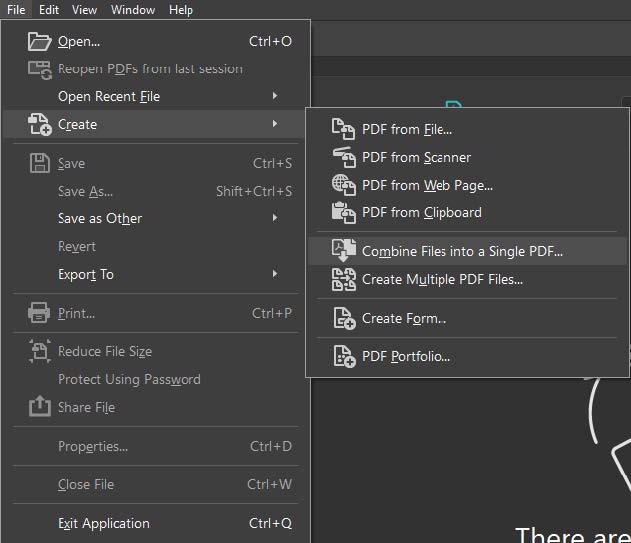
We want to create a brand new PDF file, so we’ll click “File” in the menu bar, then select “Create” followed by “Combine Files into a Single PDF”.
The next screen will ask you to add your files. Just click the blue “Add Files” button
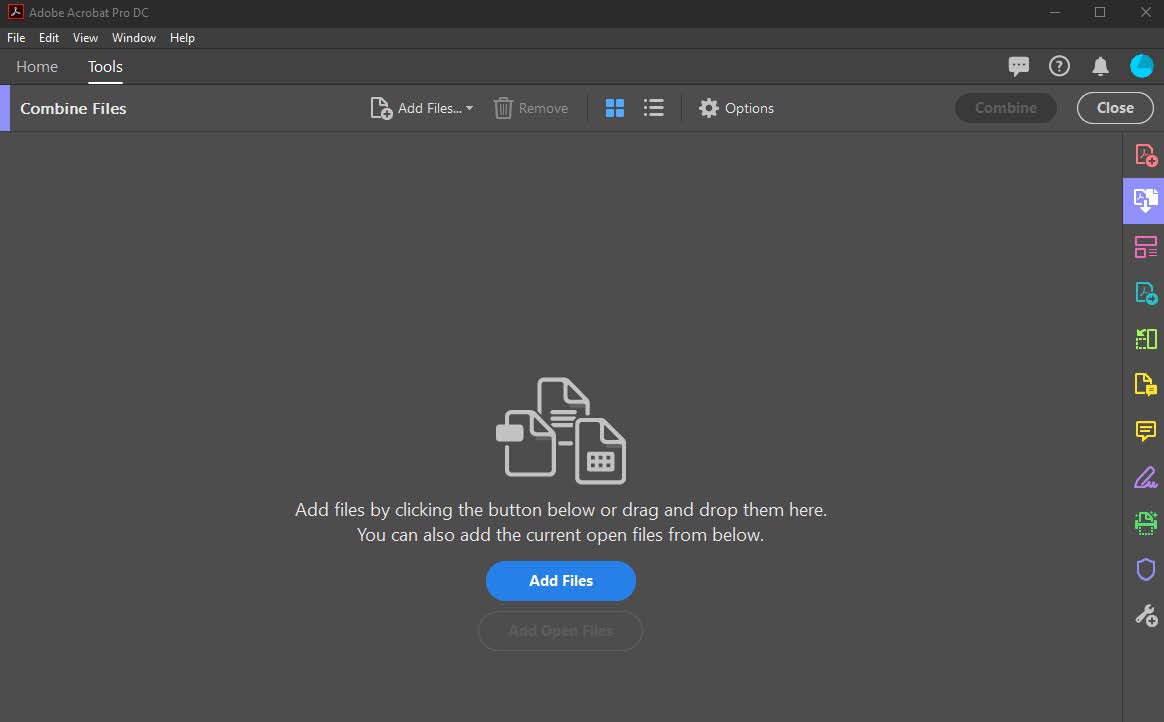
and select the files you want to compile.
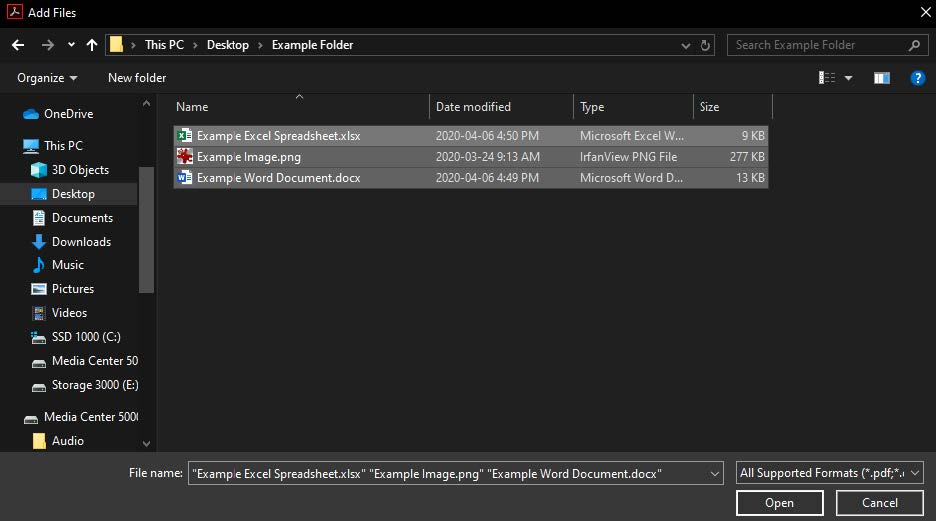
Note that I can add all three files at once this way. I just highlight all three, then select “Open”. You can also add files one at a time if you prefer.
The files we selected will all appear. Here we have our written document, our spreadsheet, and a photo of our lab assistant. You can click and drag the files to change the order they appear in – this is the order they will appear in our final PDF, so make sure it’s correct. You can also use the “Add Files” button near the top to add more.
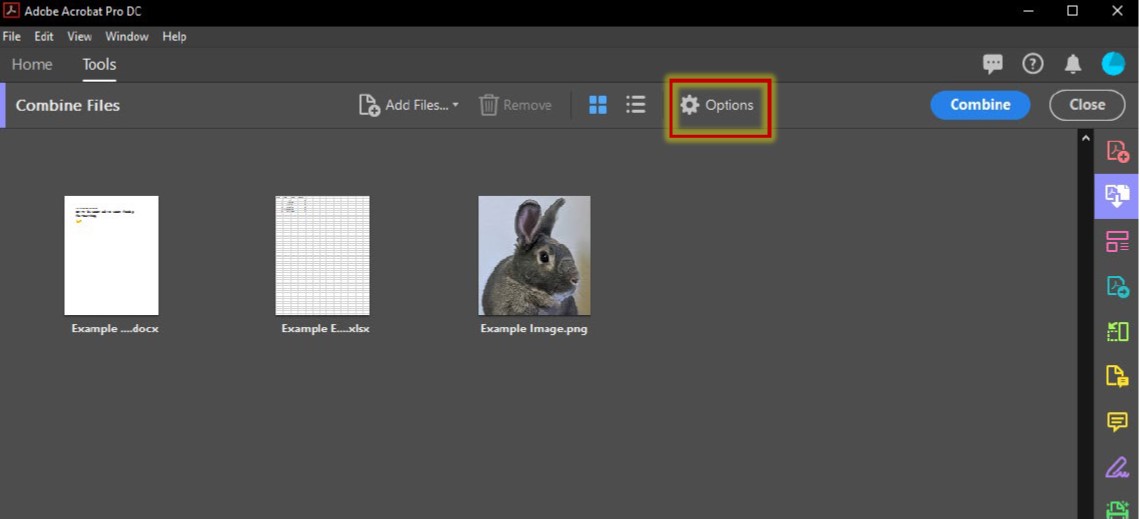
After you’ve added everything, click the gear icon to bring up the Options menu.
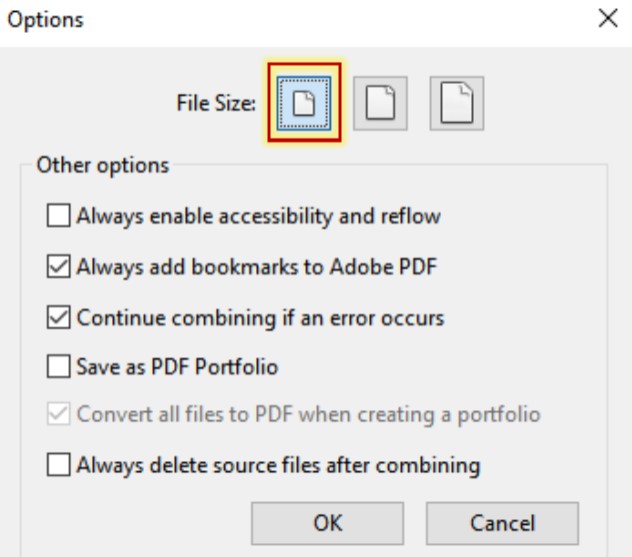
We’re not going to be printing out these documents; they’re going to be read on screen. So be sure to change the file size to the smallest option. This will automatically shrink your images down to be read on screen. This is super important to making your homework gradable online. Leave the other settings as they are and click “OK”.
To combine these into a PDF, we need only to click the blue “Combine” button in the upper right.
A green progress bar will appear at the bottom of your screen while Acrobat compiles the PDF. It may take some time if you have a slower computer.
Once the PDF is created, you’ll see it in the center window of your screen. Acrobat displays the page size near the bottom; if this is wildly different from 8.5×11 inches, it’s likely you need to reformat some of your work documents or images. Note that depending on the size of your monitor, Acrobat might not be able to display the entire document at 100% zoom. It will either reduce the zoom or add scroll bars, as you can see below:
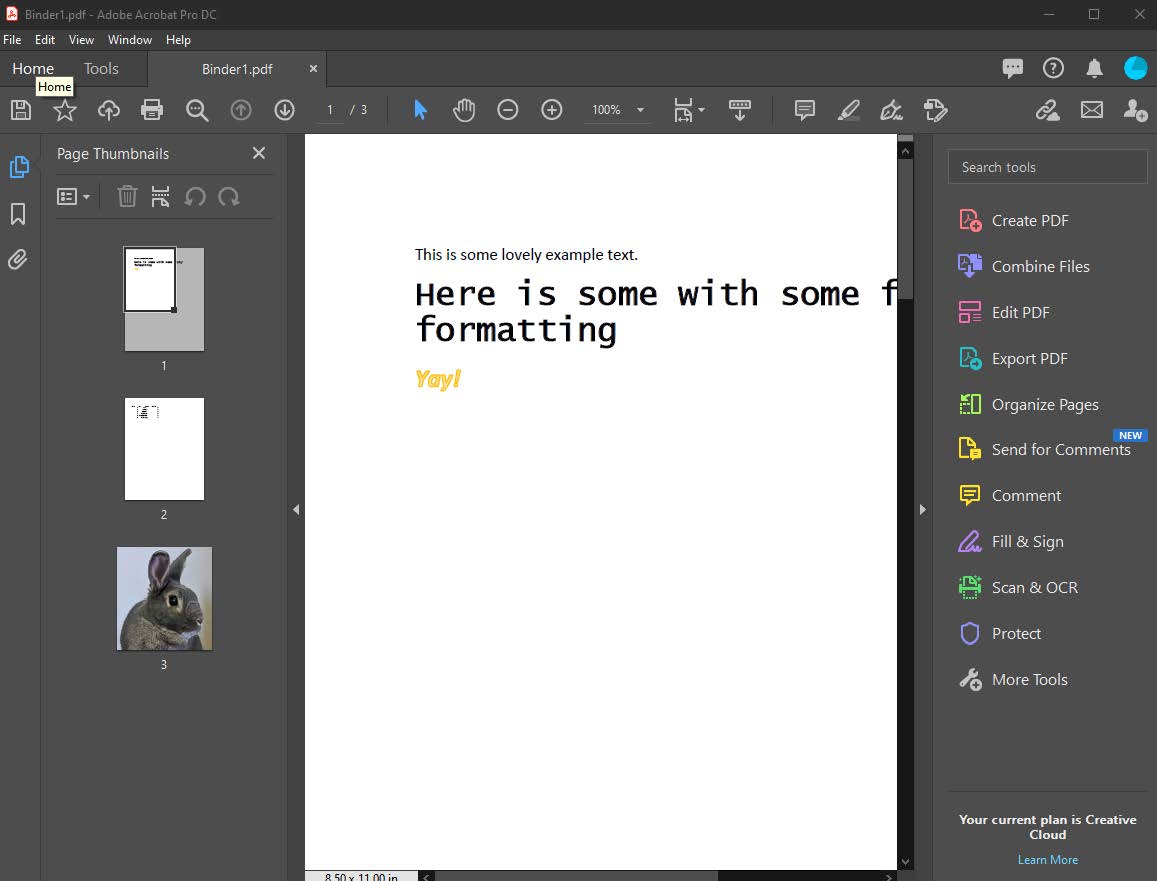
The button on the left that looks like two sheets of paper (it’s blue in the above screenshot) can be used to open the Page Thumbnails bar. This is a great way to look through the document and be sure everything looks correct. In particular, check to see that all text is legible while the PDF is at 100% zoom. Check to be sure the page can be read without horizontal scrolling, especially images.
If you’re happy with everything, just click the save icon in the upper left to save the PDF to your computer. Then you can upload the PDF to Canvas with confidence!
Important: Be sure to name your file descriptively. Include the document type, your name, and your section number. It should look like “PrelabWorksheet_DominicColosi_301.pdf”.
Please use this form to report any inconsistencies, errors, or other things you would like to change about this page. We appreciate your comments. 🙂 (Note that we cannot answer questions via the google form. If you have a question, please ask your instructor or TA.)

 or
or  , to take a shot.
 , to fix it.
 or
or  , to replace any single page that came out wonky. Note that graders might elect not to grade pages that are sideways, upside down, or otherwise illegible, so look closely!