
Part 2: Build a Course in D2L
Building the Course
There are three basic ways in which you can organize and build a course in D2L: Course Content Tool, Manage Files Tool, and the Course Builder Tool.
The easiest to use is the Content Tool. It allows you to organize course activities and upload course content in one central location. It is however important to be familiar with the other methods of course construction, especially the Manage Files Tool.
Manage Files Tool
D2L is, at its core, a website. Websites are built from a series of HTML files that live together in one place. D2L uses different tools (pages, grades, dropbox) to give structure and organize those files so they can be accessed and interacted with easily. In D2L, all of the files you upload to your course (grade documents, PDFs, HTML documents) are centrally located in “Manage Files.” Any file you upload via “Table of Contents” are in actuality loaded to the Manage Files Tool and only accessed through the Table of Contents.
This is an important distinction to know. For example, if you insert a link to your syllabus on your homepage and in your introductory module, there are not two copies of your syllabus loaded into D2L, only one. Furthermore, if you delete both links to the syllabus, the actual file is not deleted, only the links to it. The syllabus is still located in the central Manage Files repository. This is a useful feature, if you accidentally delete or lose a file; chances are the file will still be located in the Manage Files repository.
The Manage Files Tool not only is a central storage location for files, but is an application you can use to upload or delete files for use with other tools. Instructors can upload files right to “Manage Files,” and they can then be assigned to a course Module or Topic.
To access Manage Files: Click Course Admin, then Edit Course. Finally select Manage Files under Site Resources on the Course Administration Page.
Course Builder Tool
The Course Builder Tool allows you to interact with course materials and course tools (quizzes, dropboxes, etc.) in one interface. You can move pages, documents, and tools between modules by clicking and dragging them. You can likewise outline your course by dragging and dropping “placeholder” elements into each module.
The tool is something of a relic from previous versions of D2L in which you could not click and drag material in the Content page. You can safely ignore this tool. However, if you’re curious click here to learn more about the Course Builder Tool.
Content Tool
The Content Tool allows you to add files, create and edit activities, and organize the course. After the homepage, this is where your students will interact with course materials the most. Careful planning is strongly advised.
The Content Tool allows you to easily upload and share a variety of file types for already created content, including documents created in Word, Acrobat, PowerPoint, and Excel. It can also display a variety of image types (jpg, png, tif etc.) and audiovisual (mp4, mp3, wav, and etc.) file types. D2L operates under a module/sub-module system. You can create as many modules as you want, and attach as many sub-modules as you want to each module.
Uploading Content in D2L
To build modules and create content follow these instructions.
Step 1:
On your course website homepage, select Content from the “Materials” drop-down menu in the Navbar.

Step 2:
On the Content homepage, select the search box “Add a module” on the lower left-hand side of the screen.
Step 3:
Type in the name of the module you want to create and hit enter.
Step 4:
To add a new activity or upload a file, click on the blue “New” button towards the top of the screen. If you have already created an activity in another tool in D2L (such as Discussion, Quiz Tool etc.) you can add it by clicking on the white “Add existing activity” button next to the “New” button. You can also simply drag and drop a compatible file type into the area outlined by the dashed line.
Step 5:
After clicking on the “New” button you can select from a series of choices
Upload Files – 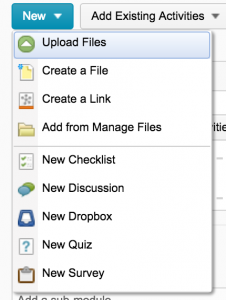 Redundant duplication of simply dragging and dropping a file into the module.
Create a File – Offers access to the Rich-Text Editor. See the Introduction to the Rich-Text Editor module for more information.
Create a Link – Allows you to link to outside resources, though it can also be used to embed content, such as a Google doc, in the page.
Step 6:
You can add sub-modules nested within the larger module simply by clicking in the “Add a sub-module…” text box below the module. This is an easy way to break down a larger module or unit (such as Week 1) into several smaller topics, activities and/or assignments.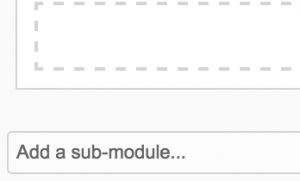
Step 7:
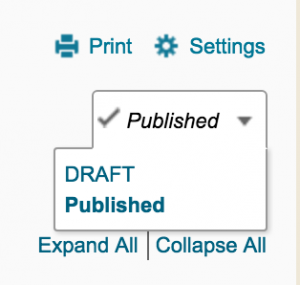
Towards the upper-right corner of the screen is a box that says “Published.” This indicates that the content is visible to your students. If you do not want students to see this module or the content within, simply click on “Published” and then select “DRAFT.” When you are ready for students to access the module, simply click on it again and re-select “Published.” (Note: You can also change individual sub-modules from draft to publish)
Resources
Division of Information Technology. “Learn@UW (UW-Madison Only) – Master KB: Content Tool.” University of Wisconsin – Madison, https://kb.wisc.edu/page.php?id=47867.
Division of Information Technology. “Learn@UW (UW-Madison Only) – Master KB: Setting Up for the Semester for Instructors.” University of Wisconsin – Madison, https://kb.wisc.edu/page.php?id=44787.
