9 Flex Your Muscles: Warm-Ups
Redesigning the Introduction Experience
Your design challenge: improve the introduction experience for your partner.
Step 1: Hear a Good Story
You’ll start by interviewing your partner about how they introduce themselves in a new setting. Your goal is to hear (at least) one good story from your partner. In order to get the most out of your interview, you’ll first create an interview guide.
1. Be human: build rapport.
Introduce yourself.
“How are you today?”
2. Seek stories.
“Walk me through the last time you had to introduce
yourself.”
“I say ‘nametag,’ you say ‘______'” … Why did you say that?”
“What would I find interesting about how you…
… prepare to attend a conference?”
… introduce yourself?”
“Tell me about a time you had a ‘meeting new people horror story.'”
3. Talk about feelings. Dig deeper by following up.
“Why do you say that? … Tell me more.”
“How did you feel at that moment, when… happened?”
Question Guide
- Open-ended
- Short
- Specific (“tell me about the last time” vs. “what do you usually do”)
- Elicit stories and emotions
- Make the person pause and think
- Uncover something surprising
- The answers are not quantifiable (not survey questions!)
Notes
Step 2: Interview Your Partner
Just have a conversation—but make sure to take lots of notes!
Notes
Interview #2
Now, deeper into one story. Remember to ask “Why?”
Notes
What Does It Mean?
Gain insights by thinking of what might be the deeper meaning behind what you heard. Have fun with it. Your goal is to take an extreme, inspired stance. You can imagine the meaning by noticing something, then inferring what the meaning might be. This is surprisingly hard! Use the worksheet below to help sort some of the data you gathered during your interviews.
Step 3: Imagine the Meaning
Notice something, then infer what the meaning might be.
Imagine possibilities for the following statements:
It’s interesting / surprising / telling that they…
[ex. “It’s interesting that Myra intentionally arrives late to a conference to avoid having to introduce herself.”]
One thing that seems to be important to him/her/them is…
[ex. “… not being overwhelmed by superficial introductions.”]
Step 4: Create a Brainstorming Topic
I wonder if this means… (write your guess/hypothesis/insight here)…
[ex. “I wonder if Myra needs a way to break the ice with strangers in a way that feels authentic and natural.”]
Flip your insight into a question. Fill in the blanks with your partner’s name and the need you identified in Step 3. This might feel repetitive, but it’s an important step.
How might we help [name] to [do/feel/achieve something based on your guess]?
Step 5: Find a collaborator who is not you partner and help each other come up with ideas
Taking turns, recap one story, share one hypothesis and your brainstorming question with your new partner — then brainstorm together to generate a diverse set of possible solutions for your brainstorming question. Your goal is to defer judgment and build on the ideas of one another.
Brainstorming Tips
- Defer judgment
- Go for quantity
- Encourage wild ideas
- Build on the ideas of others
- One conversation at a time
- Be visual
- Headline
Prototype and Test Your Idea
Step 6: Sketch It Out
Choose one idea and sketch it out into a product, service, or experience. Stay in generative mode as you work out the details and make it visual.
Keep in mind as you draw: What is it? How does one use it?
Step 7: Test with Your Partner
Set the scene for your partner and invite them into the world that you have created.

Redesigning the Morning Experience
Your design challenge: improve the morning experience for your partner.
Step 1: Hear a Good Story
You’ll start by interviewing your partner about their Monday morning experience. Your goal is to hear (at least) one good story from your partner. In order to get the most out of your interview, you’ll first create an interview guide.
1. Be human: build rapport.
Introduce yourself.
“How are you today?”
2. Seek stories.
Walk me through your Monday morning routine.”
“I say ‘Monday,’ you say, ‘______’ … Why did you say
that?”
“What would I find interesting
about how you…
… prepare for the day?”
… prepare for the week?”
“Tell me about a time you had…”
3. Talk about feelings. Dig deeper by following up.
“Why do you say that? … Tell me more.”
“How did you feel at that moment, when… happened?”
Question Guide
- Open-ended
- Short
- Specific (“tell me about the last time” vs. “what do you usually do”)
- Elicit stories and emotions
- Make the person pause and think
- Uncover something surprising
- The answers are not quantifiable (not survey questions!)
Notes
Step 2: Interview Your Partner
Just have a conversation—but make sure to take lots of notes!
Notes
Interview #2
Now, deeper into one story. Remember to ask “Why?”
Notes
What Does It Mean?
Gain insights by thinking of what might be the deeper meaning behind what you heard. Have fun with it. Your goal is to take an extreme, inspired stance. You can imagine the meaning by noticing something, then inferring what the meaning might be. This is surprisingly hard! Use the worksheet below to help sort some of the data you gathered during your interviews.
Step 3: Imagine the Meaning
Notice something, then infer what the meaning might be.
Imagine possibilities for the following statements:
It’s interesting / surprising / telling that they…
[ex. “It’s interesting that Claire only buys expensive coffee for herself on Monday mornings.”]
Some things that seems to be important to him/her/them is…
[ex. “… treating herself at the start of the work week.”]
Write your guess/hypothesis/insight.
I wonder if [name] needs a way to [something you think your partner needs].
Step 4: Create a Brainstorming Topic
Flip your insight into a question. Fill in the blanks with your partner’s name and the need you identified in Step 3. This might feel repetitive, but it’s an important step.
How might we help [name] to [what your partner needs]?
Step 5: Brainstorm as a Pair!
Start coming up with ideas! Use one post-it note for each idea. Refer to the rules above. Keep your ideas flowing. After minutes, add a radical constraint!
Brainstorming Tips
- Defer judgment
- Go for quantity
- Encourage wild ideas
- Build on the ideas of others
- One conversation at a time
- Be visual
- Headline
Prototype Your Idea
Your goal is to develop and test your solution by “trying it out” in Steps 6 and 7. Below are some hints on how to bring your ideas to life in both 2-dimensional and 3-dimensional form.
2-Dimensional Sketch
The sketch can be rough! Represent people with stick figures.
Annotated Diagram
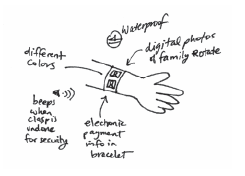
Sketch what your idea looks like, and include short notes to point out key features.

Storyboard
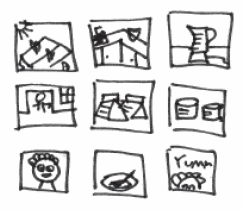
Create a series of images (rough sketches or photos) outlining a sequence of events and details.

3-Dimensional Build
Make props that create the scene/world.
Role Play/Demo
Demonstrate how your partner would engage with the solution. If it helps, create a script or storyboard, and include key props.
Consider these aspects of the imaginary world you create:
- Scene – the context of the experience
- Roles – people involved in the experience (you may want to play one yourself)
- Props – Simple tangible things in experience
Works-Like, Feels-Like
Use “cheap” materials (pipe cleaners, construction paper, tape) to create a rough mock-up of your idea. The prototype might not be functional, but it at least “works like” or “feels like” the intended solution.
Wizard of Oz
Using paper and post-it notes, develop a mock-up of the interface of your solution. If there are multiple screens or interfaces, create a mock- up of each one. Each post-it can represent a button, or an image that might appear when a previous button is selected. Once you have your mock- ups ready, show it to someone to “use” while you manipulate the post-its (thus playing the role of the Wizard or the computer).
Step 6: Sketch It Out
Pick an idea and stay in generative mode as you work out the details. Your goal is to develop the idea and make it visual. Choose one idea and sketch it out into a product, service or experience.
Keep in mind as you draw: What is it? How does one use it?
Test Your Idea
Step 7: Get Physical
Your goal is to develop and test your solution by physically trying it out. Bring your solution to life by using a unique combination of improvisational methods to create an imaginary world where your solution already exists. You can act out a scene, draw a product, build a low resolution product, or draw a scenario. The goal is to make your idea visual so that your teammate can respond to it and give you feedback. Consider building your prototype with interaction in mind!
Step 8: Test with Your Partner
Set the scene for your partner and invite them into the world that you have created.
Your goal is to show your solution and get feedback. It is important that your partner feels like they have been heard!

Experiencing a New City
Your design challenge: improve the morning experience for your partner.
Step 1: Hear a Good Story
Start by interviewing your partner about his/her experiences traveling to a new city. Your goal is to hear (at least) one good story from your partner.
But first! Create a quick interview guide (use open-ended questions!).
1. Be human: build rapport.
Introduce yourself.
“How are you today?”
“Nice to meet you. Tell me about where you’re from.”
“Where’s the most interesting place you’ve traveled?”
2. Seek stories.
3. Talk about feelings. Dig deeper by following up.
“Why do you say that? … Tell me more.”
“How did you feel at that moment, when… happened?”
Question Guide
- Open-ended
- Short
- Specific (“tell me about the last time” vs. “what do you usually do”)
- Elicit stories and emotions
- Make the person pause and think
- Uncover something surprising
- The answers are not quantifiable (not survey questions!)
Notes
Step 2: Interview Your Partner
Just have a conversation—but make sure to take lots of notes!
Notes
Interview #2
Now, deeper into one story. Remember to ask “Why?”
Notes
What Does It Mean?
Gain insights by thinking of what might be the deeper meaning behind what you heard. Have fun with it. Your goal is to take an extreme, inspired stance.
Step 3: Imagine the Meaning
Notice something, then infer what the meaning might be.
Imagine possibilities for the following statements:
It’s interesting / surprising / telling that they…
[ex. “It’s interesting that [name] consulted his taxi cab driver’s advice for where to eat in Barcelona.”]
Some things that seems to be important to him/her/them is…
[ex. “… getting an authentic culinary experience when he travels.”]
Fill in the blanks:
I wonder if [name] needs a way to [something you think your partner needs].
Step 4: Create a Brainstorming Topic
Turn your insight into a question.
First select a hunch (“I wonder if this means…”) that gives you the most unique and exciting perspective. Write it below.
How might [context] act on a hunch that [your hunch]?
Then choose a context from below (or create your own). Pick one that might best be able to take advantage of the hunch you chose. Write it above.
- A museum
- A local restaurant
- A travel or tour agency
- The Tourism Board
- A charity
- A shopping district or store
- A hotel
- A pub or bar
- The transit system
- A host or guide
- A park
- A zoo
- A dance club
- A lake
- A mountain

New Ideas!
Generate a diverse set of concepts in response to your brainstorming questions. Have fun with it. Your goal is to take an extreme, inspired stance.
Step 5: Sketch it Out
Sketch it out as many a products, services or experiences as you can think of.
What is it? How does one use it?
| !
! |
Step 6: Share Your Work and Get Lots of Feedback!
Be sure to observe reactions as well as listen to what is being said.
What are some things that seemed to really resonate?
What else did you learn?
Step 7: Refine Your Solution
This can be a combination of your ideas.
Get Physical, Physical
Your goal is to develop and test your solution by physically trying it out.
Have fun with it. Your goal is to take an extreme, inspired stance.
Step 8: Bring Your Solution to Life!
Use improvisation to create an imaginary world where your solution already exists.
Consider these aspects of the imaginary world you’re creating:
- Scene – The context of experience
- Roles – People involved in experience (you may want to play one yourself)
- Props – Simple tangible things in experience
Part 1 – Build: Make props that create the scene/world.
Part 2 – Demo: Demonstrate how your partner would engage with the solution. If it helps, create a script or storyboard.
|
|
Test
Step 9: Test with Your Partner
Set the scene for your partner and invite them into the world that you have created.

