
Course Format and Philosophy
Example Design Lab
Below is the first Design Lab for Physics 104. Note the scaffolded tasks at the beginning of the lab followed by the design challenge. Following the lab are examples of student work.
Lab 1: Charge!
What do we do in this lab?
This lab has four parts:
A. Explore electrostatic charging through conduction and induction
B. Use an electroscope to determine how charges arrange themselves on the surface of a conductor and insulator
C. Use induction to cause electrically neutral objects to move
D. Estimate the number of electrons on a charged foil ball using Coulomb’s law
Equipment:
Electroscope, acrylic rod, ebonite (rubber) rod, fur, silk, conducting spheres on stands, grounding cable, balloon, aluminum soda can, lightweight thread, aluminum foil
Why are we doing this lab?
This lab will give you a hands-on look at how electric charge can be transferred between objectsand how electrically charged objects interact. This lab will also give you a chance to see how the labs will be graded in this course. Rather than using a formal lab writeup, you will instead be producing a representation of your experiment on a small, portable whiteboard, which you will use to communicate your approach both to other groups and your TA (for your grade).
Safety concerns:
None
Advice before starting this lab:
Electrostatic experiments can be highly sensitive to environmental conditions. Take your time and expect to make multiple attempts throughout the lab. If your group is confused by any observations you make, please consult your TA.
A. Conduction & Induction
Start by charging your ebonite rod. Rub the ebonite rod with the fur, touch the ebonite rod to the knob of the electroscope to transfer some charge, then pull the rod away. The leaves should move apart, and stay that way (if they don’t, you may have not transferred enough charge – a good way to charge the ebonite rod is to hold the fur around the ebonite rod, and quickly pull the through the fur in one direction).
A1. Describe how the charge is distributed on the electroscope.
A2. Is there a way to tell the sign of the charge on the electroscope by looking at it?
A3. While the leaves are still apart, charge the ebonite rod again with the fur. Bring it toward the electroscope ball, but keep it far away. What happens to the leaves?
A4. How has the total charge on the electroscope changed when you move the charged rod toward the electroscope?
A5. When you bring in the charged ebonite rod, what is the force between the charge on the rod and the charge on the electroscope ball? What happens to the leaves of the electroscope, and why?
The process of rearranging charge on a neutral object is called induction. The object is still neutral, but the charge is negative in some regions, and positive in others.
A7. Using other materials on or around your table to produce charge by rubbing, what materials can you use to make the leaves move closer together when bringing a charged object near to the electroscope ball without touching it? Take a look at the triboelectric table to get some ideas.
A8. Explain how you can use the electroscope to determine whether two objects have the same or opposite sign of charge. Before moving on, discuss your conclusion with your TA.
B. Charge Distribution: Conductors & Insulators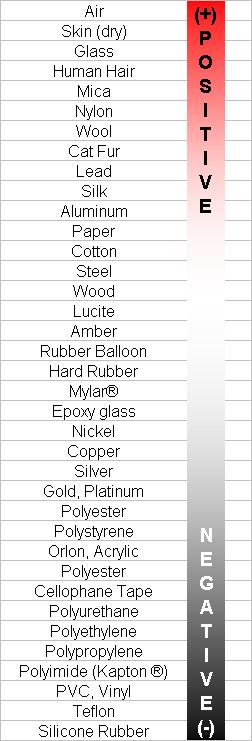
Charge up your ebonite rod and scrape it onto one section of a balloon, maybe the top. Also charge up the electroscope by touching it with charged ebonite rod so you are sensitive to both positive and negative charges as in the last section. Use the electroscope to measure the charge on different parts of the balloon.
B1. On your whiteboard, sketch the balloon and how the charge appears to be distributed on its surface.
Again charge your ebonite rod, and touch it to one of the large conducting spheres on plastic stands. Also charge up the electroscope with the rod so you are sensitive to both positive and negative charges. Use the electroscope to probe different parts of the conducting sphere by holding those parts close to the electroscope without touching. If you don’t see any effect on the electroscope, put more charge on the conducting sphere.
B2. On your whiteboard, sketch the sphere and how the charge appears to be distributed on its surface.
Now take two conducting spheres and place them close together as shown, ensuring that they are in direct contact. Charge up your ebonite rod and bring it in horizontally toward the of one of the spheres without touching either sphere. Have another group member separate the two spheres by moving the further sphere directly away.
B3. Now use the electroscope to determine the charge on each sphere. On your whiteboard, sketch the net charge distribution on both spheres at three stages: 
-
Before the rod is brought near
-
When the rod is near, before separation
-
After separation
The spheres each have a connector on their lower half for the purposes of grounding. Use the provided cable to ground each sphere by connecting them to the ground port of the Pasco computer interface. Then leave the ground connection on one of the spheres.
B4. Recharge your ebonite rod and bring it close to the grounded sphere (without making direct contact). Then remove the connection to ground and use the electroscope to determine the sign of charge on the sphere. Is the charge on the sphere the same or opposite that of the ebonite rod?
C. More Fun with Induction
You can make neutrally charged objects move through induction. For example, try bringing a charged object, such as the ebonite rod or a balloon, near some small bits of paper. What happens? You also have an aluminum can in your collection of items. Try placing the can on its side so it is free to roll, and bring a charged object close without making contact. What happens? Explain your observations in terms of the charge distribution on the objects you experimented with. You may erase your whiteboard before moving on to Part D.
D. Challenge: How many electrons?
Using some light thread and a small amount of aluminum foil, construct a “pith ball”—a lightweight conducting ball that responds easily to electrostatic forces. (A good way to do this is to make a loop at one end of the thread and bunch the aluminum foil around the loop in a roughly spherical shape.) Use tape to suspend the other end of the thread from the stand provided at your table.
Experiment with a charged rod and a single pith ball for a while, and show that you can transfer charge from the rod to the pith ball. Then make a second pith ball with the same physical dimensions as the first, and suspend it from the same point on the stand. Use the ebonite rod to charge up both pith balls simultaneously. Your task for this part of the lab is to estimate how many electrons did you transfer to one of the pith balls—10? 10,000? 10,000,000? Or more?
It’s up to you to decide how you approach to this task, but here are a few suggestions:
- A free-body diagram will help you identify the forces acting on a single pith ball
- If you know the weight of the pith ball, you can determine the Coulomb force by considering vertical and horizontal force components
- Coulomb’s law is given by F= kq ‘& , where 𝑘 = 9 Å~ 10– N m2/C2
• The charge on a single electron is 𝑒 = −1.6 Å~ 1023- C
• You will need to make some assumptions or approximations along the way. Be sure to include these on your whiteboard!
You have protractors, rulers, meter sticks, and precision balances available for your use.
Getting ready for the symposium: As you work through your experiment, write up your procedure, including a detailed diagram, on your whiteboard. You will be presenting this to your classmates later on, so write clearly and neatly. You will want to provide enough detail that other students (and your TA) can follow what you did, but not so much that it becomes too crowded. Keep your ideas organized so that others can follow without too much effort. This whiteboard will be what you turn in at the end of the lab for a grade (see the Appendix at the end of this lab for further details).
Symposium
When your TA gives the signal, choose half of your group members to get up and move around to other tables. Their goal is to see what other groups have done and to get into discussions about how they approached this challenge. The goal of the other half of the table (the half that stays behind) is to have discussions with people from the groups as they visit. Once you have visited the other tables and given/received help, get back together with your group, discuss what you learned, and make revisions to your work.
E. Uploading your Whiteboard
Once you are are satisfied with your whiteboard, have one of your group members snap a picture of it and upload it to the Canvas Lab 1 Assignment page. If you have any questions on how to do this, consult your TA.
Before you leave:
• Make sure everyone in your lab group has joined the Canvas Lab01 group correspondingto your section and table number.
• Make sure one of your group members uploaded a picture file of your whiteboard for the Lab 1 assignment.
• Log out from your Canvas account on the lab computer.
