
Introduction to Liquid Separations
TOC/Help. Click to here expand/hide
Overview
Background
Pre-lab work
Experimental
Post-lab work
![]() For help before or during the lab, contact your instructors and TAs (detailed contact information are found on Canvas).
For help before or during the lab, contact your instructors and TAs (detailed contact information are found on Canvas).
Overview
In this experiment you’ll explore the impact of mobile phase and stationary phase compositions on the quality of separations of a mixture of commercial food dyes. The set of experiments will reveal the importance of molecule size, intermolecular forces, and solvent choices for three common liquid chromatography applications.
Learning Objectives
-
- Explore the basics of three liquid chromatography techniques: thin layer chromatography, solid-phase extraction, and molecular size exclusion.
- Gain practical experience with how the choices of mobile phase impact a separation of a mixture given the same stationary phase and components of the mixture.
- Understand the importance of polarity and molecular weight on the quality of separations using liquid chromatography methods.
To cite this lab manual: “Introduction to Liquid Separations ”. A Manual of Experiments for Analytical Chemistry. Department of Chemistry at UW- Madison, Summer 2025.
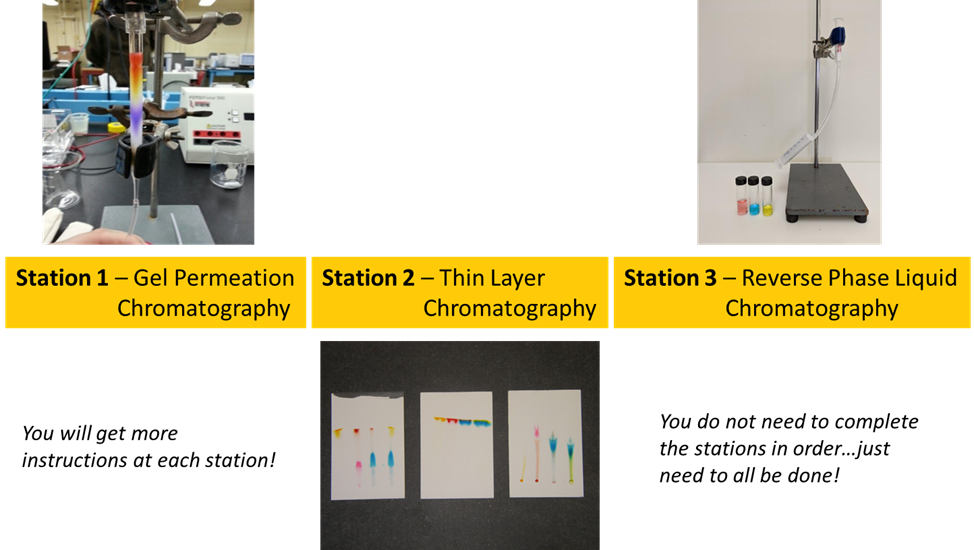
Visual Abstract

Background
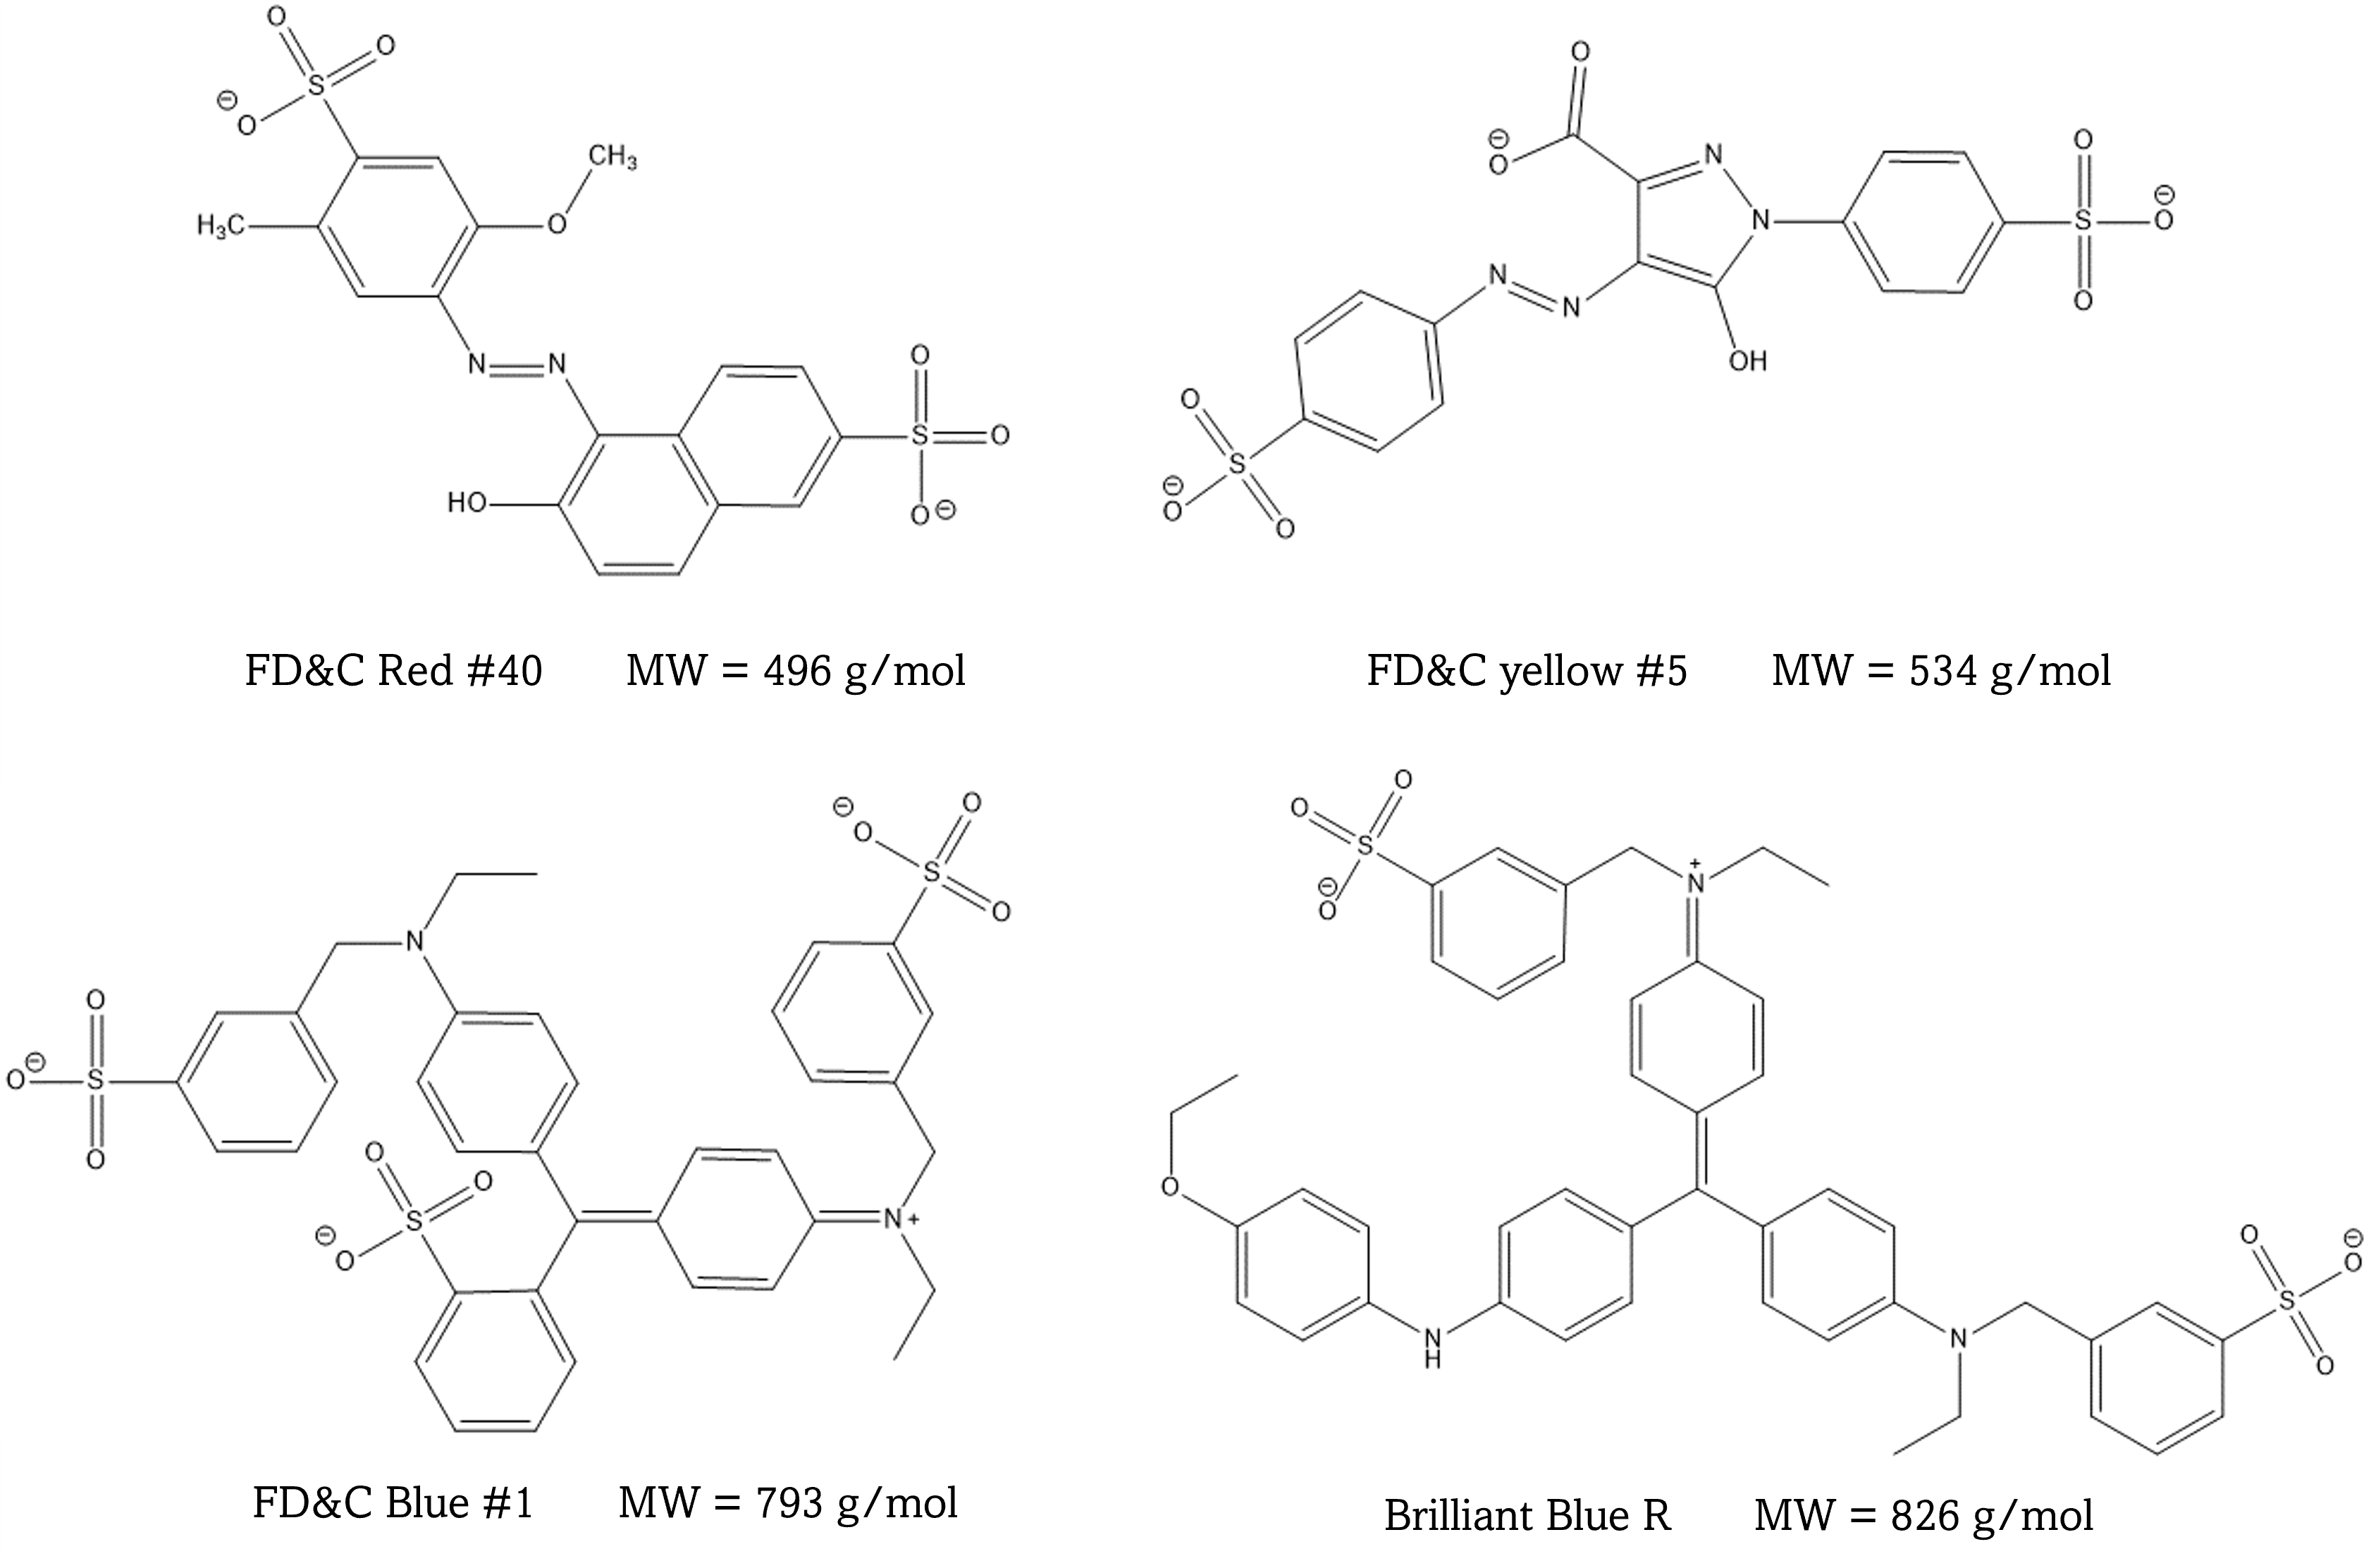
This experiment is designed to introduce you to three different chromatography techniques: thin layer chromatography, gel permeation, and reverse phase liquid chromatography. You will use these techniques to separate mixtures of dyes. Colored compounds are used since they do not require special detection techniques, and you can watch the separations with your own eyes. The molecular structures of the dyes used are shown below.
Described below are the three separation techniques you and your partner will investigate.
Gel Permeation Chromatography (GPC). Also known as molecular-exclusion or size-exclusion chromatography, gel permeation chromatography is a non-interactive mode of chemical separation. Essentially a labyrinth for molecules, a GPC column is packed with a stationary phase that has variously sized pores and pore networks. Sample molecules passing through the column migrate through some or all of the pores depending on their hydrodynamic volume (i.e., their size and shape). Large molecules cannot enter the pores of the stationary phase, so they elute very quickly from the column. Small molecules migrate into the pores created by the gel and elute much more slowly. Molecules are effectively separated according to molecular weight, since size scales with molecular weight, as they migrate through the column.
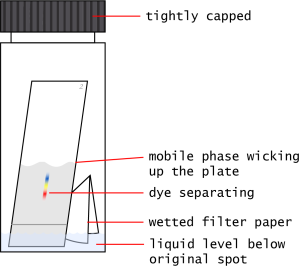
Thin Layer Chromatography (TLC). Thin-layer chromatography is one form of solid-liquid adsorption chromatography in which a solid adsorbent, about 100 to 300 μm thick, is coated on a piece of glass, plastic, or aluminum foil. To separate components in a solution, a drop of the solution is spotted near one edge of the plate, and the plate is placed upright in a developing chamber containing a layer of solvent as the liquid eluent. As the solvent migrates up the plate, components in the spot are carried at different rates, depending upon the strength of their adsorption to the solid layer. Differences in the distance of migration for components in the solution are used as the basis for the separation, and are expressed as values of Rf:
| [latex]R_f = \dfrac{distance\;moved\;by\;compound}{distance\;moved\;by\;solvent}[/latex] | (1) |
Note that all values of Rf must be less than or equal to 1, and that a value of Rf = 0 means that the compound has not moved from the original spot.
Common stationary phases include silica (with and without fluorescent indicator), alumina, cellulose, polyamide, and reverse-phase C18 on silica. Many solvents are used for developing the separations using TLC. Solvents are generally classified by their polarity into an eluotropic series, with more polar solvents having an increased ability to desorb polar molecules from the (polar) stationary phase.
Detection of the separated compounds can be accomplished using a variety of methods. If the compounds fluoresce under ultraviolet excitation, then a hand-held UV lamp can be used to see the spots. Chemical reagents can be used to visualize other compounds: ninhydrin spray reagent for amines, sulfuric acid spray for non-volatile carbon containing compounds, and iodine. If the compounds are themselves colored, as in the case of the dyes we are using, then no detection reagent is necessary.
Reverse Phase Liquid Chromatography. There are a great number of methods based on reverse phase liquid chromatography. A column is packed with a non-polar bonded phase, and a polar mobile phase is pumped through the column. It is "reverse" phase simply because historically the first separations were carried out using polar bonded phases and relatively non-polar solvents (known as "normal" phase). The separation depends on the continual partitioning of the sample between these two phases as it is carried through a column by the flowing mobile phase. Compounds in the sample which are less soluble in the mobile phase are retained longer on the column, while those that are more soluble in the mobile phase are eluted first.
In this activity you are going to develop a reverse phase chromatography method suitable for the separation of a food dye mixture. The stationary phase you will be using is a C18 bonded phase, a type commonly used in instrument-based (high performance liquid chromatography, HPLC) as well as preparatory (solid-phase extraction, SPE) applications. Your column is just a small amount of this material in a plastic tube with a syringe fitting at one end. This will allow you to “pump” mobile phase through the column with a syringe. You will make your own mobile phase by mixing water and isopropanol. The relative amount of isopropanol allows you to control the polarity of the mobile phase and hence the partitioning of the solutes between the phases. The less isopropanol, the more polar the mobile phase, and the larger difference in polarity between the mobile and stationary phases.
The trick in separating analytes by partition chromatography is to get the analytes to retain on the column long enough to achieve separation, but not have them retain so well that you cannot get them off. Sometimes this requires changing the mobile phase during the run. This is called a gradient elution.

Lab Concept Video
click here to hide the video (for printing purpose).
Write down your observations or notes from the video in your lab notebook.
Pre-lab Work

Lab Skills
There is currently no lab skills video for this lab.
Extra Resources:
click here to hide the video playlist (for printing purpose).
Prelaboratory Exercises
Read the Introduction to Chromatography document in the manual before answering the questions below.
- List the dyes you will be analyzing in order of size—smallest to largest molecule.
- The interior of the column you will make can be illustrated by the figure below, which shows cross-sections of the channel-filled particles. Predict whether the smaller or larger molecules will elute first based on the pathway opportunities available to traverse. Assume there are no other molecular interactions important to the separation other than the size of the molecule and the size and number of channels the molecule can access as it moves down the column.
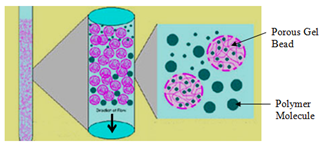
- Would the retention time of the compounds increase or decrease if the SIZE of the pores are increased in the gel?
- The interior of the column you will make can be illustrated by the figure below, which shows cross-sections of the channel-filled particles. Predict whether the smaller or larger molecules will elute first based on the pathway opportunities available to traverse. Assume there are no other molecular interactions important to the separation other than the size of the molecule and the size and number of channels the molecule can access as it moves down the column.
- Now list the dyes you will be analyzing in order of polarity—from least polar to most polar. Remember that polarity is determined by the charge on a molecule and/or the molecular dipole moment resulting from polar functional groups (such as groups containing O or N). Polar molecules will be attracted to other polar molecules that will help stabilize the dipole moment or charge(s), but will actually be repelled by nonpolar molecules. The simple rule summarizing this phenomenon is “like dissolves like” or “like is attracted to like”. With this in mind, predict the retention order for the following combinations of mobile and stationary phases:
- A polar stationary phase/nonpolar mobile phase?
- A nonpolar stationary phase/polar mobile phase?

Before You Take The Quiz on Canvas
- Read the entire experiment and prepare your notebook with a procedure.
- Answer the prelaboratory questions above, and have a hypothesis in mind as to how the differences in size, polarity, and types of functional groups may impact the time a molecule spends interacting with a stationary phase versus traveling along with the flow of a mobile phase.
- Be able to distinguish between the three types of chromatography you will be exploring in this experiment.

Experimental
As you go through the procedures, think about the important interactions or mechanisms occurring during the separation and justify the order of elution in each case. You don’t need to carry out the three experiments in any particular order.
PROTIP: Make sure you take photos of the experimental set up for each part and the results. At a minimum, you need:
- A picture of the gel permeation column as the sample makes its way to the exit.
- A picture of the vials collecting the eluent for gel permeation, and an estimate of the volumes collected for each color.
- A picture of the vials collecting the eluent for solid-phase extraction, and an estimate of the volumes collected for each color.
- A picture capturing the three TLC plates used for different solvents.
A. Procedure for Gel Permeation Separation of the Dye Mixture containing Brilliant Blue R, Red #40, and Yellow #5
- The following materials have already been prepared for you:
- A phosphate buffered saline (PBS) solution (~ 1 mM phosphate and ~15 mM sodium chloride, adjusted to pH of 7.0). This will be used as the eluent for the column.
- A slurry of approximately several grams of SephadexTM G-25 (column packing material) in PBS solution. This slurry has been sitting for at least 1 hour to allow the gel to swell.
- Glass Pasteur pipets, with the long tips cut off. Note the shape of the pipet: it has a narrow place near the top (the "neck"), is otherwise straight to the bottom, and the has a narrow at the exit (the "butt").
- Other items placed out include glass wool, wooden dowels, hosecocks, thin tubing, 7 mL vials, dye mix, and Eppendorf pipets.
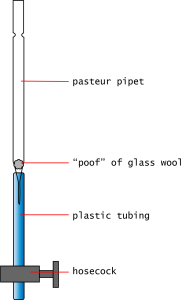 You will build the Gel Permeation column inside the glass pipet. Prepare it in the following way:
- Select a single glass pipet.
- Take a small "poof" of glass wool and roll it into a ball in your fingers. Use enough glass wool to make a gently-packed ball about 5 mm in diameter.
- Stuff the glass wool into the top of the pipet. Pack it down into the "butt" at the bottom using a wooden dowel.
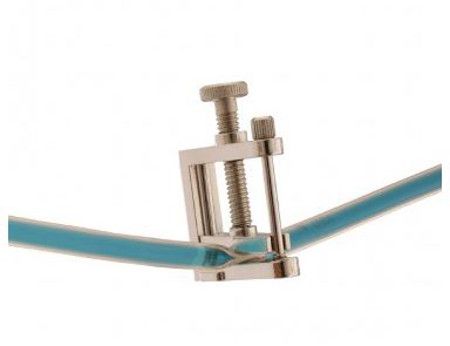
- Attach a length of narrow tubing to the "butt" of the pipet.
- Attach a metal hosecock to the bottom of the narrow tubing, tightening as needed. This serves as your "on-off" valve.
- Use your buret clamp to hold the pipet upright. You may need to bend the buret clamp to get a tight enough fit. Feel free to use padding, like paper towel, to get a tighter fit.
- Add column packing material to the column:
- Stir well the slurry of Sephadex in the beaker. Do not attempt to pour yourself an aliquot.
- When the slurry is uniform, draw up several milliliters of the suspension with a plastic pipet.
- Immediately deposit this into the top of your column, filling the column fully with the slurry.
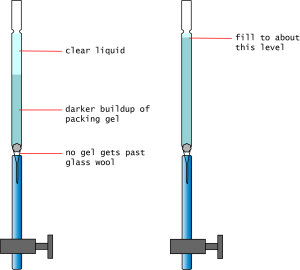
- As the Sephadex settles (creating an opaque white layer at the bottom and a clear liquid layer on top), open the hosecock and let the liquid layer drop to the top of the opaque white layer. Do not let the liquid layer drain past this point.
- Repeat the above steps until the opaque white gel layer reaches up to about 1 cm under the "neck".
- If the Sephadex gel layer drains when you open the hosecock, you may need more glass wool.
- Begin your separation!
- Using the provided Eppendorf pipets, gently apply a 20 μL of the dye mixture to the top of the gel layer. You do not need to put the pipet into the Sephadex.
- Open the hosecock briefly to let the dye soak into the gel. You may need to add a drop or two of PBS solution.
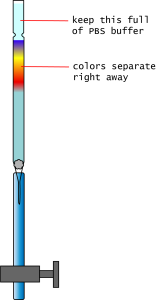
- Once the dye is soaked into the gel, you may add PBS solution to the column to fill it.
- Open the hosecock and the separation should begin immediately.
- Continue to add PBS buffer as the separation advances, not letting the liquid line go below the Sephedex.
- Collect the colors:
- As each color elutes, collect them in the provided vials.
- Each vial holds approximately 7 mL of liquid. Use this to estimate the volumes collected.
- Cleanup:
- Return each part to the pile you retrieved it from. There is no need to attempt to "clean out" the Pasteur pipet, simply return it to the pile as-is.
- Please do not dispose of any parts or tubing.
- Please be sure to cap and return the dye mixture.
- Return each part to the pile you retrieved it from. There is no need to attempt to "clean out" the Pasteur pipet, simply return it to the pile as-is.
B. Procedure for TLC of the Dye Mixture containing Red #40, Yellow #5, and Blue #1
- The following materials have been prepared for you:
- Silica TLC plates that have been pre-dried at 110 °C.
- Three mobile phase mixtures of 1-butanol/methyl ethyl ketone/water: #1 50/50/0; #2 50/30/20; #3 10/10/80.
- Other items placed out are 24-mL vials, pencils, scissors, tweezers, filter paper, rulers, glass capillaries, and dye mix.
- Cut three strips of TLC plate, approximately 1.5 cm by 5 cm. These strips each include your stationary phase on one side.
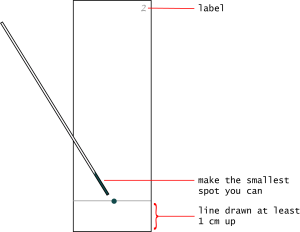
- Using a pencil, lightly mark a line about 1 cm from the "bottom" of each plate. This is where you will spot the samples.
- Mark at the top of each plate the numbers 1 through 3, to keep track of which mobile phase you will use.
- Mark very lightly, being sure not to scrape away the stationary phase.
- Spot TLC dye mix onto each plate.
- Dip a glass capillary into the dye mix. Capillary action should pull a small amount of dye into the capillary.
- Quickly spot the dye onto the plate in the center of the line.
- Do not press hard. Your goal is to make the smallest spot you can.
- Prepare your TLC development chambers.
- Gather 3 of the wider vials provided and label them 1, 2, and 3. These are your development chambers.
- Cut a quarter of a piece of filter paper and fold it in half one or two times. Place this in the bottom of each chamber.
- Add the appropriate mobile phase to each chamber using a plastic pipet. It should be enough to wet the filter paper thoroughly and have a small layer of mobile phase at the bottom, ~0.5 cm deep. The liquid level must not be higher than the dye spots on the plates.
- Add the TLC plates to the chambers.
- Using tweezers, place the plates vertically (bottom down) into the development chambers.
- Try to position them so the filter paper does not touch them.
- Cap the vials. Try not to move or shake them during the separation.
- Complete the separation.
- Watch as the mobile phase climbs up the TLC plates.
- When the mobile phase reaches approximately 1 cm below the top of the plate, remove the plate from the chamber.
- Immediately mark the place the mobile phase reached with a line. Do not delay; the mobile phase will evaporate quickly.
- Sometimes the mobile phase will stop climbing on the plate. If the mobile is no longer rising for a period of 5 minutes, you may remove the TLC plate and mark the solvent line where it is.
- Let the plates dry. Measure the distance from the original solvent spot (the bottom line) to the solvent front (the upper line). Measure the distances that each color has traveled from the original spot to its final location.
- If your spot was large, if there was a lot of vibration, or if there were other problems, the color spots may be smeared. Just try your best to be consistent with your measurements. Measure to the darkest spot visible for each color. You do not need to redo the separation.
- Consider whether you actually expect all three of these mobile phases to produce perfect results (Hint: you don't).
- Calculate Rf for each compound in each mobile phase.
- Cleanup:
- You may keep or dispose of (in the trash) your TLC plates.
- Place excess TLC mobile phase in the provided cleanup container.
- Please rinse and return the 24-mL vials.
C. Procedure for Reverse Phase Separation of the Dye Mixture containing Red #40, Yellow #5, and Blue #1
In this activity you are going to develop a method suitable for the separation of the dye mixture using the small C18 SPE column and water/isopropanol mixtures. For this part of the experiment, you will not be given a pre-made mobile phase. Real chromatography method development is done by insightful trial and error. You choose a mobile phase, try the separation, and alter the mobile phase based on your findings. The following steps outline the procedure for a single trial.
- The following materials are provided for you:
- A pre-packed, commercial. C-18 reverse phase column (stationary phase packed into a syringe).
- Water (deionized, with 1% acetic acid) and isopropanol. These will be your mobile phases (but feel free to ask for others).
- Other items placed out are tubing, a small plastic syringe, and dye mix.
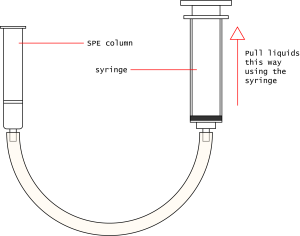
- Prepare your column like the example. Use the tubing to attach the bottom of the column to the tip of the syringe.
- One group member may hold the column while the other operates the syringe. Alternatively, it's possible to use a buret clamp to hold the syringe or column in place.
- Condition your column to get it ready for separating the dyes.
- Add about 3 mL of isopropanol to the column.
- Pull the isopropanol through the column using the syringe. Simply draw the syringe out to the 5 mL line or so and wait. You'll feel the back pressure as the liquid is pulled through.
- Detach the syringe and deposit the isopropanol in an "excess" beaker.
- DO NOT push liquid or air backward through the column. This will break the column packing and render it useless. Only pull liquid through the column.
- Repeat step 3 using water.
- Add 40 μL of dye mix directly on top of the packing material and pull it through. It should soak into the material.
- If the dye mix does not soak into the packing material, add a couple drops of mobile phase to make a liquid "seal" across the top and allow the syringe to pull it through.
- Add 3 mL of your mobile phase of choice to the column, then draw it through with the syringe.
- Think about what happened and decide what to do next.
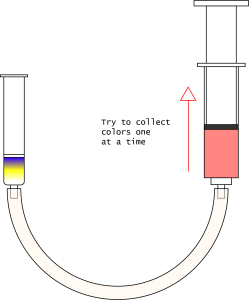
- Did you get good separation? Meaning, were you able to collect the 3 colors individually and deposit them in vials?
- If the separation is not good, what mobile phase will you try next?
- If the separation is slow, you may use more that 3 mL of mobile phase by adding it sequentially.
- Return to step 3 & 4 and recondition the column before trying a new mobile phase.
- Re-conditioning the column should remove any remaining dye and leave you prepared to try again. Some blue staining may remain, this is normal and will not alter your results.
- Please do not use more than one column.
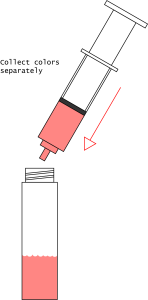
- Once you are satisfied with your separation, collect the colors separately in three vials. Describe your method and your results.
- Cleanup:
- Rinse your column with at least 3 mL of the water solution and 3 mL of isopropanol. Repeat to remove as much color as possible. Some blue staining is normal.
- Return all clean components and vials to their original location.
One Final Note: this section requires a lot of trial and error. If you've spent an hour on this station but haven't completed the gel permeation or the TLC activities, go complete them before coming back to this.
Post-Lab Work Up

Results/Calculations
Fill out the answer sheet for this experiment completely. Answer the following post-lab questions.
- Be sure to state experimental objectives and a succinct description of your methods for each experiment you perform. Be clear on the experimental choices you and your partner decided to explore when directed to create variable conditions for the method.
- Include photos of your results to support your conclusions. At a minimum:
- A picture of the gel permeation column mid-separation, and a picture of the vials containing the separated colors.
- A picture of the TLC plates in the developing chambers, and a picture of all three plates with the colors visible.
- A picture of your reverse-phase setup (it's difficult to capture the separation in action, so just do your best), and a photo of the separated colors at the end.
- For each method, report on the order of elution of each sample (based on color). Provide justifications (mechanisms or molecular interactions) for the observed order of elution for each dye.
- Report Rf for all analytes for the TLC methods.

Challenge Questions
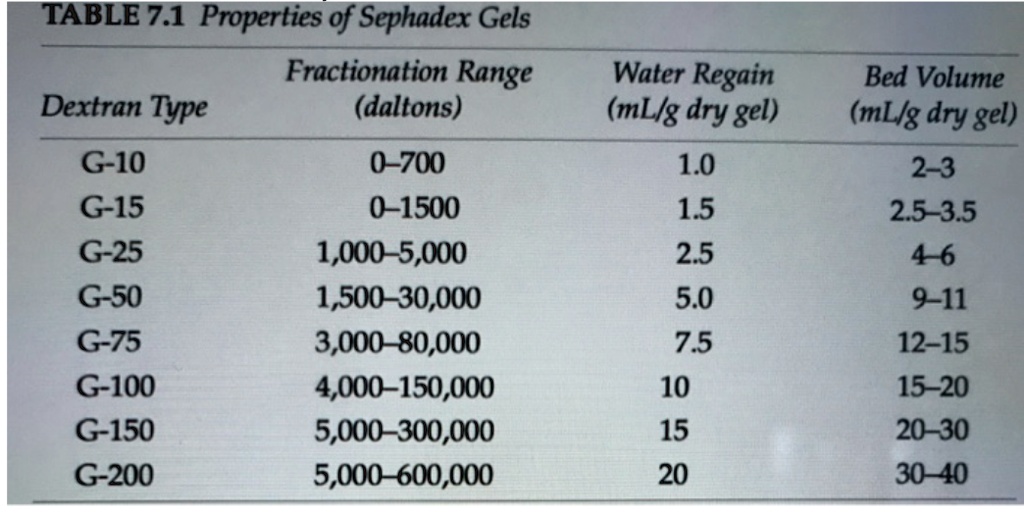
1. Sephadex, the stationary phase used for the molecular exclusion part of this lab, has many varieties. Using the table below, which would be the best form of Sephadex for us to use to separate our dye molecules? Is this the same as what we use in the lab? If so, what is the difference between these 2 stationary phases?
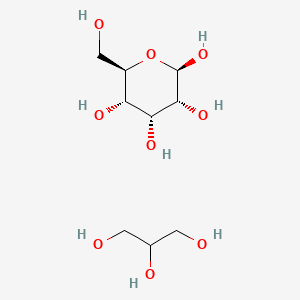
2. You now can see that we do NOT use the correct type of Sephadex for the size of our molecules. Propose a reason why, using the (individual subunit) structure of Sephadex- G-25 (which polymerized in its final form) and our mobile phase (pH=7.0 phosphate buffered saline) in your explanation. (HINT: Is this separation purely sized-based? Or could it be something else?)
Lab Report Submission Details
Submit your lab report on Canvas as 1 combined PDF file. This submission should include:
- The completed answer sheet.
- Your lab notebook pages associated with this lab, which should include answers to the post-lab questions.
The grading rubric can be found on Canvas.
References:
- Harris, D. C. & Lucy, C. A. Quantitative Chemical Analysis, 10th ed.; W. H. Freeman: New York, NY, 2020
Please use this form to report any inconsistencies, errors, or other things you would like to change about this page. We appreciate your comments. 🙂 (Note that we cannot answer questions via the google form. If you have a question, please ask your instructor or TA.)