
Lab 2 Procedure
PCR
Note: Students should complete this experiment in a group of 4; each will complete two of the eight reactions and a negative control (reaction without the Phusion enzyme).
- Begin by calculating the volume of all the components for the two reactions you will be running.
- This quick video explains how to do the dilution calculations for PCR:
- The table below lists each reagent needed for PCR, the stock solutions that you will be provided, and the desired final reaction conditions:
| Reagent | Stock Conditions | Final Conditions | Reaction 1 | Reaction 2 | Negative Control |
| Reaction Buffer | 5X | 1X | |||
| dNTP | 10mM | 200 μM | |||
| Primers | 10 μM | 400nM | |||
| DNA template | 2.5ng/ μL | 10ng | |||
| H2O | |||||
| Phusion | 1U/ μL | 1U | |||
| Total Volume | 50 μL | 50 μL | 50 μL |
- Use the information above to create a table in your lab notebook that looks like the one above. If you use an electronic notebook, you can also use the Word document of the table here.
- You should arrive at the lab with as much of the table completed as possible.
- Once you are confident in your calculations, get your aliquots from the back bench. Keep the aliquots and your PCRs on ice until you put them into the thermocycler. This will help maintain the activity of your Phusion enzyme.
- Prepare the reactions, per your calculations, into PCR tubes.
- Start by adding water, then buffer, then primers, dNTP, DNA, the, and at last, add the Phusion enzyme.
- Note: You must label the PCR tubes clearly and in a way that will allow you to distinguish your reactions from your classmates’. The teaching team will take the PCRs out of the machines the next morning, and all the tubes will be placed into one large freezer box. You will need to recognize yours in the next lab period.
- Once all the components have been added to the tubes, mix them with a pipette or by gently flicking the tubes. Do not vortex!
- Centrifuge the PCR tubes briefly using the small nanotube centrifuge on your bench. You can spin the tiny PCR tubes by placing them inside a 1.5 or 2 mL microfuge tube without the cap (you can break the cap of the tubes).
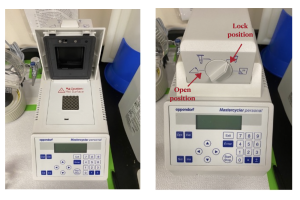
- Once you have finished setting up your PCR reactions, put your PCR reactions in the small wells of each of the following PCR machines according to the instruction below:
- PCR machine 1: reactions F1, F2, F3, F4
- PCR machine 2: reactions F5, P1, P2
- PCR Machine 3: reaction P3
- Negative controls should be put into the PCR machine corresponding to primers used. For instance, if the negative control contains primers for F1, the negative reaction should be put into PCR machine 1.
Note: Reactions needed to be put into different PCR machines because different extension time is needed to amplify PCR products with different final length. The extension rate for the Phusion enzyme is 15 seconds/kilobase nucleotides (s/kb).
For F1 with a final length of 10,000 base pair (bp) or 10 kb, for example, at least 2 minutes and 30 seconds of extension time is needed (in reality, we will use 3 minutes to ensure all bases are amplified).
For P1 with a final length of 713 bp, however, only 15 seconds are needed, and it would be counterproductive if we use an extension time of 3 minutes.
Therefore, we sort the PCR reactions into different PCR machines based on their extension time.
- Don’t start the program until all PCR reactions in the class are put into the designated PCR machines.
Make 1% agarose gels
- The following video demonstrates the gel pouring process in the 375 lab. Note that our pouring systems may be different than those you’ve used in other labs:
- Each pod (composed of four people) should prepare one batch of 50 mL agarose and use it to pour two gels.
- Calculate the amount of agarose you will need for 50 mL of a 1% gel.
- Be mindful that the agarose gel uses a weight-by-volume (w/v) weighting system. This means, for example, to make a 100 mL 1.2% w/v sodium chloride solution, one will need 1.2 gram of sodium chloride and add water up to 100 mL.
- Weight out the agarose and add it to a 250 mL Erlenmeyer flask.
- Add 50 mL of 1 X TAE buffer to the flask.
- TAE stands for Tris-Acetate-EDTA. A recipe for TAE, and most buffers used in this course, can be found in Appendix 4 for future reference.
- Note: The amount of agarose you will be adding to the TAE is small, so you can use 50 mL of TAE.
- Note: 1 X TAE buffer will also be used as the running buffer for gel electrophoresis in future labs. Therefore, the gel and the running buffer will have the same ionic strength. Failure to use the running buffer to prepare the gel will result in erratic separation of DNA, or no running at all when current is applied.
- Place an inverted 25 mL Erlenmeyer flask in the mouth of the 250 mL flask and heat in a microwave for 45 seconds, swirl to mix, and then heat for additional 15 seconds. If the agarose is not completely melted, repeat the swirl and the 15 seconds.
Caution: Agarose may boil over in the microwave or when swirled. Wear a heat-resistant glove when removing the agarose and swirling heated flasks.
- Remove the small Erlenmeyer flask and let the agarose solution cool to the touch.
- Meanwhile, place the black rubber bumpers onto the ends of the clear plastic gel casting units. The bumpers are a tight fit so they may be difficult to put onto the casting unit. If you have difficulty sliding the bumpers onto the casting unit, try sliding one side on and then the other. You can also try to apply a small quantity of water on the clear plasmid gel casting units before sliding; water may ease the sliding friction.
- Once the agarose is cool to the touch, add 2.5 μL of ethidium bromide (EtBr), and gently swirl to mix. Do not remove the EtBr solution from the designated area. Use the designated pipette and dispose of the pipette tip to the appropriate tip beaker.
- Pour approximately half of the agarose into each casting unit (~25 mL each; eyeballing is fine). Immediately add a comb to each gel. Use the 10-well side.
Note: EtBr is a carcinogen (cancer-causing)! When working with it, please observe the following precautions:
- Work with the provided EtBr stock only in the designated area.
- Use the designated EtBr pipette. Dispose of pipette tips in the designated EtBr tip waste container.
- Wear gloves and eye protection.
- Dispose of EtBr gels in the designated containers.
- Wait about 10 minutes for the gel to solidify; the gel should appear cloudy, not clear.
- Once the gel has solidified, gently pull the comb straight up out of the gel. Be careful not to destroy the wells when you pull out the comb!
- Next, remove the bumpers by gently twisting them off.
- After removing the comb and the bumpers, use a sheet of Saran wrap to wrap the gel by sliding the gel from the gel holder onto the wrap.
- Write down your section number and name on the Saran wrap. The gels will be used in later labs.
- Place the gels in designated areas.