
Lab 4 Procedure
Agarose Gel Electrophoresis
- Working in a group of 2, obtain your PCR reactions.
- Add 4 μL of the 6X loading dye to each of your PCR reaction; mix well.
- Take out the agarose gel you prepared in the last lab period.
- Load 20 μL of all PCR reactions and 3 μL ultra-low DNA ladder.
- Once all the samples have been loaded into the gel, gently place the cover on the running box. Be sure to match the color between the cover and the electrodes (black with black, red with red).
- Attach leads to the power supply in a color-matched manner.
- Set the voltage at 150 volt (V) and press the run button.
- Continue electrophoresis until the running front (darker dye) has migrated to 1 /2 or 2/3 of the gel.
- Take a picture of your gel using the gel doc, with help from the teaching staff.
- Pour your TAE buffer into the “Used TAE” carboy so it can be reused.
Analyze Gel Pictures
- Compare your gel picture to the sample picture below.
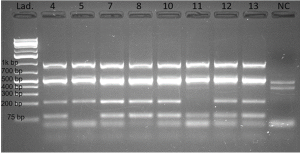
- Compare the number of bands, size of the bands and the intensity of the bands.
- Record your comparison in the lab notebook.
Please be mindful that the band ~70bp (smallest band in Figure 4.1) is NOT a PCR product and is not considered as a “correct band”. The band is intrinsic to the yeast, since it is present in the negative control sample in lane 10 (Figure 4.1).
- If one or more lanes contain 4 correct bands, it is likely that the YAC assembly is correct, and the corresponding yeast colony harbors the T7 mutant phage genome. Those yeast colonies can be called “positive colonies”.
- Discuss with the teaching team on which positive colonies should be used for future experiments.
- If none of the lanes contains 4 correct bands, talk to a teaching staff for further instructions.
Prepare for Yeast Culture
- Obtain 1 culture tube with 5 mL YDP. Label the tube with your names/group number and the colony number.
- Take out the yeast plates from the last lab period.
- Use a 10 μL pipette to gently touch the clone that contains the correctly assembled T7 genome and drop the pipette into the test tube.
- Incubate the tube at the 30 °C shaker overnight.
- You will purify the vector containing the T7 genome from the yeast cultures in the next lab.