
Lab 1 Procedure
Pipette Practice
Micropipettes
Accurate liquid transfer is one of the most important techniques in a biochemistry laboratory. All experiments are dependent on the accurate measuring and mixing of different solutions. In this laboratory, we have four air-displacement pipettes, or micropipettes.
- The p1000 is used for volumes of 100-1000 μL
- The p200 is used for volumes 20-200 μL or p100 is used for volumes of 10-100 μL
- Th p20 is used for volumes of 2-20 μL
- The p10 is used for volumes of 0.5-10 μL
The pipettes are most accurate at the higher end of their range, so even though the p200 could be used to pipette 20 μL, the p20 would be more appropriate.
Unit of Volume
To successfully work in a biochemistry laboratory, you need to be able to convert easily and quickly between different units of volumes and mass. The basic unit of volume is the liter (L). The units of volume most commonly used in a lab setting are the milliliter (mL) and the microliter (μL).
1 mL = 10-3 L
1 μL = 10-3 mL = 10-6 L
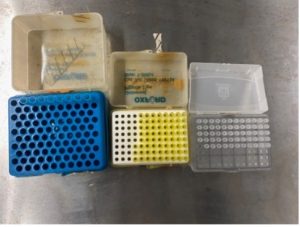
Pipette Tips
The blue tips are for the p1000, the yellow tips are for the p20, p100 and p200, and the clear tips are for the p10.
Disposable tips are always used. When attaching the tip, make certain that the tip is the correct type for the pipette you are using, and that the tip is properly seated on the end of the pipette.
When you empty a tip box, you must refill it with new tips; you may exchange it for a full, sterile box. Points will be deducted from your lab performance score if you do not do so.
When not in use, keep your tip boxes closed to maintain sterility.
When you are done with tips, please discard them in the large cardboard boxes labelled “TIPS” or “TIP WASTE”. Nothing else should be put in this box. Please discard used gloves, conical tubes, Eppendorf tubes and paper towels in the regular trash. If you have a question about where something should be discarded, please ask the teaching staff.
Pipetting
Video tutorials: Pipettes and pipetting – https://www.youtube.com/watch?v=QGX490kuKjg
Exercises: Pipetting
- Working as a group of 2, take one pipette out of the rack.
- Identify (with the help of the instructors if needed) the following parts on the pipette:
- Plunger button
- Tip ejector button/arm
- Volume adjustment knob
- Volume indicator
- Try pressing the plunger down. As you press, you will feel a sudden increase in resistance. This is the first “stop”. If you continue pushing, you will reach the second “stop”. You should stop at the first stop when pipetting.
- Take out a small beaker from your drawer and fill the beaker with tap water.
- Take out one 1.5 or 2 mL microfuge tube from the plastic beaker in your drawer and put it on the rack.
- Place the tip on the pipette so it stays on (not too tight).
- Hold the pipette over the water and push the plunger down to the first stop. Do not go past the first stop.
- Insert the end of the pipette tip just underneath the surface of the water.
- Slowly release the plunger, keeping the end of the tip in the water until the water is drawn into the tip.
- After the plunger is all the way up, keep the tip in the water for a few seconds to make sure the solution is no longer moving into the tip. NOTE: this is especially true for viscous solutions, such as glycerol.
- Move the pipette to a microfuge tube to dispense the liquid. Touch the tip to the side of the tube and slowly press the plunger to the first stop.
- If you wish to mix by pipetting, you must keep the tip in the solution at all times and only go down to the first stop. It is easy to form bubbles if done incorrectly, so practice with water and pay attention to placement of the tip in the solution (should always be submerged) and not passing the first stop.
- Use the tip ejector button to remove tip from pipette and into the “Used Tip” plastic beaker on the bench.
- When finished using the pipette, adjust setting to the highest volume and hang the pipette on the rack. Adjusting the setting preserves the spring as long as possible and hanging the pipette upright allows any liquid that may have been aspirated to drain out.
Exercises: making serial dilutions
Find a 1.5 or 2 mL microfuge tube of Coomassie brilliant blue dye (Note: this solution stains clothing).
Note: ALWAYS briefly spin down tubes in a microcentrifuge before opening them to ensure that all the liquid is in the bottom.
Practice pipetting large volumes by creating serial dilutions with a lab partner.
- Take out a small beaker from your drawer and fill the beaker with tap water.
- Take out five 1.5 or 2 mL microfuge tubes, label them and put them on a tube rack. These tubes will be used to make serial dilutions of the blue dye.
- Make 500 μL final volume of the following serial dilutions of the blue dye using the tap water in the beaker.
- Tube 1: 1/2
- Tube 2: 1/4
- Tube 3: 1/8
- Tube 4: 1/16
- Tube 5: 1/32
- To make serial dilutions with final volume of 500 μL in each tube, you can start by adding 500 μL of tap water in each of the five tubes. Then, transfer 500 μL of the blue dye into tube 1, mix the solution very well, then transfer 500 μL of the solution in tube 1 into tube 2.
- Repeat the steps for subsequent tubes until tubes 1-4 have 500 μL of solution and tube 5 has 1 mL of solution.
- To make tube 5 with a volume of 500 μL, take out another microfuge tube and transfer 500 μL of the solution from tube 5 into the new tube. The new tube can be discarded later.
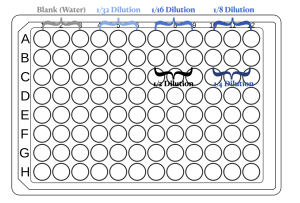
- Pipette 100 μL of each solution into the well of a 96-well plate in triplicate.
- In all experiments, controls or blanks are needed to subtract the basal effect that is not caused by the experimental condition. In our experiment, we want to measure the absorbance of the dye in different concentrations. To subtract the absorbance of water (solvent), a triplicate of water only should also be pipetted into the 96-well plate.
- You can use the figure below as a reference for loading the samples.
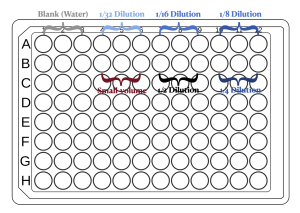
Exercises: Pipetting small volumes
- Pipette 99 μL tap water into each of three wells in your plate
- Add 1 μL of the blue dye from the original stock.
- Pipetting small volumes can be tricky; here are a few suggestions:
- Be sure your pipette tip gets down into the blue dye. After drawing up the 1 μL, look at the pipette tip. You should be able to see a small amount of liquid in the end of the tip.
- Be sure the tip gets down into the solution you are adding the 1 μL to before release the liquid into the well.
- Draw out the tip and visually check to make sure the liquid is dispensed.
- Mix by pipetting up and down with a larger pipette (p20 or p100)
- You can use the figure below as a reference for loading the samples.
Measure the absorbance of the plate at 595nm (A595). Once you have the data, take a look at the triplicates and see how precisely you pipetted the solution into the plate. Next, use the absorbance measurements to determine how accurate your dilutions were.
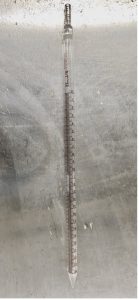
- The glass pipettes are numbered backward to what you might expect, so pay attention. For example, if you want 4 mL on a 10 mL pipette, you pull up to the 6 mL line not the 4 mL line.
- When you read the meniscus, make sure that the pipette is vertical and that you are at eye level.
- Practice using either the bulb or the pump, whichever you find easier to work with.
- Do not let the glass pipette hang over the edge of the bench.
- Find a 50 mL conical tube of green food coloring. Re-use the same liquid and test tubes for each of the following exercise.
- Add 2.5 mL of the solution to five separate glass tubes using the 10 mL glass pipette. Look at the liquid levels in each tube to determine how precise your pipetting is. If you are noticeably off, pour the liquid back into the conical tube and try again. Pour the liquid back once this exercise is finished.
- Next, add 1.5 mL of the solution to the five glass tubes using the 5 mL glass pipette. Again, check your technique by checking the liquid level. Pour the liquid back once this exercise is finished.
- Finally, add 4 mL of the solution to the give glass tubes using the 25 mL glass pipette. Check your technique. Pour the liquid back once this exercise is finished.
- Share pipettes with everyone at your bench, and return them to the containers when you are finished.
- Return the green water to the back bench.