
OPTIONAL: Using the annotation function
Key Takeaways
- You — and your students! — are welcome to use the Hypothes.is annotation layer in Pressbooks to take private notes or to engage in guided annotation activities.
- Users need to create a free account to contribute
- If you’re going to use the annotation function, please create a private group for your class rather than publishing to the public layer. (See below.)
- The annotation layer can be powerful and can promote active and social reading, but this is the case only when instructors carefully teach students how to use the tool and provide guidelines for appropriate participation. It’s a mistake to assume that students will pick this up on their own. If you expect students to use this layer, reserve time in class to show students how to use it.
The Basics
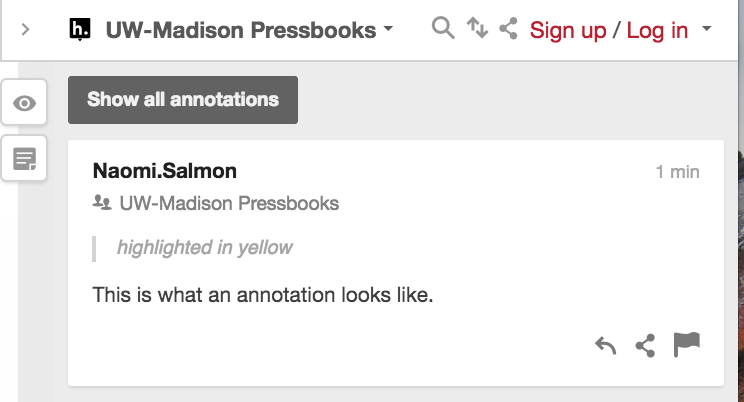
When someone adds a Hypothes.is annotation to the web version of this text, the annotation will appear highlighted in yellow.
For example, this note should appear highlighted in yellow. Try clicking on it!
Doing so should expand an annotation toolbar on the right-hand side of your screen. (You may need to wait a few seconds for this to render.)
Once the annotation toolbar is expanded, clicking outside of the toolbar–for instance, in the space on the left-hand side of your screen–should hide the annotation toolbar once more.
If you find the yellow annotation highlights distracting, you can also click on the eye icon at the top right-hand side of your screen to hide them from view.

When you click on a highlight and the sidebar opens, you’ll see the words “UW-Madison Pressbooks” appear at the top of the pane.
You can display all of the annotations on this layer at once by clicking the “show all annotations at once” button that appears when you’ve expanded a single annotation highlight. Another approach: when the annotation pane is closed, you can display all of a page’s annotations by clicking the carat symbol at the top-right-hand side of the screen: (“<“). Clicking on the carat again (“>”) will hide the annotation pane.
You can change the width of this annotation pane by clicking and dragging the sidebar:
Click here to see an animated example.
Once the annotation toolbar is expanded, clicking outside of the toolbar–for instance, in the space on the left-hand side of your screen–should hide the annotation toolbar once more.
Public Annotation Layers
By default, UW Pressbooks texts contain two different public Hypothes.is annotation layers. The first is the published UW-Madison Pressbooks publisher layer, which is what you should see by default. (This UW-Madison publisher layer won’t be accessible to you or your students, but you can make private groups specific to your class. See later sections of this page for more information.)
The Public annotation layer is a space that anyone can contribute to and anyone can see. If you use the Hypothesis layer, please ask your students not to post to the public annotation layer. Instead, they can post their own notes privately or comment in a private group specific to your class.
Joining In
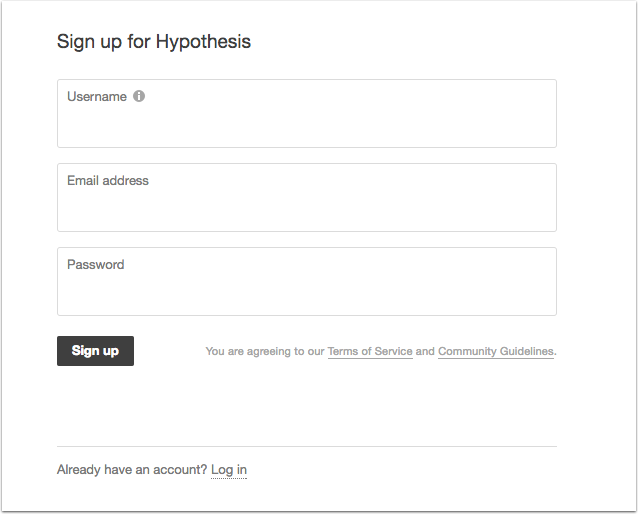
You don’t need to be registered to view others’ annotations, but to add your own comments to the layer, you’ll need to register for a Hypothes.is account. To do so, you’ll need to provide a username, email address, and password and then click the Sign Up button. After that, you should receive a confirmation email with a link to click to validate your account. If you don’t see this email, check your Spam or Junk folder.
Annotation
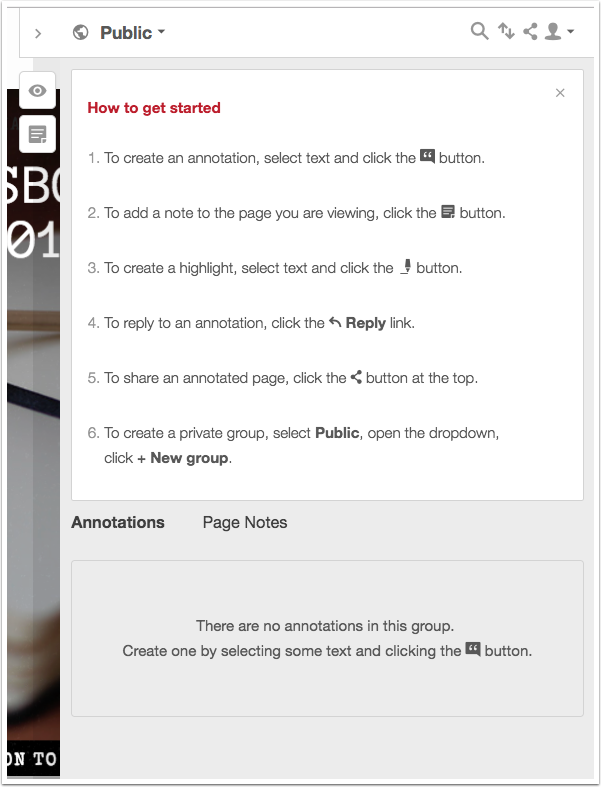
The How to Get Started box is displayed the first time you log into your Hypothes.is account. It offers explanations of the different button functions and briefly outlines how to use them.
To create an annotation or highlight, start by selecting the text and then choose either annotate or highlight. Choosing annotation will open the annotation pane to a new blank annotation field. Selecting highlight will highlight the text you have selected.

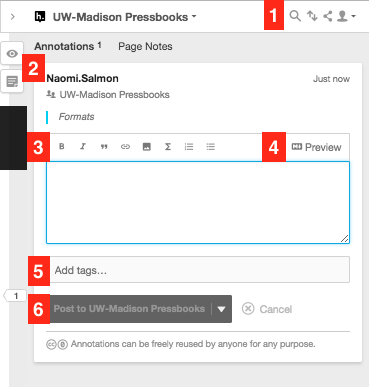
Annotation Pane Tour
- Filter, Sort, Share, and Account buttons
- Turn on/off highlights, create annotation buttons
- Text editor formatting tools – bold, italic, quotation, link, media, LaTex, numbered list, bulleted list,
- Preview annotation
- Tags Field – add multiple tags separated by commas
- Post button – you can use the drop-down button to easily switch between Public, Private, and Group posting
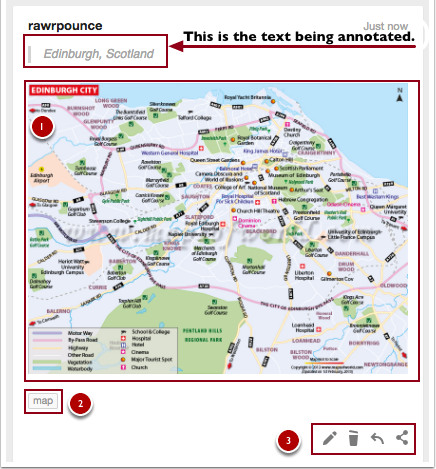
Once you’ve created an annotation, it will appear in the annotation pane on the right side of the page. It features the text that you’ve selected to annotate at the top, your annotation text, and any tags you have added.
In the screenshot below, you’ll see an annotation (1). In this case, I’ve provided a map of Edinburgh, Scotland to show other users what the city’s layout looks like. Item (2) illustrates what tags look like when you use them on an annotation, and item (3) displays the edit, delete, reply, and share buttons.
Creating a Private Group
If you would like to have a private discussion space that is only accessible to people you invite—for instance, students in your class or peers in a study group—I recommend following the Hypothes.is Creating a Group step-by-step guide video tutorial.
If you use this private group function, make sure to reserve time in class to show your students how to access the group and how to toggle between layers so that they can see the private group rather than the “UW-Madison Pressbooks” publisher layer or public layer.
Joining a Group
The following Hypothes.is “Joining a Group” step-by-step guide video tutorial provides a comprehensive overview:
Review a Group’s Annotations
Once you’re the member of a group, you can easily review the annotations that the members of that group have created.
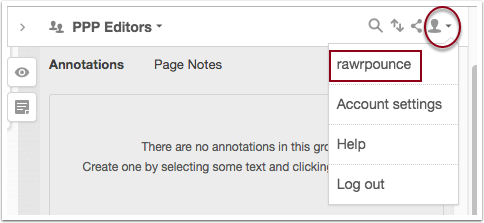
To navigate to the annotation activity for a specific group, open the annotation pane on your book and select the user icon to open the drop-down tray of options, then click on your username.
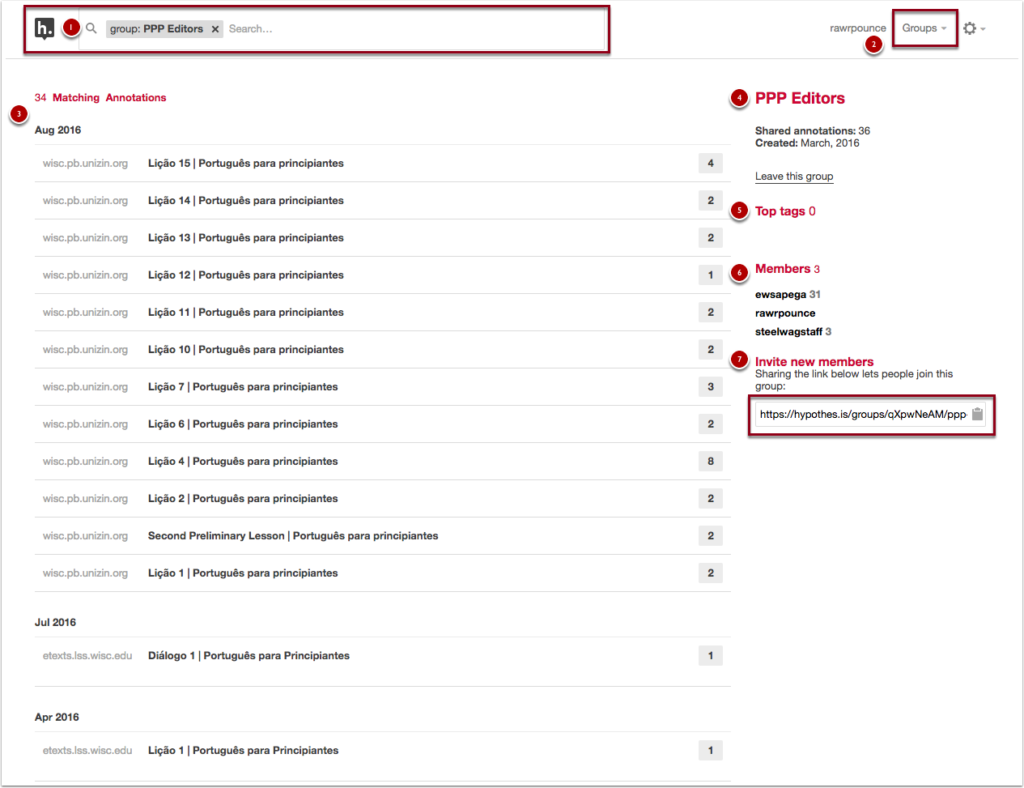
This will load your account page, from there click Groups and from the drop-down tray select the group you want to review.
This will load the group page that you’ve selected. At the top of the page you’ll find (1) the group you’ve selected as a filter in the search box, (2) the account and group navigation options in the top right of the page, (3) a listing of the matching annotations for the group tag, (4) the name of the group and group information, (5) a listing of the top tags for the group, (6) a list of members in the group, and (7) the link to invite new members to the group.
Resources
Hypothes.is offers some great resources for using annotations with students and in groups. Check out the following resources:
Back to School with Annotation: 10 Ways to Annotate with Students – offers 10 creative ways to use annotation with your students.
Annotation Tips for Students – offers tips aimed towards helping students complete annotations.
How to Embed Images and Other Media Into an Annotation
Hypothes.is Education – offers more guides and classroom examples for using Hypothes.is.
You can also check out the Hypothes.is YouTube channel tutorials.
Source
The Hypothes.is tutorial on this page is adapted from UW-Madison’s Pressbooks 101 text, which was originally created by Steel Wagstaff and Amanda Larson and maintained by Naomi Salmon (2018). Pressbooks 101 is openly shared under a Creative Commons Attribution 2.0 license. Naomi Salmon expanded this page for a literary studies open pedagogy project.
