
TeachOnline@UW: Rubrics – Advantages and Best Practices
Steps to Developing Rubics
Step 1: Review Learning Objectives
Step 2: List Performance Criteria
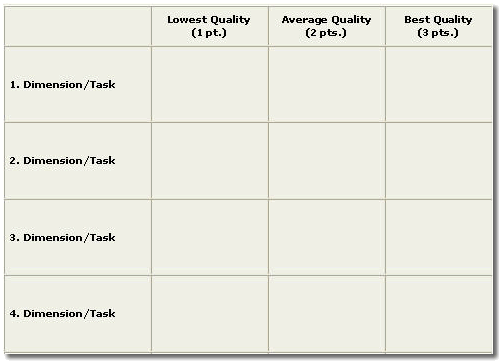
Step 3: Describe Levels of Quality for Each Criterion
Step 4: Develop a Grid
Step 5: Add a Descriptor or Numerical Score to Each Performance Level
Step 6: Practice Using the Rubric
Step 7: Share the Rubric with Students
Step 8: Assess Students’ Work
Step 9: Revise the Rubric
TIP
Canvas has a rubric that can be linked to assignments and grades. This Canvas guide walks instructions through the process of creating rubric in 20 minutes. More details are provided in this rubric overview video.
Note: It is recommended to talk with a technologist or instructional designer for help on developing effective rubrics.
Step 1: Review Learning Objectives
Identify what you want students to do or to accomplish as the learning outcomes.

The ASU Objective Builder is a great way to identify objectives for your course.
Step 2: List Performance Criteria
Develop a list of criteria that reflect the learning objectives and that describe the tasks, behaviors, or elements that students are expected to demonstrate in their product or performance. Select criteria to match your assignment or learning activity.
 Search for existing rubrics from colleagues, the internet, rubric databases, and open educational resources. Adapt an existing rubric to match your assignment or activity goals.
Step 3: Describe Levels of Quality for Each Criterion
Describe the best and worst levels of quality for each criterion, and then fill in the middle levels to complete the range of performance levels.
Review past examples of student work (e.g. “A “work and “D” work) to draft levels of quality or performance for each criterion.
Use a grid format with columns and rows, listing objectives or expected performance in the first column and descriptions of various levels of performance in the next columns. For an example, download the rubric template.
Step 5: Add a Descriptor or Numerical Score to Each Performance Level
Use a descriptive word to identify each performance level, such as “beginning, developing, accomplished, exemplary.” There are a number of rating scales to utilize. If you want to score/grade the student’s work, add a number or rating to each level.
Advanced Exercise
Correlating Points with Your Gradebook
Use the worksheet linked below to better comprehend how rubric point systems correlate to assignment grades.
How to Calculate Points for Rubric to Correlate With Your Gradebook
Step 6: Practice Using the Rubric
Before using formally, verify the rubric by using it to evaluate previous student work. Or practice with students to determine if the rubric is clear, accurate, and covers all potential performances. Ask for student feedback on the usefulness and fairness of the rubric.
Step 7: Share the Rubric with Students
Before students begin an assigned activity that will be assessed, share the rubric with them to clarify what is expected in their work. Consider involving students in developing or evaluating a rubric.
Use the rubric to guide you in assessing how well students performed, or their level of mastery, in doing the learning activity or assignment.
Keep track of the strengths and weaknesses of the rubric as you use it to assess student work. Revise to build in detail and improve communication.
Rubric Self Assessment
Use the rubric link provided below to download a rubric to assess the rubric you have created. That’s right! A rubric to assess a rubric.