
2 Spinal Cord | Trunk Wall (Part 1) | Vertebral Column | Bones of the Thoracic Cage
Learning Objectives:
By the end of this lab, students will be able to:
- Describe the gross anatomy of the spinal cord and identify its regional variations.
- Identify the level and gray and white matter regions of the spinal cord on the cross-sectional images.
- Identify the anatomical features of the vertebral column.
- Identify the bones of the thoracic cage and their anatomical features.
- Identify and describe the function of the muscles of the back and abdominal wall.
Terms to Know
|
Spinal Cord Gross Anatomy
Muscles of the Trunk Wall
|
Bones of the Thoracic Cavity
Vertebral Column
|
Introduction
In this lab, you will be examining the spinal cord, vertebral column, and the abdominal wall. The spinal cord serves as the connection between our peripheral nervous system and the brain. The central region of gray matter is primarily composed of cell bodies and unmyelinated axons. The outer region of white matter is composed mainly of myelinated axons ascending, carrying sensory information, to the brain, or descending, carrying motor information, from the brain to the target tissues.
The vertebral column supports the weight of the body and helps to transmit forces between the upper and lower extremities. The muscles of the abdominal wall act on the vertebral column to create movements such as lateral bending, rotation, flexion, and extension at the trunk. These muscles are also continually working to stabilize the trunk and vertebral column, both with movement and at rest.
Today is the first lab you will see human cadaveric tissue. Please be respectful, appreciative, and understand, a human donated their tissue(s) for you to learn.
Lab Activities
Activity 1: Spinal Cord Anatomy
Wet Spinal Cord Specimens:
View the slideshow of wet human spinal cords on Canvas and view images of the spinal cord in the Abrahams’ Atlas and Netter’s Atlas. The spinal cords have been dissected and sectioned at the UW Hospital as part of an autopsy. Anatomical variation is common, and each spinal cord is slightly different. You could be asked to identify structures on any of the spinal cords on an exam.
- Observe the spinal cord as a whole. Is it shorter or longer than you expected it to be? Though our vertebral column extends down from the skull to our coccyx, the spinal cord only extends down to the L1 vertebral level. The conus medullaris is the somewhat cone-shaped inferior end of the spinal cord at this level. Identify this structure on the spinal cord. Notice all of the string-like extensions of nerves hanging off of the conus medullaris. Because the spinal cord ends at L1, the nerve roots exiting the vertebral column below that level have to leave the spinal cord at this level and travel through the vertebral column to get to the level that they will exit the vertebral column. This group of spinal nerves is called the cauda equina (Latin for “horse’s tail”).
- Observe the cervical region of the spinal cord. Notice that part of this region is larger (wider) than the rest. The wider section is the cervical enlargement. Now observe the region just above the conus medullaris, and notice that it is also larger than the area just above or below it. The larger region is the lumbar enlargement.
- The meninges are the layers of tissue that surround the brain and spinal cord. You can see the meninges on the spinal cords. The dura mater is the tough outer layer, and the arachnoid mater is the thin, transparent layer, deep to the dura mater. The final layer, directly touching the spinal cord, is the pia mater. You cannot see the pia mater directly surrounding the spinal cord (or brain), as it is too thin. However, there are two places where you can observe the pia mater without magnification.
- The filum terminale is an extension of pia mater that anchors the spinal cord from the conus medullaris to the coccyx. By gently moving the nerve roots of the cauda equina to the side, you can see the very tip of the conus medullaris. The string-like projection off of the conus medullaris that is lighter in color than the nerve roots of the cauda equina is the filum terminale.
- In the space between the dura and lateral aspect of the spinal cord, you will see a few triangular-shaped sections of tissue. The base of the triangle is coming from the spinal cord, and the tip is connecting to the dura mater. The triangular looking tissues are the denticulate ligaments, and the function to anchor the spinal cord laterally and keep it centrally located within the vertebral column.
- Observe the roots exiting the spinal cord. The smaller branches immediately leaving the spinal cord are called rootlets, and the rootlets merge to form roots. This tissue is dissected so that the dura mater is cut anteriorly, making the anterior or ventral portion of the spinal cord more easily visible. Therefore, the branches that you most easily see exiting the spinal cord are the ventral roots (and rootlets). These carry motor information from the spinal cord out to the muscles.
- Deep to the ventral roots are the dorsal roots (and rootlets). These carry sensory information, including fine touch, pain, and proprioception from the periphery to the spinal cord.
- Follow the dorsal and ventral roots to the dura mater, and on the outer aspect of the dura mater, at a few levels, look for the small ball-like swelling. This is the dorsal root ganglion, which houses the cell bodies of the sensory neurons traveling through the dorsal root.
- Just past the dorsal root ganglion, you may be able to observe that the dorsal and ventral roots merge for a short distance. This is called the spinal nerve. Motor and sensory information mix in the spinal nerve, and then two branches extend out into the periphery. The dorsal ramus runs dorsally to innervate the muscles and skin of the back. The ventral ramus runs anteriorly to innervate the muscles and skin of the extremities and anterior trunk. Most of the other nerves we will observe in this course originate from the ventral rami. While it is unlikely that you will be able to see the rami on the spinal cord tissue, you can observe these structures in images in the Netter’s atlas.
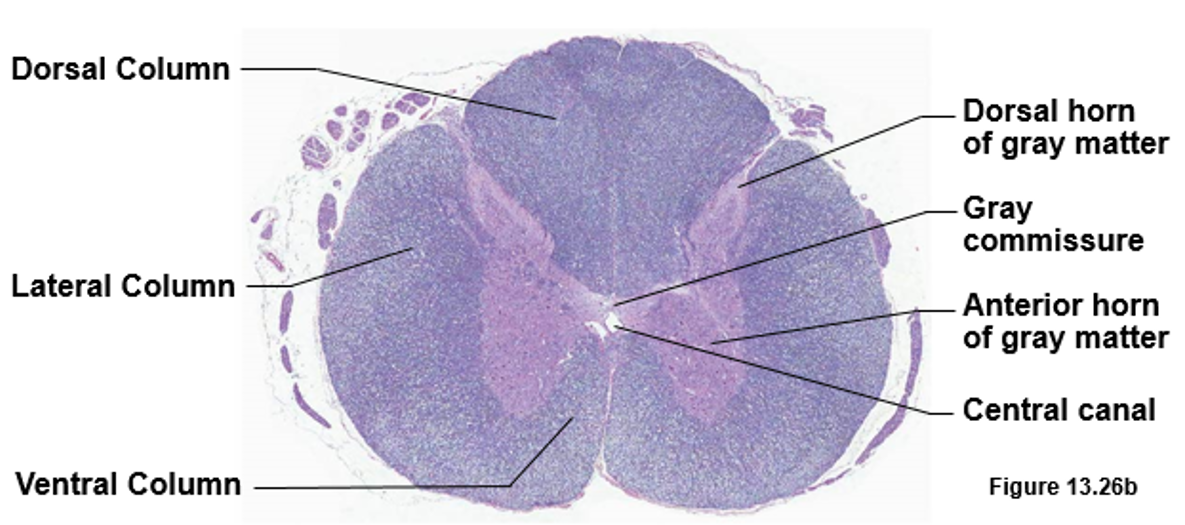
- Review the regions of the white matter and gray matter of the spinal cord in the cross-sectional images below. Figure 1, in purple, shows the gray matter (butterfly shape) as a lighter shade of purple and the white matter (outer portion) as a darker shade of purple.
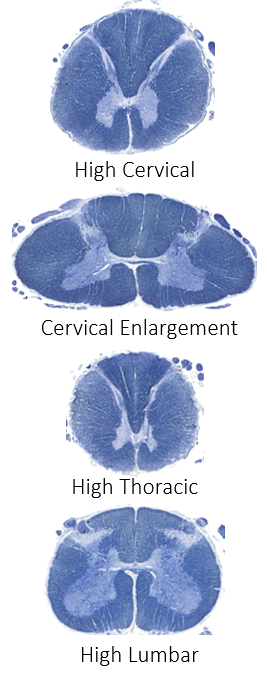
- Review the parts of the spinal cord in cross-section and observe different levels along the spinal cord to see how the white and gray matter changes in cross-section from superior to inferior. Figure 2, in blue, shows the gray matter as a lighter shade of blue, and the white matter as a darker shade of blue. Note the differences in the shape of the spinal cord, the dorsal horn, and the anterior horn through the different regions.
Plastinated Spinal Cord:
View the slideshow on Canvas of the plastinated vertebral column and spinal cord. The plastinated spinal cord is sitting within a spinal column. The vertebrae have been cut at the lamina, and the spinous process has been removed. This procedure is called a laminectomy, and it allows you to view the spinal cord within the vertebral foramen.
- Observe the spinal cord as a whole, and compare its length to the vertebral column. Notice how the dorsal and ventral roots run more horizontally in the cervical region but tend to leave the spinal cord and run downward to reach their exit point (intervertebral foramen) at the lower thoracic and lumbar levels. Observe cervical and lumbar enlargements as well as the conus medullaris and cauda equina.
- Though the meninges are difficult to see here, you can observe the filum terminale (an extension of pia mater) within the cauda equina, anchoring the spinal cord to the coccyx. You can also see a few denticulate ligaments anchoring the spinal cord laterally.
- Follow the dorsal and ventral roots and observe the small swelling, or dorsal root ganglion, near the intervertebral foramen. Just past the dorsal root ganglion, you may be able to observe that the dorsal and ventral roots merge for a short distance. This is called the spinal nerve.
Activity 2: Spinal Cord Model
The spinal cord models are 5-times life-size. Orient yourself when looking at the spinal cord, the cross-sectional images will be on the right, the 3B symbol will be on the top left of the base. While looking at the spinal cord model in this position, the side closest to you is ventral, the side furthest away from you is dorsal.
Activity 3: Trunk wall using the Digital Human Anatomy Atlas
Watch the videos on Canvas on the muscles of the trunk wall, and observe these muscles in the Abrahams’ and Netter’s atlases.
-
- External Oblique: Contraction causes trunk rotation to the opposite side (i.e., right external oblique helps you turn to your left) and lateral trunk flexion to the same side (i.e., right external oblique helps you flex laterally to your right side).
- Internal Oblique: Contraction causes trunk rotation to the same side and lateral trunk flexion to the same side.
- Transversus Abdominis: Contraction compresses the abdomen and, with unilateral contraction, causes trunk rotation to the same side.
- Rectus Abdominis: Contraction causes trunk flexion.
- Erector spinae: Iliocostalis, Longissimus, Spinalis. Together contraction of these muscles helps to extend the vertebral column. Note that the iliocostalis runs from the iliac crest of the pelvis to the ribs (costals), the longissimus is the longest of the erector spinae muscles, and the spinalis is the most medial of the erector spinae muscles, closest to the spine.
Activity 4: Spinal Column / Vertebrae:
Watch the videos on Canvas and observe the following structures of the vertebral column in the Abrahms’ and Netter’s atlases
- Bony landmarks of the vertebrae: identify the following landmarks:
- Spinous process
- Transverse process
- Superior articular facet
- Inferior articular facet
- Vertebral foramen
- Intervertebral foramen
- Body
- Intervertebral foramen (observed by stacking two adjacent vertebrae together)
- Regions of the vertebral column: Identify the following structures/landmarks that are specific to vertebrae from different regions of the vertebral column.
- Cervical vertebrae
- Transverse foramen
- Atlas
- Anterior Arch
- Posterior Arch
- Axis
- Dens
- Thoracic vertebrae
- Costal facets/demifacets
- Note: If demi means half and a demifacet is a half facet, what has to happen for a whole facet to be created? Think about the arrangement of vertebrae. We will look at these facets more closely in the next lab.
- Sacrum – Five fused bodies of vertebrae
- Sacral Canal
- Superior articular facet
- Anterior/posterior sacral foramina
- Coccyx – Three to five fused vertebrae
- Cervical vertebrae
- Compare the superior and inferior articular processes and facets of a thoracic and lumbar vertebra. Notice that these facets of the thoracic vertebrae are oriented more within the coronal plane, while the facets of the lumbar vertebrae are oriented more within the sagittal plane.
- In the atlases, view the anterior and posterior longitudinal ligaments. The anterior longitudinal ligament runs vertically along the anterior surface of the vertebral bodies, while the posterior longitudinal ligament runs vertically along the posterior aspect of the vertebral bodies. These ligaments help to stabilize the vertebral column.
Activity 5: Bones – Ribs / Sternum / Thoracic Vertebrae
Watch the videos in Canvas examining the ribs and sternum, as well as how the ribs articulate with the thoracic vertebrae. You can view these structures and landmarks in the Abrahams and Netter’s atlases as well.
Examine the following bony landmarks:
- Ribs
- Head
- Articular facet of the transverse process (on the thoracic vertebrae)
- Sternum
- Manubrium
- Body
- Xiphoid process
- Suprasternal notch
- Clavicular notch
- Sternal Angle
- Try to palpate these structures on your sternum. At the superior aspect, palpate the suprasternal notch. As you move about two inches inferiorly, you can feel the sternal angle, where the manubrium meets the body. Just lateral to the sternal notch, you can palpate the sternoclavicular joint and sternoclavicular notch, where the sternum articulates with the clavicle (collarbone).
- Examine the differences between true, false, and floating ribs.
- Observe the bony landmarks on the thoracic vertebrae where the ribs articulate (Costal facet of the transverse process, superior costal demifacet, inferior costal demifacet). Notice how the superior demifacet of the inferior vertebrae & inferior demifacet of the superior vertebrae form one full facet articulating with the rib head. Notice the costal facet on the transverse processes of the thoracic vertebrae.
Activity 6: Radiology – Vertebral column, thoracic cage, and spinal cord
View the slideshow in Canvas identifying the anatomy of the vertebral column, thoracic cage, and spinal cord in radiology images. The unlabeled images are also provided as a study tool.
Wrap-Up and Clinical Connections
The clinical connection for this lab discusses lumbar disc injury and its effects on the spinal cord and spinal nerves. Watch the video in Canvas, and also look over the following 3D image of the vertebral column, intervertebral discs, and spinal nerves. The image shows degenerative disc injuries including a herniated disc, placing pressure on a spinal nerve.
