
1 Course Introduction | Introduction to Anatomy
Learning Objectives:
By the end of this lab, students will be able to:
- Explain how the course is set up and where to find important information about the course.
- Describe anatomical position and properly use directional terminology with respect to that position.
- Associate how the basic principles of standard radiological methods are used clinically.
- Interpret how cross-sectional anatomy relates to 3D anatomy.
- Explain the function of various bony markings.
Terms to Know
|
Positions and Planes
Terms of Motion
Terms of Direction
Radiology Terms
|
Bone markings
|
Introduction
Welcome to Anatomy & Physiology 338: Human Anatomy Laboratory! In this lab, we will begin with an introduction to this human anatomy lab course. We will discuss the logistics of the course, and you can ask any questions you might have. We also ask that you review the course Canvas website for additional details about the course. We put great effort into providing you with all of the information you need in a user-friendly way on the site. In the future, we ask that you look at the website before emailing questions to TAs or Professors.
After the introduction to the course, you will view a presentation on radiology methods in Canvas. Following the radiology presentation, you will work through four interactive activities: a radiology interactive review, a review of planes of motion, movement, axes, and directional terminology, an introduction to cross-sectional principles, and an introduction to bones and bony markings.
Radiology Presentation
 The most common way you will interact with anatomy in a clinical setting is through surface anatomy. Surface anatomy is the anatomy that we can see from the surface of the body. For example, if you look at your knee, you can see where the patella (or kneecap) is located. We will explore surface anatomy throughout the course.
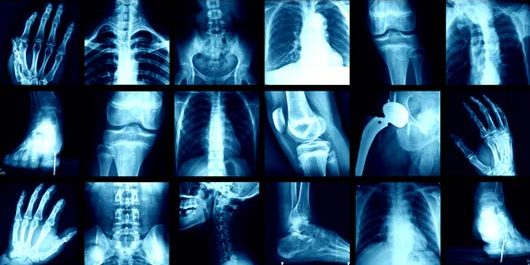
The second most common way you will interact with anatomy in the clinic is through radiological imaging. For this activity, you will listen to a presentation prepared by Dr. Lonie Salkowski, a radiologist at UW Hospital. She will describe the different types of radiological images that you may see in the clinic and show a few examples of cases using these types of imaging. There may be times in the presentation where she uses terminology that you aren’t familiar with, and that’s ok. We will learn some of this terminology throughout the course. The key take-aways that you should get from the presentation are found in the interactive radiology presentation (Activity 1).
Radiology Slideshow Presentation in Canvas
Lab Activities
Activity 1: Radiology presentation
Activity 2: Anatomical terminology, planes, motion, and axes.
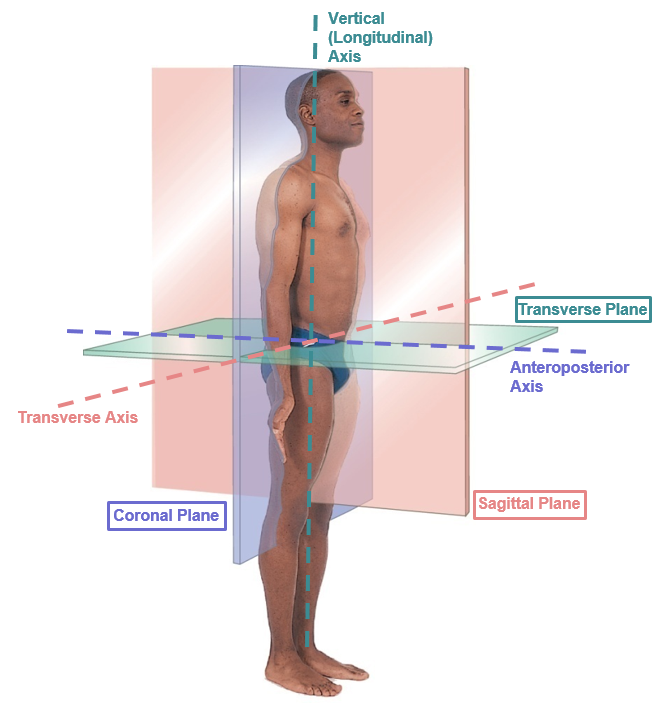
Using the table and image below, complete the terminology, planes of movement, axes of rotation, and motion activity. You may want to look at the Anatomical Terms and Terminology references on the Canvas page. Please, get up and move during this activity!
| Plane | Axis | Description |
| Sagittal | Transverse | Bisects the body from front to back, dividing it into left and right halves. Flexion and extension movements typically occur in this plane. |
| Coronal/Frontal | Anterior-posterior | Bisects the body from side to side, dividing it into front and back halves. Abduction and adduction movements typically occur in this plane. |
| Transverse/Horizontal | Vertical | Divides the body horizontally into superior and inferior halves. Rotation movements typically occur in this plane. |
Activity 3: Cross-Sections
In this activity, you will work through the PowerPoint slideshow found on Canvas for Lab 1. You will view cross-sectional images of objects, and you will be asked to guess what the objects are. You will be prompted to think about a few questions as you go through the activity.
Activity 4: Bony Markings
Review the following document on bony markings before working through the activity below.
- Look at the bones in the images below and take note of the areas highlighted, circled, marked with a star, or an arrow.
- Why might these areas exist on bones? Specifically, why are there holes within the skull?
- Why are there locations on long bones that are rough, smooth, protruding, grooved, or depressed?
- **NOTE: You do not need to know the names of specific markings at this time.** For now, you should understand the general names for different bony markings and the purpose of each marking (e.g., attachment site, passageway, space a structure runs through).
Wrap-Up and Clinical Connections
After completing the activities during the lab, head back into Canvas to learn some clinical connections. Clinical connections provide you an application to the information you are learning each day.
The clinical connections for this lab include palpations (touching) of bony markings and a couple of radiology cases examining a knee and a finger.
