
Media Arts Production
7 The Nature of Multimedia
Designing Multimedia for Instruction
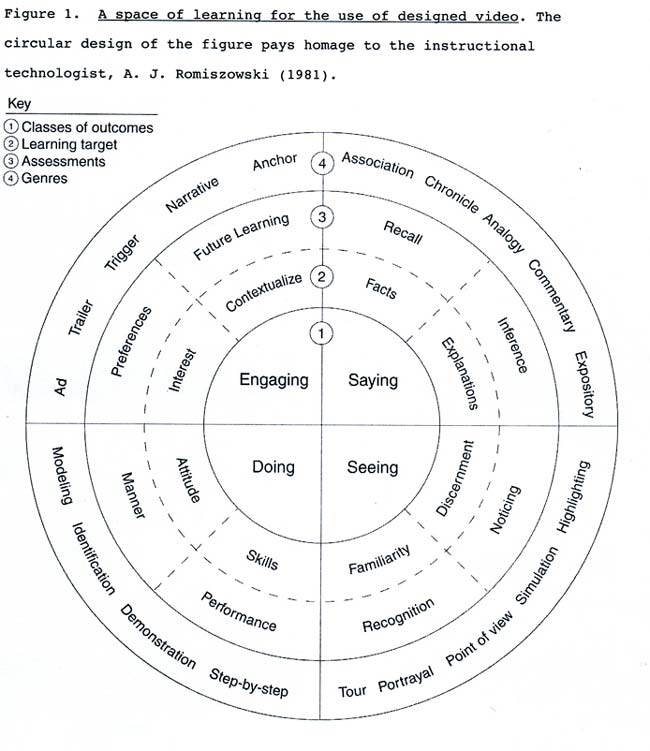
The following diagram by Daniel L. Schwartz & Kevin Hartman at Stanford’s School of Education maps learning outcomes to the most effective designed video genres. By working in this way you can see that the use of video in instruction can be targeted and quite specific.
Take a moment to map one of your own teaching needs to this model. Does this reframe how you have been using designed video? Does it simply reflect what you are already doing?
Week 1 Activities
 Observe & Consider
Observe and consider the following short video. Think about how the video relates to the designed video diagram above.
Production Notes from David
Media arts is like… had a non-traditional workflow. I had the idea churning around for awhile, then took advantage of being at Barnes and Noble to take 3-4 minutes of video using the video camera on my iPhone 4. I edited the video down, eliminating the video that was shaky or that had magazine titles that didn’t fit into the overall idea. To get the video off of my phone I sent it first to my camera roll and then uploaded it to my Dropbox.com account. From my laptop I imported the footage into iMovie 09. I recorded the audio using an H2 Handy Recorder and edited the audio in Soundtrack Pro. I created a new multitrack project in Soundtrack and used the built in audio loops to design the soundtrack. I did two supplemental recordings to build out the sections of audio that used the walkie talkie effect, needing to do two separate imports from the H2 Recorder. I exported the audio from Soundtrack and imported the audio into iMovie. I started bringing clips into iMovie only to find out that the duration of the clips was not going to fill out the video, so I culled still images from the source video (from within iMovie) and layed down a sequence of images, adjusting the duration of the images so that they cut in a logical relationship to the audio. All audio from any of the barnes and noble or driving footage was muted. I exported the video in medium resolution. The film filter is “1960s” in the iOS app “16mm”. Rather than import the video back onto my phone, I played the footage on my laptop at the brightest settings and all other lights in the room off and recorded using the “16mm” app. The happy side effect is that it allowed me to do small pans and “pushes” on the video.
The video at the top of the page was self-recorded in the video recording studio in 368 Van Hise Hall. Total time from recording until the video was embedded in the course estimated at approximately 2.5 hours. The initial recording was about 20 minutes and included about a dozen incomprehensible statements, which I attribute mostly to the odd dynamic of speaking to a lens, but also because I wanted to speak somewhat off the cuff. While there are many avenues for self-recording using a laptop, the combination of a private room, help with setup and teardown, and high quality cameras and mics, may be something that you’d like to try.
Media Attributions
- 3-modesB
