Media Arts Production
8 Design Guide
Introduction
In their essay “It is not television anymore: Designing digital video for learning and assessment,” Daniel Schwartz & Kevin Hartman provide a way to map learning outcomes directly to distinct video genres. The following design guide serves as a way to continue to the next steps of creating a designed multimedia object. We begin by taking pictures. Why pictures? The fundamentals of photography are the fundamentals of video. A single picture allows us to slow down the stream of many pictures per second that occurs in video and slow it down to its essence-a single image.
Process
The design-development process usually begins with a set of requirements. As preparation for watching the tutorial, assume that the learning outcome and multimedia genre have been selected. The artifact being photographed needs to be seen well enough to perform a live annotation of it’s text and design during a front of the class presentation.
Review
Take note that the video moves through a sequence of actions that are informed by techniques, design principles and one law of the physical universe. Consider that the steps could be seen as purely technical. Then again, consider whether or not the starting design requirement, that of a clearly rendered image suitable for presentation, could be reached as well without the application of theories inherent within the media arts discipline.
Recall the sequence of tips:
- Assess the quantity of light
- Isolate or contextualize the image
- Use available resources (i.e. make use of what you have as opposed to wishing for what you don’t have)
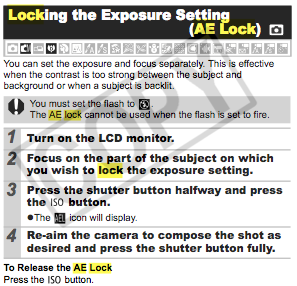
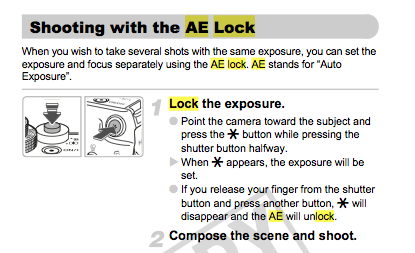
- Optimize exposure with AE lock if needed
- Don’t rely on exclusively the first shot composition
- Understand light, intensity, and distance vis a vis the inverse square law
- Shape and modify light to refine image
Camera Notes
Chances are you’ll be using a point-and-shoot camera or the camera on your phone to complete the following project. Naturally, it’s impossible to account for every type of camera, but the techniques covered here will apply to almost all situations with a few slight variations.
Canon cameras use a function button along with the shutter. For example, Canon cameras found on campus all share the same procedures, but have slightly different function buttons. The best advice is to check the manual before starting the assignment.
Canon G11
Canon SD1000
UW-Madison Location: College Library