
Media Arts Production
11 Video Editing Activities
 Observe & Consider
Introduction to Video Editing
The medium of film and video is fundamentally linear. Certainly there are stories that are told in non-linear ways, but every video starts at a point in time and moves forward, very much like a train heading toward it’s destination. It’s no wonder that the term “tracks” describes the metaphorical space within which video and audio are arranged in a video editing program.
In order to fully understand video editing, the idea of choosing distinct points in time is extremely important. You may have heard of three-point editing, which is a technique of editing, but also reflects how video editing works. Put another way, the process of video editing is essentially taking something long and making it shorter. But In order to make that happen, the editor must identify the point in time to start a selection. Let’s say it’s right at the beginning (POINT 1). The next thing she needs to do is determine the end of the selection, let’s say twenty minutes later (POINT 2). Where’s the third point? Recall the train track. Right now that track is empty and is waiting to be loaded with cargo. The point at which you place your selection (your cargo) is the third point in three-point editing.
The following activity serves as a way to apply editing functions to a bridge between introductory training provided by STT and full courses at Lynda.com. The objective of the tutorial is focused on basic technique in an applied context. If you can do this tutorial, the requirements of the upcoming projects will be a natural progression. If you find that you are running into multiple obstacles, you should take advantage of the Lynda.com iMovie ’09 introduction course.
https://www.youtube.com/watch?v=AGQYTIrhofA
 Practice & Apply
Record a voice-over narration
Scenario: You’ve been asked to contribute to an academic journal as part of a conference. The conference committee has asked for short digital media submissions and you have been selected to record the voice-over. Use iMovie to open a new project, import the video file, and then use the voiceover tool to record the text (provided below).
Objective: Position the audio recording so that it compliments the existing audio and video.
Instructions:
- Download the exercise video
- When you click on the link, a new window will appear. Press the “Download” button at the top right of your browser.
- Print the text snippet below (or just jot it down).
- Record the following voiceover text:
The day turns bright and brisk in a Montana gulch, just at the boundary of urban and wilderness. In this Digital Media Assignment, Caitlin DeSilvey, Senior Lecturer in Cultural Geography at the University of Exeter, relays her early interest in old decaying places, which very much describes the subject of her research–a 100-year-old homestead in Missoula’s north hills. - Reflect on the following questions:
- What issues arose in terms of rhythm and pace, volume, and tone?
- What was the biggest technical issue?
- How long did it take you to complete the tutorial?
Design Guide Part 2
Observe & Consider
Overview of the Final Project
The two videos that follow will overview the process of adapting a slide presentation to an online video presentation. The length of both videos is on the longer side at ~20 minutes. The topic is actually very much relevant to the workshop series, but also emulates a highly likely scenario–that of translating an existing presentation for online delivery.
Example of the finished video: Understanding Digital Essays
- Original format and duration: Face-to-face conference presentation to a group of about forty people. 75 minutes.
- Translated format: YouTube Video with voiceover. 20 minutes.
Watch the making of Understanding Digital Essays:
Practice & Apply
Activity: Practice capturing your screen with Quicktime
- Open Quicktime Player.
- Start a new screen recording from the File menu then New Screen Recording.

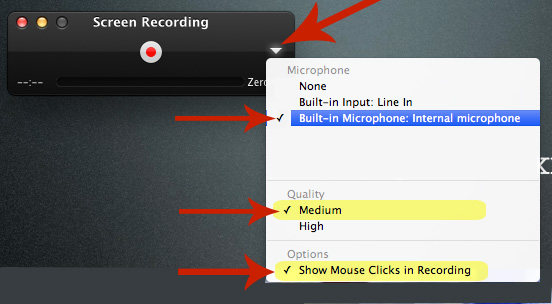
- Check audio recording input settings and quality settings before continuing. Click the arrow to reveal the dropdown menu.
- Click the red button to begin. Quicktime will prompt to drag an area of the screen or click the red button again to record the whole screen.
- Click the stop recording button or use the key combination command + control + escape to end the screen capture.
- Save and close your recording. If prompted to save a format, 720p is a good middle path.
Media Attributions
- 3-modesB
- MSA_1
- SoN-photo-copy
