
Lab 3: Trunk Wall Part II | Heart | Respiratory System
Learning Objectives:
- Identify the muscles of the thoracic cage involved in respiration and describe their functions.
- Identify the components of the respiratory system, including the trachea, bronchi, and lungs.
- Identify the great vessels transporting blood to and from the heart and outline the pattern of blood through the heart and lungs.
- Identify the internal and external anatomical features of the heart.
- Identify the valves of the heart and understand how valves regulate blood flow through the heart.
- Identify and describe the location and branches of the coronary blood vessels.
- Identify structures of the thoracic cavity using various imaging modalities, including X-Ray, CT, and Echo.
Terms to Know
|
Muscles of Respiration
Trunk Wall
Respiratory System Structures
Great Vessels
|
Heart Anatomy
Coronary Circulation
|
Introduction
In this lab, you will examine the muscles of respiration, lungs, heart, and roots of the great vessels. The lungs function for the exchange of oxygen and carbon dioxide between the alveoli and the blood. Our muscles of respiration allow us to inhale and exhale by expanding and diminishing the space in our thoracic cavity and, in turn, our lungs. The heart pumps blood throughout our body, carrying oxygen and nutrients to our tissues, carrying waste products away from our tissues, and much more.
You will have the opportunity to examine preserved human heart and lung tissue in this lab. Treat this Donor tissue with care and respect. As with all of the human tissue that we will view in this lab, we have the opportunity to examine them because the donors and their families were generous enough to allow us to learn from them. Appreciate how great this opportunity is, and give them the respect that they deserve.
Lab Activity 1: Muscles of Respiration – digital atlas
Utilize the digital atlas to explore the muscles of respiration.
- Open the Atlas app and go to Muscular System Views.
- Under the muscular system views, click on 9. Inhalation and 10. Exhalation.
- Identify the following muscles of respiration (work from superficial to deep). Highlight each muscle. The box on the upper right side of the screen shows the action of each muscle, and those actions are listed below as well. You are only responsible for the actions of these muscles (not the origin or insertion, for example). Be sure to look at the muscle from various angles and zoom levels to appreciate the architecture and orientation of the muscle fibers. This is important when considering the action of the muscle.
- External intercostals: Elevate ribs with passive inhalation
- Internal intercostals: Depress the ribs with forced exhalation
- Serratus posterior superior: Elevate the ribs with forced inhalation
- Serratus posterior inferior: Depress the ribs with forced exhalation
- Diaphragm: Expands and increases the vertical dimension of the thoracic cavity, Increases pressure in the abdominopelvic cavity
- Go back to the menu of the Atlas App and now go into the Muscle Actions tab.
- Under the muscle actions, click on Ribs elevation and Ribs depression.
- While in these views, the virtual cadaver will be moving. You can still touch each of the muscles listed above to see their role in either rib elevation or depression (inhalation or exhalation).
Lab Activity 2: Trunk Wall and Muscles of Respiration – Donors
In Lab 2 you viewed the posterior musculature of the trunk on Donor A. In this lab you will view the anterior musculature of the trunk on the Donor A, review this musculature on the Donor B, and view the muscles of the thoracic cage. Observe the following muscles on both donors:
- External oblique
- Internal oblique
- Rectus abdominis
- Transversus abdominis
Observe the thoracic cage. The ribs have been cut in order to view the contents of the thoracic cage, and you can move the anterior thoracic cage back into anatomical position. View the sternum in the center of the thoracic cavity. Palpate the manubrium, body, and xiphoid process. Also palpate the sternal angle and suprasternal notch.
Between the ribs, observe the external and internal intercostals. You will need to open the thoracic cage to observe the internal intercostals on the internal aspect.
Lab Activity 3: Heart and respiratory tissue – Donor A
Observe the heart and lungs in situ. The heart and lungs have been removed in Donor A, but they can be placed in the thoracic cavity to observe their position in situ. In Donor A, the pericardium has been removed anteriorly, and the pericardial fat remains. Observe the orientation of the heart. The right ventricle is inferior, resting on the diaphragm. The great vessels (aorta and pulmonary trunk) are visible superiorly. The right atrium is to the right, and the left ventricle is to the left. Observe the pericardium inferiorly as well. Donor A’s heart is somewhat enlarged, which is in line with the diagnosis of congestive heart failure. Enlargement of the heart is called cardiomegaly.
Observe the lungs. Donor A had COPD, and you can observe a lack of elasticity and areas of enlarged alveoli in his lungs. There are dark spots in his lungs as well, which could have been caused by smoking, secondhand smoke, exposure to environmental pollution. Be sure to feel the lung tissue in the healthy areas and in the areas with pathological change.
Lab Activity 4: Additional Heart and Lung Tissue
We also have heart and lung tissue (as well as abdominal and pelvic organs) from other Donors. Not all structures will be visible on this tissue, but you should be able to observe the structures below between the different sets of Donor tissue. Be extremely gentle when handling and turning this tissue.
- Observe the external features of the heart. In the region of the atria, notice a pouch-like structure. This is called the auricle, and there is one present on each atrium. It is visible on both the wet tissue and the plastinated hearts in the activity below.
- Observe the great vessels entering and leaving the heart. The aorta leaves the left ventricle, while the pulmonary trunk leaves the right ventricle. The aorta has thicker walls than the pulmonary trunk. The superior and inferior vena cava carry deoxygenated blood to the right atrium, while the pulmonary veins carry oxygenated blood to the left atrium. They will appear as holes in the right atrium on the plastinated hearts.
The two coronary arteries and four primary branches arteries can be seen on this heart.
- The left and right coronary arteries branch off the ascending aorta just after it leaves the heart.
- Right coronary artery – Brach off of the aorta traveling to the right in the coronary sulcus
- Right marginal artery – branching from the right coronary artery and traveling along the right margin of the heart
- Supplies the right border (margin) of the right ventricle
- Posterior interventricular artery – on the posterior aspect of the heart traveling between the right and left ventricles. This vessel is often called the posterior descending artery (PDA) in the clinical setting.
- Supplies the posterior aspect of the right and left ventricles
- Right marginal artery – branching from the right coronary artery and traveling along the right margin of the heart
- Left coronary artery – Brach off of the aorta traveling to the left in the coronary sulcus
- Anterior interventricular artery – on the anterior aspect of the heart traveling between the right and left ventricles. This artery is often called the left anterior descending artery (LAD) in the clinical setting.
- Supplies the anterior aspect of the right and left ventricles as well as the interventricular septum
- Circumflex artery – travels around the left aspect of the heart in the coronary sulcus between the left atrium and left ventricle
- Supplies portions of the left atrium and ventricle
- Anterior interventricular artery – on the anterior aspect of the heart traveling between the right and left ventricles. This artery is often called the left anterior descending artery (LAD) in the clinical setting.
- Note*** You can observe the left marginal artery along the left margin of this heart. You will not be asked to identify this artery.
The middle cardiac vein can also be seen next to the posterior interventricular artery. It drains blood from the same area supplied by the posterior interventricular artery. The great cardiac vein, which travels with the anterior interventricular artery, and small cardiac vein, which runs with the marginal artery, cannot be observed here, but you can view these veins on the laminated images or with the visible body atlas. The great cardiac vein drains blood from the area supplied by the anterior interventricular artery, and the small cardiac vein drains blood from the same area supplied by the right marginal artery. These veins drain into the coronary sinus on the posterior aspect of the heart in the coronary sulcus.
Observe the great vessels. The ascending aorta leaves the left ventricle, and then the aortic arch arches to the left. The descending aorta descends through the thoracic cavity and continues into the abdominal cavity, carrying blood to the body tissues. The pulmonary trunk leaves the right ventricle and branches into the right and left pulmonary arteries. You can follow the pulmonary arteries to the hilum of the lung.
Observe the size of the lungs. The right lung has three lobes: Inferior, superior, and middle. The oblique and horizontal fissures separate the lobes. The left lung only has two lobes due to the space taken up on the left side of the thoracic cavity. The two lobes of the left lung are separated by an oblique fissure.
Darkened spots may be observed occasionally throughout the lung. This can be evidence of smoke inhalation in some cases, and it can also occur with frequent inhalation of polluted air.
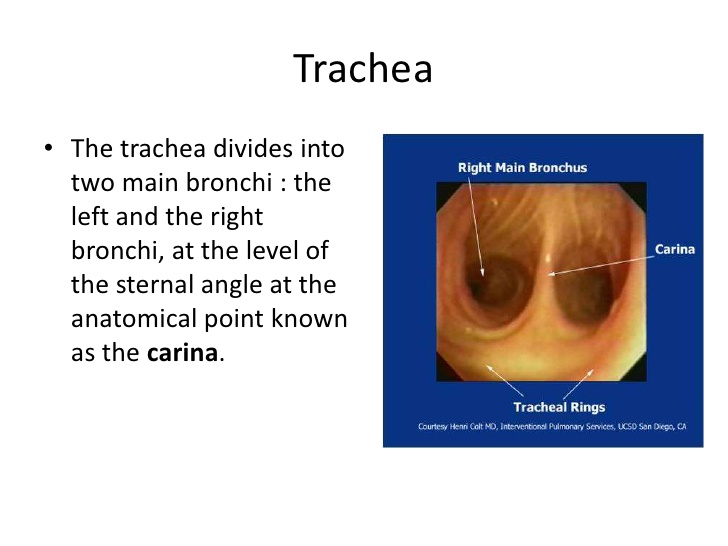
Observe the trachea and primary (main) bronchi. Feel the tissue and notice the hard cartilage. The point at which the trachea branches is called the carina. The image at the right is taken from within the trachea, looking down at the bronchi.
Observe the hilum on the medial aspect of the lungs. By the end of the unit, you will observe several organs that have a hilum. This is where neurovascular structures, and sometimes other structures, enter or leave an organ. In the lungs, you can observe bronchi, arteries, and veins in this location. The bronchi will feel hard as a result of the cartilage in their walls. Arteries have thicker walls than veins, and this will be evident in the hilum as well.
The orientation of these structures as they enter/leave the hilum is consistent and can tell you if you are looking at a right or left lung. You can use the mnemonic “RALS.”
- In the Right lung, the pulmonary artery will be Anterior to the main bronchi.
- In the Left lung, the pulmonary artery is located Superior to the main bronchi.
Lab Activity 5: Plastinated Heart Tissue
The plastinated tissue is human tissue that has been preserved in a way that hardens it. While studying this tissue, you can touch it without gloves. However, please try to limit how much you are handling it. This is because the oils and dirt on your hands can degrade the plastinated tissue over time. One of the plastinates has been cut through the right ventricle and atrium. The other has been cut through the left ventricle and right atrium. *Note: The vessel coloring is indicating arteries in red and veins in blue. The colors do not necessarily indicate oxygenated or deoxygenated blood.
When examining the plastinates, use the laminated images and/or digital atlas to help you identify structures in the list of terms and described in the previous activities and below.
- Observe the ventricles. Notice that the left ventricle is thicker than the right. The left ventricle pumps blood out to the whole body, while the right ventricle pumps blood to the lungs.
- The right (tricuspid) and left (bicuspid, mitral) atrioventricular (AV) valves prevent backflow from the ventricles into the atria. The pulmonary and aortic semilunar valves prevent backflow from the pulmonary arteries and aorta into the right and left ventricles. You should note whether or not it appears that the valve is near an artery or separating the atria and ventricles. You can also differentiate an AV valve from a semilunar valve by determining if the chordae tendineae are attached to it. The chordae tendineae prevent the AV valves from prolapsing (collapsing backward) into the atria.
- The projections from the heart wall that attach to the chordae tendineae are the papillary muscles. They provide support to prevent prolapse of the AV valves.
- The muscular ridges on the walls of the ventricles are called the trabeculae carneae. Their function is not well-understood.
- Also, observe the interventricular septum separating the right and left ventricles.
Lab activity 6: Plastinated Respiratory Tissue
Observe the lobes and fissures of the lungs. Notice the orientation of the pulmonary arteries and bronchi as they enter the lungs at the hilum. You should see that the pulmonary artery is anterior to the bronchus on the right, while it is superior to the bronchus on the left.
Observe the diaphragm. This thin muscle is the primary muscle of respiration. Notice how it is dome-shaped, extending upward into the thoracic cavity. It is innervated by the phrenic nerve, which cannot be seen on our tissue but can be seen in laminated images or in the visible body atlas. The phrenic nerve descends through the thoracic cavity and innervates the diaphragm. It originates from the C3, C4, and C5 spinal roots. Remember, C3, C4. C5 keeps the diaphragm alive. A portion of the diaphragm is also present with the trachea in Case A.
Lab Activity 7: heart and lungs – Anatomage Navigator tool
The Navigator program will be open and ready for you to use. Ask your TA if you need any help or if it is not open. Zoom in on the heart and lungs, and center them on the screen.
- Using this tool, explore the cross-sectional and internal anatomy of the heart and lungs. Hover the cursor over one of the cross-section images at the top of the screen and scroll. Compare what you see on the 3D digital model and cross-sectional images to better understand the relationship between the 3D anatomy that we typically see and how the structure appears in cross-section. For example, you will be able to see the chambers of the heart labeled as you move superiorly and inferiorly along the model. You will also see the different structures visible in the same section at different levels. The cross-sections are essentially a color version of the black and white images that you will see in radiology images. Spend some time exploring the structures in the digital model and cross-section. Be sure to view the cross sections in all three planes.
- Observe the heart, lungs, and trachea on the 3D model. Only a few structures will be visible on the 3D model, but between the digital model and the 3D model, you should identify most of the structures in the list of terms.
- You will be asked to identify structures in the cross-sectional images on the exams. A helpful method for orienting yourself to the cross-section is to identify structures that you know are surrounding a given structure. Understanding what other tissues look like around the target tissue can help you understand whether you are superior or inferior, medial or lateral, etc.
Lab Activity 8: Thoracic Radiology
View the radiology presentation in Canvas on a lab computer. You will see X-Ray imaging, Echo imaging, and CT imaging of the thoracic cavity. Identify the following structures:
X-Ray
- Lungs
- Heart
- Liver
- Ribs
- Vertebrae
Echocardiogram (echo) – Heart
- Atria
- Ventricles
- Right atrioventricular (tricuspid) valve
- Left atrioventricular (bicuspid/mitral) valve
- Pulmonary semilunar valve
- Aortic semilunar valve
- Interventricular septum
- Papillary muscles
CT
- Lungs
- Heart
- Aorta
- Liver
- Vertebrae
