
Lab 5: Radiology of the Abdomen & Pelvis, Urinary System, Reproductive System
Learning Objectives:
- Identify and describe the anatomical structures of the kidney.
- Identify the structures of the urinary system and its blood supply.
- Identify the anatomy of the female and male reproductive systems.
- Identify the structures of the pelvis using multiple imaging modalities.
Terms to Know
|
Vasculature
Kidney
Urinary Tract
|
Female Reproductive System
Male Reproductive System
|
Introduction
In this lab, you will explore the organs of the urinary system and the male and female reproductive systems. You will also observe the abdominal aorta and the arteries that branch off of the aorta along its path through the abdominal cavity. As you are using the tools and specimens in the lab today, keep in mind that not all structures will be visible using all tools.
Lab Activity 1: Urinary and Reproductive Systems – Anatamage Navigator
The navigator model has female anatomy, so you will only explore female reproductive anatomy in this section. You can review the male reproductive anatomy with Donor A, atlas images, and digital atlas. First, ensure that the Navigator is on the correct settings. You should be able to see all of the internal pelvic organs present in the 3D model. If this is not the case, click on the eye (view) icon on the toolbar and choose another preset. Be sure to view the structures in all three planes.
- Explore the kidneys, ureters, bladder, uterus, uterine tubes, and ovaries in the 3D printed model.
- Also, observe the renal arteries and veins that carry blood to each kidney. Notice that the ureters and vasculature all enter/exit the kidney in the same area. As in the lung, this region is called the hilum.
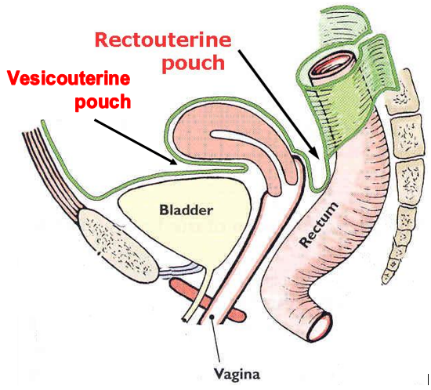
- Posterior to the bladder, observe the uterus, oviduct, and ovaries, which are structures of the female reproductive system. Though not visible in this model, the rectum would sit just posterior to the uterus. Notice the spaces between these structures. The vesicouterine pouch is located between the bladder and the uterus, while the rectouterine pouch is located between the uterus and the rectum. These pouches represent the most inferior portions of the abdominal cavity. Fluids and infections within the abdominal cavity can accumulate in these pouches, especially in the rectouterine pouch. The rectouterine pouch is also the preferred place for peritoneal dialysis, a form of dialysis used in end-stage renal (kidney) failure patients.
- Observe the kidneys in cross-section. These organs are located along the posterior abdominal wall. You can see the renal medulla/renal pyramids and the renal cortex in cross-section.
- Observe the bladder, uterus, and rectum in cross section, and view the vesicouterine and rectouterine pouches, particularly in the sagittal plane. You can also see the ovaries and uterine tubes, though they can be more difficult to discern in these cross-sections.
Lab Activity 2: Urinary and Reproductive Systems – Digital Atlas
- Open the Atlas app and go to the Digestive System Views. Click on 8. Stomach Vasculature. Click twice on veins in the column at the left to remove the veins and give you a better view of the arteries.
- Observe the aorta.
- Ascending aorta: the portion of the aorta that carries blood superiorly as it leaves the heart. This is difficult to see on these aortas, but it can be seen in the hearts.
- Arch of the aorta: the portion of the aorta the forms an arch between the ascending and descending aorta. Though the aorta has been cut open, you can generally still appreciate the arch of the aorta on this tissue.
- Descending aorta: the portion of the aorta carrying blood inferiorly. The portion of the descending aorta located in the thorax is called the thoracic aorta, while the portion located in the abdomen is called the abdominal aorta.
- Between the liver and stomach, click on the celiac trunk branching off of the descending aorta. It is a midline, unpaired artery.
- Three branches of the celiac trunk supply the digestive tract from the inferior esophagus through the first half of the duodenum of the small intestines and the spleen and liver: the common hepatic artery, splenic artery, and left gastric artery. You observed these branches in the previous lab, and you can see them in this view in the digital atlas.
- Hide the stomach, body of the pancreas, transverse colon, ileum, and jejunum. Click on the superior mesenteric artery, which branches from the aorta just inferior to the celiac trunk. Notice its branches that supply the second half of the duodenum of the small intestines to the first 2/3 of the transverse colon.
- Click on the inferior mesenteric artery, which branches from the aorta more inferiorly. Notice its branches supply the digestive tract from the distal 1/3 of the transverse colon to the rectum.
- Click on Arteries in the column at the left to show the rest of the arteries. The most inferior aspect of the aorta branches into the right and left common iliac arteries. The common iliac arteries then branch into the internal iliac artery, which supplies pelvic and gluteal structures, and the external iliac artery, which supplies the lower extremity.
- Click on Veins in the column at the left to show the veins again. Observe the inferior vena cavaascending next to the aorta. This vessel carries blood from the legs and abdomen back to the heart.
- Observe the aorta.
- Go to the Urinary System Views click on 10 or 11. Renal Vasculature. From this view, you will be able to identify the following structures to know for this lab; Renal Pyramids, Renal Pelvis, Ureter, Renal Arteries, Renal Veins, Inferior Vena Cava, Descending Aorta. You will not be able to see all of the structures from the list of structures under Kidney. You will have to rotate the figure around, zoom, zoom out, and tap on the structures to find exactly what you are looking for. As with all of the structures, feel free to click on the book icon to read a little further on the function of the structure.
- Back to the systems view, open the Urinary System View again, and click on 18 or 19. Bladder Section (M or F). From this view, you will identify the following Urinary Tract structures; Ureters, Urinary Bladder, Urethra (Male only – Prostatic Urethra, Membranous Urethra, Spongy Urethra), Prostate Gland, Testes, Epididymis, (Vas) Ductus Deferens. (***NOTE, to see the different parts of the male urethra, you will have to hide the muscles of the penis; ischiocavernosus, corpus cavernosum, and bulbospongiosus). You will have to rotate the figure around, zoom, zoom out, and tap on the structures to find exactly what you are looking for. As with all of the structures, feel free to click on the book icon to read a little further on the function of the structure.
- Back to the systems view, open the Reproductive System View and click on 2. Pelvic Region (M). From this view, you can identify most of the male reproductive system structures: Testes, Epididymis, (Vas) Ductus Deferens, Prostate Gland, and Penis. (**To see the Glans, Corpus Cavernosum, Corpus Spongiosum, Testicular Artery, and Pampiniform Plexus, you will have to hide the fascial layers of the penis and testes twice, then these structures will be visible.) Again, you will have to rotate the figure around, zoom, zoom out and tap on the structures to find exactly what you are looking for. As with all of the structures, feel free to click on the book icon to read a little further on the function of the structure.
- Back to the systems view, open the Reproductive System View again, and click on 18. Location of Organs (F). From this view, you will appreciate where the female reproductive organs are in relation to the pelvis. You will be able to see the following structures; Ovaries, (Fallopian) Uterine Tubes, Uterus, Vagina, Labia Majora, and Minora, as well as the Clitoris. Again, you will have to rotate the figure around, zoom, zoom out, and tap on the structures to find exactly what you are looking for. As with all of the structures, feel free to click on the book icon to read a little further on the function of the structure.
- Back to the systems view, open the Reproductive System View again and click on 3. Internal Genitalia (M), 9. External Genitalia (M), 17. Internal Genitalia (F) and 22. External Genitalia (F). These views will allow you to see the internal and external genitalia and allow you to remove surrounding structures and layers to see more anatomy of the region. As with all of the structures, feel free to click on the book icon to read a little further on the function of the structure.
Lab activity 3: Donor A and Donor Kidneys
Observe the structures of the urinary system and reproductive system on Donor A. Begin by observing the kidneys. The kidneys remove waste products from the blood and work to control fluid and electrolytes in the body. The latter function allows them to play a role in blood pressure regulation as well. Observe the renal artery and renal veins supplying and draining blood from the kidneys, respectively. Also observe the ureter leaving each kidney and traveling inferiorly to the posterior wall of the bladder.
Also examine the donor additional kidneys, which have been opened. Comparing these structures to an atlas image, observe the following features:
- Renal cortex
- Renal pyramids
- Renal medulla (Darker area made up of the renal pyramids)
- Major calyx
- Minor calyx
- Renal pelvis
- Renal column
Examine the hilum of the kidney. This is where the renal arteries enter the kidneys, and the renal veins and ureters exit the kidneys.
Donor A – Male Reproductive Organs and Urinary System Organs
Gently move the intestine aside to observe the right and left kidneys one at a time. Emerging from the right kidney, locate the renal vein. Follow the renal vein medially from the kidney to where it merges with the inferior vena cava. Moving superiorly, trace the inferior vena cava as it travels posterior to the portal triad and continues posterior to the liver. The left kidney presents very fatty. It has been left undissected to compare the appearance of a fatty kidney.
Observe the urinary bladder. It has been cut so that you can observe the lumen and the muscular wall of the organ. On the posterior left side of the bladder observe the ureter, Notice how the ureters enter the inferior posterior aspect of the bladder. The ureters carry urine to the bladder, where the urine is stored until it is expelled through the urethra. They enter the bladder at an angle. As the bladder fills with urine, the pressure on the ureters within the wall of the bladder increases and prevents the backflow of urine into the ureters. Note the size of the ureters and imagine passing a kidney stone through these structures. The ureters are highly innervated, and passing kidney stones are excruciating. If the stone is too large, it cannot pass through these narrow structures and remains in the kidney. In atlas images, observe the urethra. The male urethra has three parts: the prostatic urethra, membranous urethra, and spongy urethra. The prostatic urethra is surrounded by the prostate gland. The female urethra is much shorter and is positioned anterior to the vagina.
Observe the testes and the epididymis.
Observe the ductus deferens. This structure travels from the testicle through the spermatic cord and inguinal canal into the pelvic cavity. Notice the artery traveling from the aorta into the spermatic cord. This is the testicular artery that supplies the testicle with blood. It is traveling through the abdominal cavity with the testicular vein. You can observe some of the pampiniform plexus of veins around the testicular artery in the spermatic cord, especially on the right where the cord is still bound by fascia.
Now observe the penis. The glans and external urethral orifice are both visible distally.
Lab activity 4: Pelvic Radiology
View the imaging presentation of the pelvis on the lab computers. You will have the opportunity to see X-Ray imaging, CT imaging, and a fluoroscopic study of the pelvis. As you are watching the images, we would like you to identify the anatomical structures presented to you. You may not be able to see all of the structures from each view. (An HSG is a fluoroscopic image where dye is injected into the uterus to evaluate for blockages of the uterine tubes.)
X-Ray
- Lumbar vertebrae
- Inter-vertebral Space (what fits here?)
- Ribs (which ones can you see and what vertebrae do they originate from?)
- Liver
- Colon
- Bladder
- HSG
- Uterus
- Fallopian Tubes
CT
- Lungs
- Liver
- Spleen
- Kidneys
- Renal Arteries
- Stomach
- Small intestine
- Large intestine
- Descending Aorta
- Common Iliac Artery
- Hepatic Portal Vein
- Bladder
