
Lab 4: Abdominal Quadrants, Digestive System, and Abdominal Radiology
Learning Objectives:
- Identify the vasculature of the digestive system and accessory organs, including the great vessels and associated branches.
- Identify the structures of the alimentary canal and the accessory organs of the digestive system.
- Identify the ducts carrying bile from the liver and gallbladder to the duodenum.
- Identify the quadrants of the abdomen and list the organs found in each quadrant.
- Identify structures of the abdominal cavity using various imaging modalities.
Terms to Know
|
Vasculature
Digestive Tract
|
Accessory Digestive Organs
Other Abdominal Organs
Abdominal Quadrants
|
Introduction
In this lab, you will learn about the organs of the digestive system located in the thorax, abdomen, and pelvis. This includes both the organs of the alimentary canal or digestive tract and the accessory digestive organs. Though the spleen is not part of the digestive tract, we will discuss it today due to its location in the abdomen. You will also organize the organs into their abdominal quadrants and observe them in cross-sections and radiology.
As you use the various tools and specimens in the lab today, keep in mind that not all structures will be visible using all tools. Try to identify the structures on the specimens. If they are not visible on the specimens, observe them using atlas images or the Navigator.
Lab Activity 1: Abdominal Quadrants Exercise
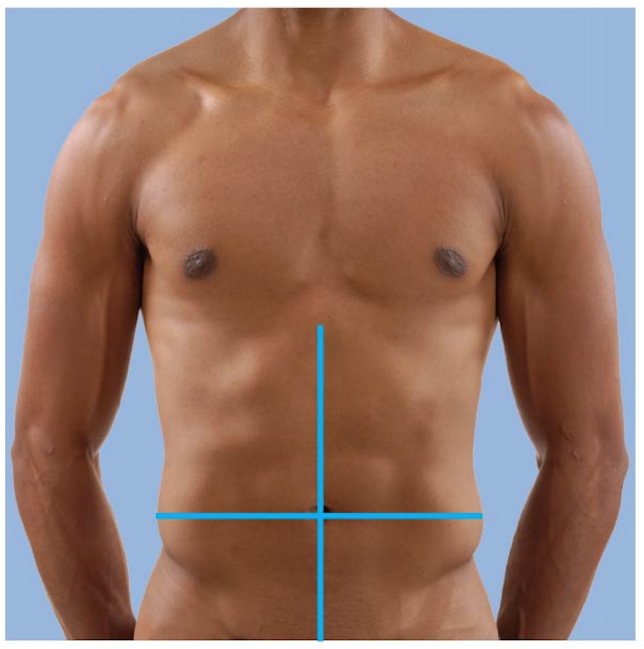
How do you evaluate the location of internal organs when you can’t see them? It is of critical importance for clinicians in various health science fields to navigate the location of these organs when looking at the abdomen. Where to palpate (feel with your hands), what type of pain is produced, and does pain move or extend into other quadrants are all key questions a clinician may want to know. The umbilicus (aka your belly button) is the center of a grid or intersection of two lines that form the abdominal quadrants. We orient by designating the quadrants by anatomical location (not the way YOU look at them), Upper Right Quadrant (URQ), Upper Left Quadrant (ULQ), Lower Left Quadrant (LLQ), and Lower Right Quadrant (LRQ).
There will be a grid on a table in the lab, like the one shown above. Each organ, or part of an organ (hint: some are in more than one quadrant), is listed on laminated cards. Your task is to properly label each quadrant and then place each organ (label) into the quadrant where it is found in the abdominal cavity. For example, the appendix card goes in the lower right quadrant, etc.
Lab Activity 2: Digestive Organs – Digital Atlas
Open the Atlas app on the iPad and go to the Digestive System Views. Click on 11. Regional Vasculature. From this view, you will be able to identify all of the vasculatures from the list of structures to know for this lab; Inferior Vena Cava, Hepatic Portal Vein, Celiac Trunk, Splenic Artery, Common Hepatic Artery, and Left Gastric Artery. You will have to rotate the figure around, zoom, zoom out, and tap on the structures to find exactly what you are looking for.
Back to the systems view, open the Digestive System View again, and click on 7. Alimentary Canal. From this view, you will identify the following digestive structures; Esophagus, Stomach, Cardiac Sphincter, Pyloric Sphincter, Duodenum, Cecum, Appendix, Ascending Colon, Transverse Colon, Descending Colon, Sigmoid Colon, and Rectum. (**NOTE: You cannot see some of the stomach features on the app, but you will be able to see these on the wet specimen. The app does have the muscular layers of the stomach that are pretty cool to see.) You will have to rotate the figure around, zoom, zoom out and tap on the structures to find exactly what you are looking for.
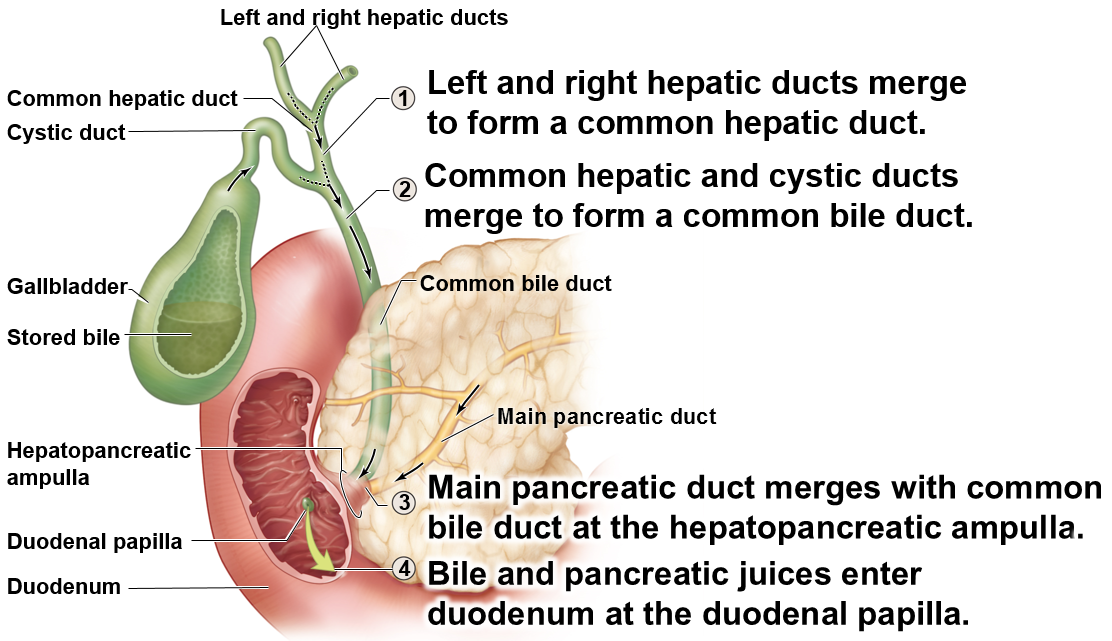
Back to the systems view, open the Digestive System View again, and click on 10. Accessory Organs. From this view, you will be able to identify the following accessory digestive organs; Liver (***NOTE you cannot identify the lobes well using the app aside from the Caudate Lobe), Common Hepatic Duct, Gall Bladder, Cystic Duct, Common Bile Duct, Pancreas (you can find the Pancreatic Duct if you hide part of the Duodenum). Again you will have to rotate the figure around, zoom in, zoom out, and tap on the structures to find exactly what you are looking for.
Back to the systems view, open the Digestive System View again and click on 2. Lower Digestive System. From this view, you will be able to identify the Greater Omentum. As with all of the structures, feel free to click on the book icon to read a little further on the function of the structure.
Lab Activity 3: digestive system organs – Anatomage Navigator
First, ensure that the Navigator is on the correct settings. You should be able to see all of the internal organs present in the 3D model. If this is not the case, click on the eye (view) icon on the toolbar and choose another preset.
Observe the abdominal organs in cross-section. You should observe each structure in cross-sectional images based on the spatial relationships between structures. Be sure to view the cross sections in all three planes. In the coronal cross-sectional image, you are looking at the individual as if they are laying on their back, and you are looking up at them from their feet.
Go to the level of the heart and observe that the esophagus sits directly anterior to the vertebral column and posterior to the trachea (in the superior thorax). The aorta sits just anterior and slightly to the left of the esophagus.
Move inferiorly and notice that the liver takes up a large portion of the superior abdominal cavity. Continue moving inferiorly. Examine the cross-sectional images with respect to where in the 3D image you are, and explore the digestive structures you can see in cross-section.
Use the advanced view to observe structures on the “List of Structures” for this lab. You can choose to view gastrointestinal structures. You can also unclick that box and instead view the great vessels by clicking on Cardiovascular in the system column, for example, and narrowing down the structures using the Category and Structure columns. Keep in mind that some structures are better viewed in an atlas or on the bones or specimens.
Lab Activity 4: Digestive organs and spleen – Donors A and B and Prosected donor Organs
For the donor organs, ensure that you are viewing the anterior aspect of the tissue, as if the individual was supine. Observe the organs in anatomical position. Keep in mind that not all structures are visible on each specimen. Be sure to observe all tissue, as there is some anatomical variation. You may not be able to observe every structure well on each donor, but you will be able to observe each structure on at least one donor or organ set. As a reminder, treat these organs with care and respect. Your group should have an atlas or iPad with you as a reference when examining these organs.
In the Donor A observe the greater omentum overlying the abdominal organs anteriorly. The greater omentum is one of the mesenteries of the abdominal cavity. The mesenteries hold organs in place, store fat, and provide a route for vessels and nerves to reach the organs. Gently move the greater omentum to see the spatial relationships between the organs in situ.
Superiorly, observe the esophagus. The esophagus is located along the midline, just to the right of the descending aorta, and just anterior to the vertebral column and (superiorly) posterior to the trachea. The esophagus has to pass through the posterior aspect of the diaphragm to reach the stomach. Feel where the esophagus meets the stomach and notice a subtle thickening in this area. This sphincter works to prevent regurgitation of stomach contents back into the esophagus.
Now observe the stomach in anatomical position, and notice the lesser curvature to the donor’s right and the greater curvature to the donor’s left. Notice the location of the stomach with respect to the surrounding organs. The liver sits just superior and to the right of the stomach, while the spleen is to the left (and somewhat posterior in anatomical position). Use the digital atlas as a reference and try to identify the different regions of the stomach. The cardiac region is nearest the esophagus, and the fundus is the most superior, dome-shaped region. Though the borders are difficult to ascertain, the central region of the stomach can be considered the body. Near the entrance to the duodenum is the pyloric region of the stomach. As the stomach approaches the duodenum, feel the very thick pyloric sphincter. This regulates the passage of digested materials from the stomach to the small intestines. You may need to move lift the liver slightly to access the pyloric sphincter. Use the atlas images to observe the rugae, or folds on the interior surface of the stomach.
Observe the small intestine. The duodenum is the first portion of the small intestine leaving the stomach. The ilium is the last portion of the small intestine that meets the large intestine, and the jejunum is in between. On an atlas image, notice folds within the small intestines, which help to increase surface area for nutrient absorption. Notice the mesentery holding the small intestine in place and providing a pathway for the neurovascular to reach the organ. Some of the mesentery has been dissected so that you can view the neurovasculature, which is coming from the superior mesenteric artery (you will view this artery in the next lab).
Observe the large intestine and its subregions, using the digital atlas or another atlas image as a guide: the cecum, ascending colon, transverse colon, descending colon, sigmoid colon, and rectum. The primary function of the large intestines is the absorption of water. Observe the small section of the ilium of the small intestine that is attached to the cecum, and feel the ileocecal junction. The cecum is larger in diameter and somewhat pouch-like. It also has a small tube-like structure extending from it. That is the appendix. Though its function was misunderstood for a long time, we now know that the appendix has lymphatic and immune functions. Follow the large intestine throughout its path to the sigmoid colon and rectum.
Now observe the liver. The liver is involved in many functions, including bile production; detoxification of drugs, metabolites, and poisons; storage of certain vitamins and nutrients; and synthesis of blood plasma proteins. Use atlas images to help you identify the lobes of the liver. There is usually a thin layer of tissue that separates the right and left lobes. You can identify the caudate (posterior) and quadrate (anterior) lobes on the inferior aspect. The caudate lobe may be difficult to see as it may be blocked by other tissue. The vasculature is located on the posterior and inferior aspects of the liver. The largest, thin-walled vessel is the inferior vena cava. This vessel ascends through the abdomen and carries blood from the lower extremities and trunk back to the heart. It picks up blood that has been processed in the liver along its path.
Observe the gallbladder on the inferior aspect of the right lobe of the liver. The gallbladder is green because it stores the bile that has been produced by the liver, and bile is green. Bile plays an important role in fat digestion.
In Donor A, view the common bile duct, hepatic portal vein, and common hepatic artery traveling next to each other towards the liver. From a superior view you can see the inferior vena cava on the posterior aspect of the liver. Observe the cystic duct and common hepatic duct that merge to form the common bile duct. Bile is carried from the liver through the common hepatic duct. The cystic duct connects the common hepatic duct to the gallbladder. The duct formed by the merging of the common hepatic duct and cystic duct is the common bile duct. When food enters the small intestines, bile travels from the liver via the common hepatic duct and gall bladder through the cystic duct, then through the common bile duct to the duodenum.
Two vessels travel alongside the common bile duct to the liver. The smaller but thicker-walled vessel is the common hepatic artery. This artery supplies oxygenated blood to the tissue of the liver. This is a branch of the celiac trunk. The larger but thin-walled vessel is the hepatic portal vein. This vein carries blood from the digestive tract to the liver to be processed and detoxified before entering general circulation.
Observe the pancreas just inferior and somewhat deep to the stomach. It is light yellow in color and more granular than nearby adipose (fat) tissue. Pancreatic endocrine cells secrete insulin and glucagon into the blood to regulate blood sugar levels. Pancreatic exocrine cells produce enzymes and bicarbonate that are key for digestion in the small intestines. The pancreatic duct joins the common bile duct at the hepatopancreatic ampulla before emptying its contents into the duodenum. Follow the common bile duct to the duodenum. From there, you can follow the pancreatic duct a short distance into the pancreas. Notice how the hepatopancreatic ampulla, where these ducts meet, is very short and somewhat enlarged. These ducts empty their contents into the duodenum at the duodenal papilla.
Observe the artery that is twisting and winding near and in the pancreas. This is the splenic artery. It is a branch of the celiac trunk, and it supplies the spleen, part of the stomach, and part of the pancreas. The left gastric artery is the third branch off of the celiac trunk, and it supplies the rest of the stomach and inferior esophagus. You can tell which artery is which based on where it is traveling.
Observe the spleen. This structure is part of the lymphatic system, not the digestive system, but we will examine it today due to its location in the superior abdomen, surrounded by digestive organs. This organ recycles old blood cells, kills bacteria and other foreign particles, and plays an important role in the immune system.
Lab Activity 5: Abdominal Cavity Radiology
View the presentation on the computers in the lab on the radiology of the abdominal cavity, specifically the digestive organs and spleen. The slides will also be posted as a study tool. Observe the following structures in the radiology images.
- Stomach
- Pancreas
- Liver
- Small intestines
- Ascending colon
- Transverse colon
- Descending colon
- Hepatic flexure
- Splenic flexure
- Spleen
- Abdominal Aorta
- Inferior vena cava
