Part 5: The Gradebook
Connecting Activities to the Gradebook
After you have finished the Setup wizard, you can begin to build your Gradebook. Setting up your Gradebook for the first time may seem daunting, but it is a crucial component to grading in D2L – and will save you time in the long run.
Grade Categories vs. Grade Items
Your Gradebook is built of two components: Categories and Items. The difference between the two can be confusing.
Categories: Categories are containers in which you place grade Items. They are not linked to any assignment or assessment. They are there to organize Items.
Items: Items are linked to Assignments or Assessments and are organized within Categories.
How Categories and Items interact depends on the grade system you selected in the Setup Wizard.
Overview of the Weighted and Points Grade Systems
There are a few different grade systems you may choose to use in D2L, this guide will explore two of the most popular. It makes little difference which grading system you choose. Just go with the method that makes the most sense for you.
Weighted Grade System
As reviewed in the module Building the Gradebook with the Setup Wizard, a weighted Category is a grouping of grade Items that together represent a fixed percentage of the final grade. For example, Participation could be one Category, and worth 20% of a student’s final grade. That means that no matter how many points each grade item within the Participation grade category may be worth, their total impact on the final grade will be 20%. See the example below.
Grade Category: Assignments (20% of final grade)
Grade Item: Assignment #1 (50% of Assignments Category)
Grade Item: Assignment #2 (50% of Assignments Category)
Grade Category: Participation Category (20% of final grade)
Grade Item: Week 1 Participation (25% of Participation Category)
Grade Item: Week 2 Participation (25% of Participation Category)
Grade Item: Week 3 Participation (25% of Participation Category)
Grade Item: Week x Participation (25% of Participation Category)
Grade Category: Exam Category (60% of final grade)
Grade Item: Grade Item: Mid Term (30% of Exam Category)
Grade Item: Final Exam (70% of Exam Category)
——————————————–
Final Grade: /100%
Points Grade System
The points system calculates the final grade by totaling together the points users received on grade items.
As reviewed in the module Building the Gradebook with the setup wizard, the Points Grade System, assigns each grade Item a point value and calculates grades based on the points each student earned over the course of the semester. In this system, categories serve no purpose other than helping you organize your Gradebook.
Let’s return to the Participation example. Each grade item in the Participation category is worth 12.5 points of the final grade which totals 250 points. The Mid Term and Final Exam have much bigger impacts on the grade. They are worth 50 and 100 points respectively.
Just as with the Weighted grade system, D2L will calculate the grade as a percentage. However, with the points grading system, the percentage will be based on the total number of points (in the example above 250), and not a percentage out of 100 (for example 80/100 = 80%).
Grade Category: Assignments (50 points total)
Grade Item: Assignment #1 (25 points)
Grade Item: Assignment #2 (25 points)
Grade Category: Participation Category (50 points total)
Grade Item: Week 1 Participation (12.5 points)
Grade Item: Week 2 Participation (12.5 points)
Grade Item: Week 3 Participation (12.5 points)
Grade Item: Week x Participation (12.5 points)
Grade Category: Exam Category (150 points total)
Grade Item: Grade Item: Mid Term (50 points)
Grade Item: Final Exam (100 points)
——————————————–
Final Grade: /250 points
Building Categories in a Weighted Grading System
Step 1:
If you plan to use a Weighted Grading System ensure that you have selected Weighted in the Setup Wizard. See Building the Gradebook with the Setup Wizard for additional details.
Step 2:
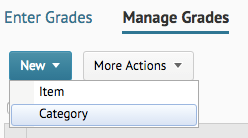
Go to Manage Grades. Click on “New” and choose “Category.”

Step 3:
Under the Properties tab in the New Category page, enter a category name, and if you wish, provide a Short Name.
Step 4:
Choose the category’s weight, or the percentage it will contribute to the final grade.
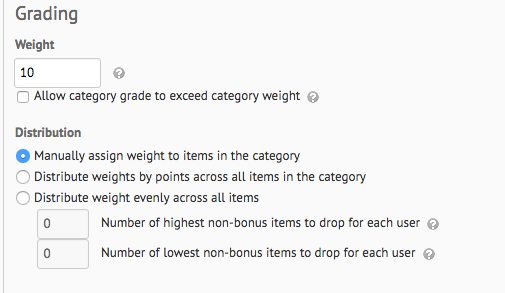
If you plan to provide students extra credit opportunities within this category you may consider checking the box next to Allow category grade to exceed category weight. This will mean that if a student’s category grade is 105%, the 5% above the max category points will be counted towards the student’s final grade.
Step 5:
Select how D2L will distribute points and percentages to the Grade Items within the category.
Manually assign weight to the items in the category:
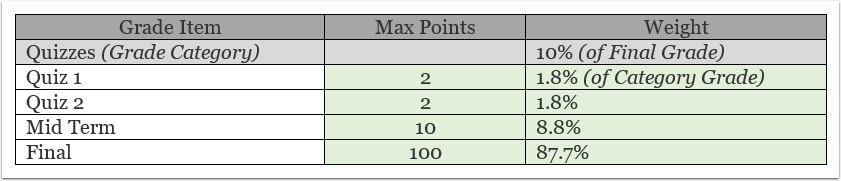
This means you will have to calculate the percentage each individual grade item in the category is worth. All Grade Item percentages will need to equal 100% in the category. (See the Weighted Grade System example above)
Distribute weight by points across all items in the category:
Choosing this option means D2L will weigh the Max. Points of each grade item, and convert them to a percentage grade. If addition Grade Items are added or removed from the Category, D2L will automatically adjust points and percentages.
For example:
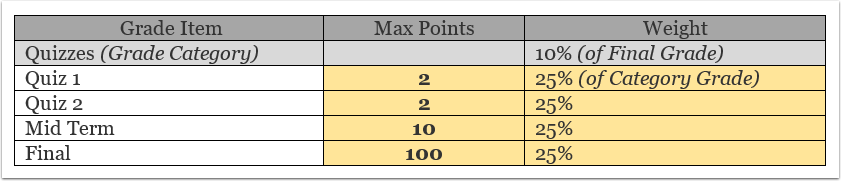
Distribute weight evenly across all items:
Choosing this option means that each grade item will count the same towards the Category Grade, no matter the number of Max Points you assign the activity.
Let’s look at the above Quizzes example once more, but now with each grade item weighed the same. Here we see that even though Quiz 1 is worth a maximum 2 points and the Final is worth 100, they will both have the same impact on a student’s final grade as each are weighed the same (25% of Category Grade).
Note: Most instructors do NOT choose to weigh quizzes the same as a final exam!
Building Categories in a Points Grading System
Step 1:
If you plan to use a Points Grading System ensure that you have selected Points in the Setup Wizard. See Building the Gradebook with the Setup Wizard for additional details.
Step 2:
Go to Manage Grades. Click on “New” and choose “Category.”
Step 3:
Under the Properties tab in the New Category page, enter a category Name, and if you wish, provide a Short Name.
Step 4:
If you plan to provide students extra credit opportunities within this category you may consider checking the box next to Allow category grade to exceed category weight. This will mean that if a student’s category grade is 105%, the 5% above the max category points will be counted towards the student’s final grade.
![]()
Step 5:
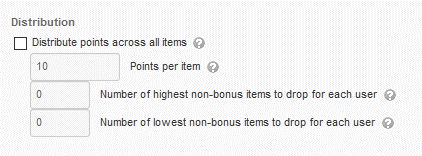
Choose how D2L will distribute points and percentages to the Grade Items within the category. If you want all grade items to be worth the same number of points, click the box next to Distribute points across all items. You will then have the option of setting how much each grade item within this category will be worth and whether or not you wish to drop either the highest or lowest grade item for each user.
If you wish to set the point value of each grade item within a category. You do not yet need to do anything. You will assign point values as you create grade items.
Building a Category Continued: Settings found in both Weighted and Points Grading Systems.
After you have made your initial category settings in either your weighted or points grading systems, you should next set the following options.
Set Category Display Options
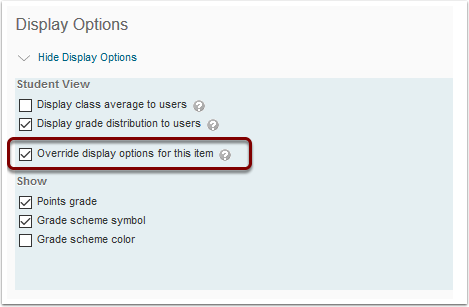
Here, you will choose how students see their grades in this category. You can allow students to view class average and grade distribution. You may, if you wish choose to Override display options for this item (category). This will override the course’s global display settings (those you built in the Gradebook Setup Wizard), and will only impact the display of grades in this category.
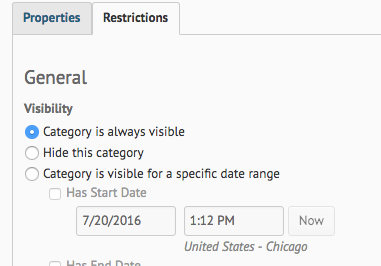
Optional: You may choose to “hide” the grade item from the students for a certain amount of time. This can be done by clicking on the “Restrictions Tab.” However, this should only be done for specific targeted purposes, such as not revealing any individual’s grade until after you have had a chance to discuss the assignment in class.
Grade Items
When you build quizzes or a Dropbox assignment, it will not automatically link to the Gradebook, they must be connected, or associated, to a Grade Item.
Grade Items can be created prior to creating assignments, or on the fly as you create assignments in D2L. The process is the same. To learn how to create a Grade Item from the Gradebook or within a tool, refer to the following step-by-step instructions.
Creating Grade Items
We will first walk through the settings for a Grade Item, then we’ll take a look at how to create a Grade Item in different tools.
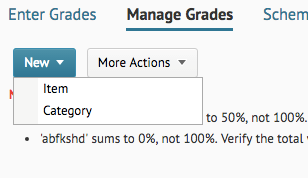
Step 1:
From the Manage Grades page, click on New and then Item.
On the New Item page you will be asked to choose the Grade Item Type. The standard Grade Item is Numeric, and I suggest that you select it. You may choose other types, though they will not be covered here.
Step 2:
On the next page, begin by giving the Grade Item a name. If it is a very long name, you may also choose to also give it an abbreviated Short Name to ease subsequent navigation.
Step 3:
Select the Category in which to place your item.
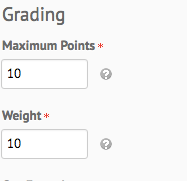
Step 4:
Choose the points you wish to assign to the Grade Item. If in either the Weighted or Points Grading Systems, you indicated that weight/points should be distributed equally across Grade Items, the “Weight” field will automatically populate, and you will not be able to change it (from this screen). If you indicated that you will assign the weight/points manually, you will need to fill in that field at this point.
Step 5:
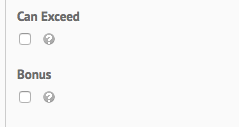
You may wish to give extra credit points to the Grade Item. Click the box below Can Exceed if you want students who achieve a grade higher than 100% to receive more than the maximum number of points for this item. If you wish to make the entire assignment extra credit, choose Bonus.
Items that are Bonus, only add to a student’s grade, they will not subtract from the total.
Step 6:
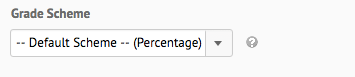
If you wish to use a different Grade Scheme (other than the course’s default), you may choose the Grade Scheme from the drop-down menu. Grade Schemes should be created prior to Grade Items. See the module Creating and Editing Grade Schemes for more information.
Step 7:
You may wish to use a D2L rubric to grade the assignment. If you have already created a rubric, you may choose it by clicking on “Add Rubric.” You may also create a rubric from the Grade Item. See the module Rubrics for Feedback and Grading to learn more.
Step 8:
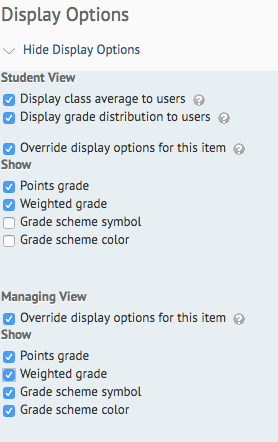
Set Grade Item Display Options
Setting the display options for a grade item overrides the settings made at the grade Category level. Selecting the box next to Override display options for this item will override (for this grade item only) all settings made in the Gradebook Setup Wizard, and the Grade Category level.
It is strongly suggested that you set the Grade Display options in the Gradebook Setup Wizard, and not at the Grade Item or Grade Category levels. Exceptions should be rare and for a specific pedagogical purpose.
Creating Grade Items in a Dropbox Folder
Step 1:
Go to the Dropbox Folders page. Select either the blue New Folder box or, if you have already built a Dropbox folder, click on the triangle next to the folder for which you wish to create a grade item. Select Edit Folder.
Step 2:
In the New Folder page, you will be first directed to the Properties tab. Underneath the Folder Type options you will see the Category box. This is for placing Dropboxes in various categories, not the Gradebook categories. Dropbox Categories are only for organization and have no connection to Gradebook Categories. You can ignore this option if you like.
Step 3:
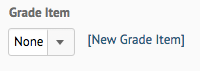
Beneath the Dropbox Category box is the Grade Item box. If you have already created a Grade Item, click on the triangle next to the box and select the appropriate grade item for this Dropbox folder from the drop-down menu.
If you have not created a Grade Item for the Dropbox folder, you can do so by clicking on the link “New Grade Item” and following the procedure described at the beginning of this module.
Step 4:
Finish building Dropbox – for additional information see the Collect Assignments with Dropbox module.
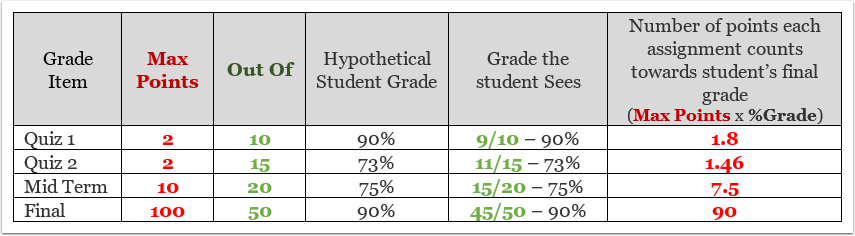
Grade Items: Maximum Points vs. Out of Score
You should be aware of the sometimes confusing difference between the Maximum Points of a Grade Item and the Out of Score of a Grade Item.
The Maximum Points score sets the maximum number of points a student might receive after completing an activity. This score directly impacts the final grade. The more points an activity is worth, the bigger impact that activity has on the final grade.
The Out of Score only impacts a student’s final grade indirectly. No matter if the Out of Score of an activity is set to 1 or 1,000, its impact upon a student’s final grade is determined by the Max (possible) Points that activity is worth.
However, an activity’s Out of Score is not entirely arbitrary. Instructors frequently link the Out of Score to the number of problems or actions sets in an activity, and/or the difficulty of those actions.
For example if there are 10 questions in a test, an instructor may set that test’s Out of Score to 10.
Or, in an other example, if a test has 10 questions, but the last 5 are particularly complex, the instructor may wish to weigh those final questions more heavily. In that case the Out of Score may be set at 15: the first five questions are each worth 1 point, and that last five questions are each worth 2 points.
(5 x 1) + (5 x 2) = 15.
In both of these examples, the activity’s impact is set by its Max (possible) Points value and not its Out of Score.
D2L uses the Out of Score to calculate a percentage grade and then employs that percentage to calculate how many of the Max (possible) Points a student will receive in an activity.
Let’s look at an example:
Creating Grade Items in a Discussion Topic
Step 1:
Go to the Discussion page. Select either the blue New box or, if you have already built a Discussion Topic, click on the triangle next to the topic for which you wish to create a grade item. Select Edit Topic.
If you are unfamiliar with how to build a Discussion topic see the Planning and Building Online Discussions module, and then return to this page to continue.
Step 2:
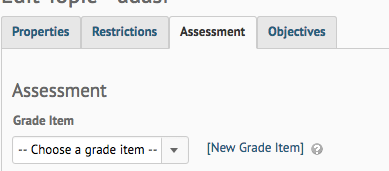
When you first start creating a new discussion Topic, or first begin editing an existing one, you will first be directed to the Properties tab. To associate or create a Grade Item for the Topic click on the Assessment tab.
Step 3:
If you have already created a Grade Item, you may associate the Discussion Topic to it by choose the name of the Grade Item from the drop-down menu. If you have not created a Grade Item for the Discussion Topic, you can do so by clicking on the link “New Grade Item” and following the procedure described above.
Step 4:
If you have already created a Grade Item, click on the triangle next to the Grade Item box and select the appropriate grade item for discussion topic. If you have not created a Grade Item for the discussion topic, you can do so by clicking on the link “New Grade Item” and following the procedure described at the beginning of this module.
Creating Grade Items in a Quiz
Step 1:
Go to the Manage Quizzes page. Select either the blue New Quiz box or, if you have already built a Quiz, click on the triangle next to the topic for which you wish to create a grade item. Select Edit.
If you are unfamiliar with how to build or edit a Quiz see the Building a Quiz in Desire 2 Learn module. Then return to this page to continue.
Step 2:
When you first create a new Quiz, or first begin editing an existing one, you will be directed to the Properties tab. To associate or create a Grade Item for a Quiz you need to navigate to the Assessment tab.
Underneath the Name box you will see the Category box. This is for organizing Quizzes into categories on the Manage Quiz page. It has no bearing upon the Gradebook, or Gradebook categories. You can ignore this option if you like.
Please Note: If you are building a new quiz, I suggest you first follow the instructions from the <link>Quiz Module</link> before continuing to the Assessment Tab.
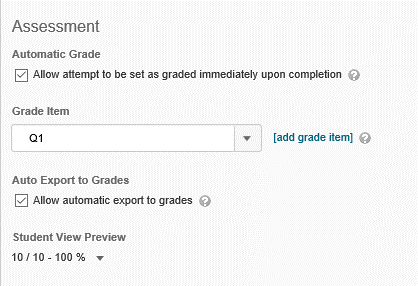
Step 3:
If you wish the Quiz to be graded automatically, you must follow the three sub-steps listed.
A) Click Allow the attempt to be set as graded immediately upon completion.
B) Associate Grade Item to Quiz: If you have already created a Grade Item, you may associate the Quiz to it by selecting the name of the Grade Item from the drop-down menu. If you have not created a Grade Item for the Quiz, you can do so by clicking on the link New Grade Item and following the procedure described at the beginning of this module.
C) Finally, click the box next to Allow automatic export to grades.