Part 5: The Gradebook
Rubrics for Feedback and Grading
Rubrics Overview:
Rubrics serve two basic functions.
- Explain grading criteria prior to assessment – Rubrics are an effective way to create transparency in the grading process. By explicitly defining the grading criteria and the common aspects present at different levels of achievement, students can work towards a final product with a clearer understanding of instructor’s expectations.
- Explain grading criteria following assessment – Rubrics can also make it simple for instructors to offer students meaningful feedback that touches on each of the main grading components of an activity. Grading rubrics provide students a clear comparison to their own work and the criteria to which they were judged.
The two types of rubrics share many characteristics. However, they will differ in language, especially in how you explain an activity’s core learning objectives to students.
Desire2Learn Terminology
- Criteria: In an analytic rubric, criteria are rows. Criteria are the things that will be graded (e.g.: argument, evidence, mechanics). Holistic rubrics have only one criteria.
- Levels: Levels are the different plateaus of achievement that students can get on a criteria (e.g.: Exemplary, Meets expectations, Needs improvement).
- Range: A range is the percentage span that is possible in a holistic rubric.
- Analytic: Analytic rubrics form a grid to assess students on multiple criteria (or things that will be graded).
- Holistic: Holistic rubrics assess students on a single criteria. They work much like a letter grade, but offer additional feedback for each level.
Analytic vs. Holistic Rubrics
Desire2Learn (Learn@UW) offers two types of rubric: the Analytic Rubric and the Holistic Rubric.
The Analytic Rubric
The Analytic rubric is perhaps the one most commonly used by instructors. It features a grid of criteria (columns) and “levels” of achievement (rows). By separating the total activity score into separate criteria (e.g.: summary, argument, grammar & mechanics) the rubric provides detailed feedback to students on the strengths and weaknesses of each aspect of their work. This provides students targeted information they can employ to improve their grade in subsequent assignments.
Provide students a copy of the rubric you will use to grade their work at the same time you first give them the assignment. This will help students focus on assignment criteria that you have identified as most important, and help relieve student apprehension.
The Analytic rubric makes it easy to demonstrate visually each criteria’s importance through its position: such placing as formatting and citations beneath much more important criteria such as argument. This helps demystify to students what you believe to be most important.
See example below:

The Holistic Rubric
While less common, holistic rubrics are a way to quickly give feedback by providing a score based on levels for one criteria. In addition to making grading go more quickly, holistic rubrics are appealing to instructors who are uncomfortable separating the evaluation of student work into discrete criteria.
See example below:

Create a Rubric
The steps necessary to create either an Analytic or Holistic rubric are essentially the same. Differences will be noted where appropriate.
Step 1:
A new rubric can be created within an activity by creating a new rubric within a grade item or via the Course Administration page. Click Course Admin, Edit Course, Rubrics then (under Assessment), and finally click the blue New Rubric button at the top left of your screen.
More information on how to attach a rubric to an assignment will be covered below.
Step 2:
Follow these steps under the Properties tab on the New Rubric page:
A) Name you rubric.
B) Select the Rubric Status.There are three options.
Draft: The initial status of a rubric. Draft rubrics are not yet available for new associations.
Published: Associations can be made with published rubrics. Once a rubric has an association, you cannot change the rubric’s name, description, levels, and criteria. However, you may copy the rubric, and make changes to the new copied rubric for use in subsequent activities.
Archived: Archived rubrics do not appear in default search results and are not available for new associations. Existing associations with archived rubrics remain functional.
It matters little whether or not you choose Draft or Published. However, the rubric status must be set to Published before it can be attached to an assignment.
C) Add a description if desired.
D) Set Rubric Type to either Analytic or Holistic.
Step 3: Additional Properties settings
Analytic Rubrics Only
A) Enter the desired number of Levels (columns) and Criteria (rows) for the rubric. You can edit both at a later time.
B) Select the Scoring Method. Rubric scoring for Analytic Rubrics is done in text, points, or customized points.
Performance levels can be indicated by Text Only. For example, three performance levels for a rubric can be “Poor”, “Good”, and “Excellent”.
Points scoring includes points to assess performance. For example, three performance levels for a rubric can be “Poor (0 points)”, “Good (75 points)”, and “Excellent (125 points)
The Custom Points scoring method is similar to the Points scoring method, but you can customize the points given for each criterion (row) so they are not the same. This is useful for weighing some criteria more than others (such as making Argument worth more than Spelling and Grammer).
For example, if performance levels are “Poor”, “Good”, and “Excellent”, then the criterion Spelling and Grammar can be worth 0 points, 10 points, and 20 points for each level, and the criterion Argument can be worth 0 points, 30 points, and 60 points, making it worth three times the points of Spelling and Grammar.
C) When finished, click Save.
For greatest flexibility, I suggest using Custom Points.
Holistic Rubrics Only
A) Enter the desired number of Levels (grade levels) for the rubric. You can edit this at a later time.
B) Select the Scoring Method. Rubric scoring for Analytic Rubrics is done in text, points, or customized points.
Performance levels can be indicated by Text Only. For example, three performance levels for a rubric can be “Poor”, “Good”, and “Excellent”.
Percentages scoring in a holistic rubric essentially just allows you to add an additional layer of feedback to an existent grade scheme. For example: Instead of just giving students an 88% on an activity you can add greater detail. Such as 88%: Good, Generally accurate, but weak quality of writing. See Holistic Rubric example above.
C) When finished, click Save.
Step 4: Hide Scores
In both Analytic and Holistic Rubrics you have a final option: Hide scores from student views.
Unless you have a pedagogical rationale for hiding student scores, leave them visible.
Editing a rubric
You can edit a rubric by clicking on its name in the Rubrics page. Once in the Edit Rubrics page you will notice two tabs at the top of the page: Properties, and Levels and Criteria.
Quick Note: Once you use a rubric to grade a student activity, it will lock and you will be unable to edit any properties. You may copy the rubric (click on the arrow next to the rubric’s name, select copy) if you need to make changes or reuse the rubric at a later date.
Properties Tab
From the Edit Properties tab you can rename your Rubric, change its status, and add a description.
Levels and Criteria Tab
The Levels and Criteria tab permits you to change most everything else about your rubric. The illustrations below are from an Analytic Rubric.
Adding Levels or Criteria
To add levels and criteria, navigate to the Levels and Criteria tab. Next to each column is a small arrow that indicates a drop-down menu. This menu will enable you to add, delete, or edit columns (levels) and rows (criteria).
Editing Criteria
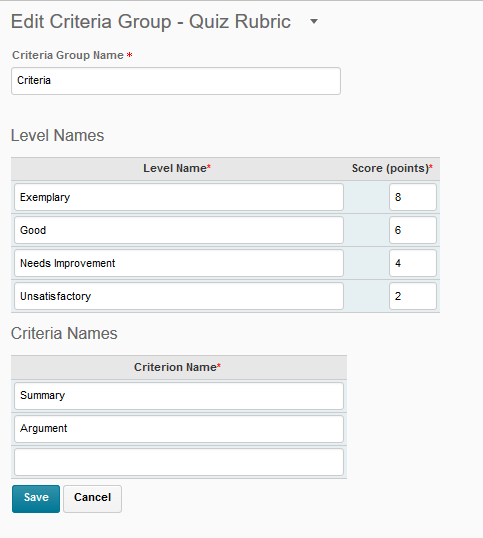
Next, let’s edit all of the criteria at once. First, select Edit Criteria Group by first clicking on the triangle next to Criteria.
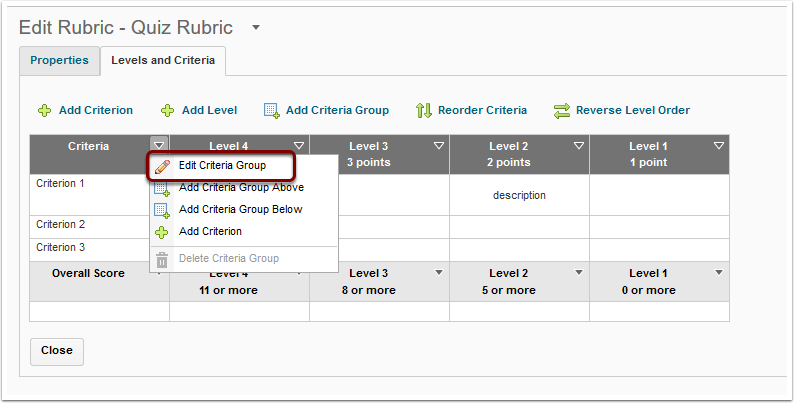
From here you can quickly edit each criteria group. You can add level names, enter the score for each level, and add criterion names for your rubric.
Click on save when you are finished.
Editing Levels
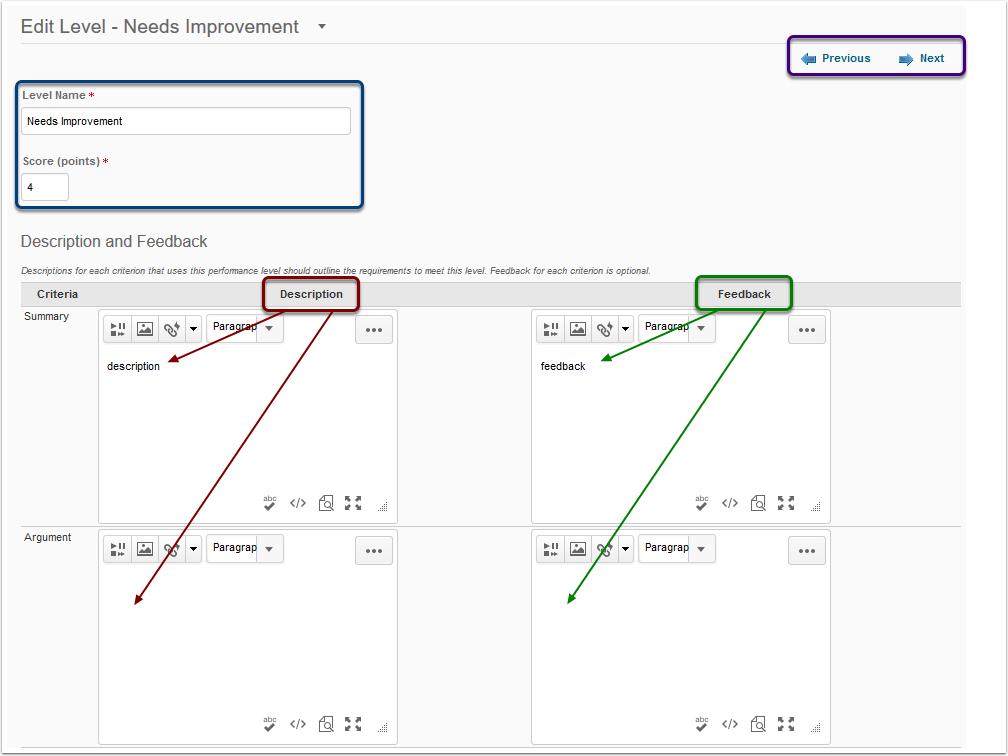
To edit your rubric level by level, click on the triangle next to the Level Name you wish to edit. Select Edit Level.
From the Edit Level page you can make all major adjustments to that level.
A) You can rename your level or adjust the score it receives. (NOTE: This is a duplication of a process discussed above by editing the Criteria Group)
B) You can edit the Description and Feedback for each criteria within the level.
Description and Feedback each perform unique tasks in a rubric.
Description – describes to students what they need to accomplish in order to reach that particular level. The description should be provided to students prior to turning in the activity.
Feedback – Is very similar, but is offered in response to a student’s work. It tells them why you graded them at that particular level.
To quickly navigate between levels click on the previous and next arrows at the top-right of the screen. (see illustration below)
You may choose to build your rubric by levels (columns) or criteria (rows), though it is suggested to build the rubric by levels, as this allows you to set points at the same time.
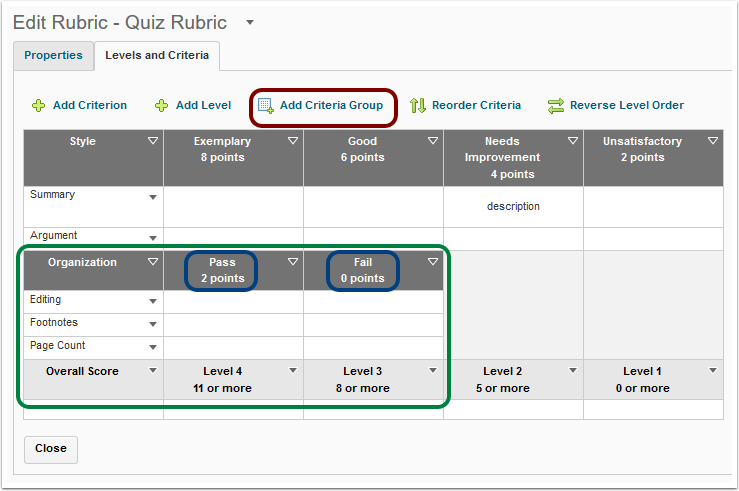
Multi-part Rubrics
At times you may wish to grade some aspects of an activity on differing point-scales or levels. In this case a multi-part rubric may prove useful. To create a multi-part rubric, click Add Criteria Group on the Edit Rubric page. Then add Criteria and Levels just as above.
See example below: Notice that each criteria group can have differing point-scales and number of levels.
Overall Score
Finally, you can edit the Overall Score much like you would other levels and criteria.
Step 1:
On the Levels and Criteria tab, on the Edit Rubric page, click on the triangle next to Overall Score. From here you can Edit and Add Levels.
Step 2:
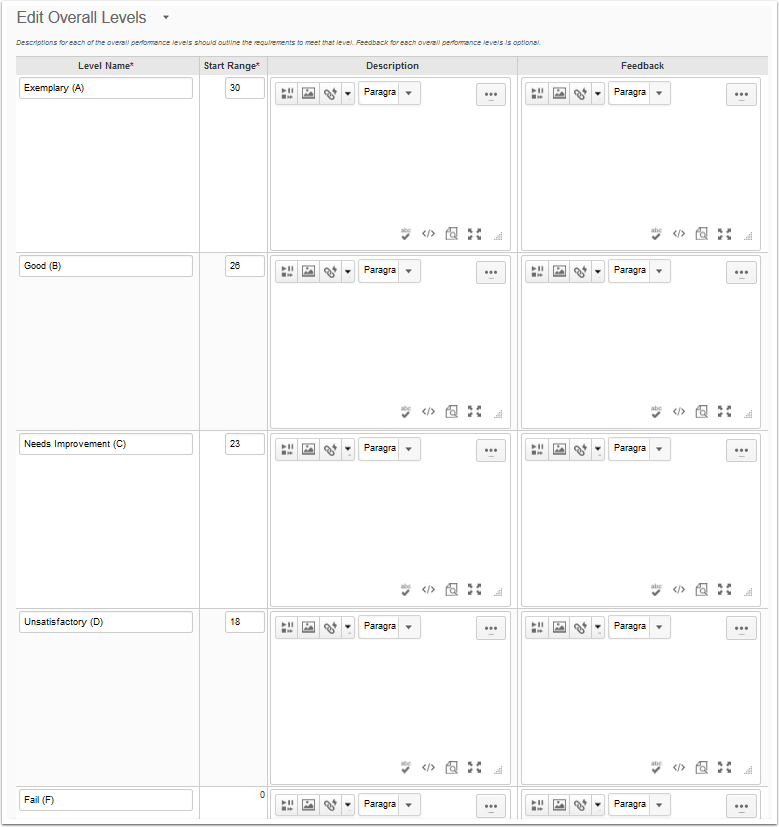
Select, Edit Levels. On the Edit Overall Levels page, select the grade range for each level. Here you will enter the lowest grade required to reach the particular level.
In the example below, the highest possible grade is a 36. However, to reach the level marked Exemplary (A), a student need only achieve 30 points. Therefore enter 30 in the Start Range that corresponds to the level Exemplary (A).
To reach the level Good (B) a student must have at least 26 points (though fewer than 30). Therefore enter 26 in the Start Range that corresponds to the level Good (B).
For the lowest level, you will not be able to enter any number – it is automatically set at o points.