
Part 2: Build a Course in D2L
Nav Bar and Themes
The first thing your students will see when they login to your class is the Course Homepage and Navigation Bar (Navbar).
This first impression is an important part of the course. Not only do the aesthetics play a role in how the students will initially perceive the course, the homepage is the course’s “home base.” News, navigation, and access to other tools often run through the Homepage and Navbar. Your homepage design can help students answer the questions, “What am I supposed to do? When am I supposed to do it? and How do I get to the information I need?” Take a look at Part 1: Essentials of Course Design to learn more about conceptualizing your navigation design.
Although designing your Homepage and Navbar are is fairly straightforward, planning ahead before jumping into the technology can make the process more efficient and the product more effective.
Navbar and Theme
You can customize the Navbar by changing the links and aesthetics. In addition to adding preexisting tool links to your Navbar, you can create your own links to areas within your course or other sites outside your course.
Select a different Navbar and Theme
Step 1:
Click on the Course Admin drop-down menu in the Navbar, then select Edit Course.
Step 2:
Select Navigation & Themes. On the Navbar page you will see a list of the Navbars to which you have access. Your active Navbar is the one selected in the Active Navbar drop-down list.
Step 3:
Preview the Navbar and themes by clicking on the small black arrows next to the Navbar title. See below.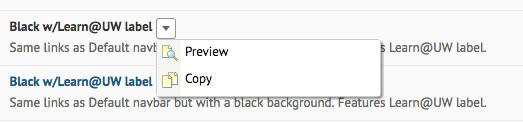
Step 4:
Choose a Navbar and make a copy. To make a copy click the little arrow next to the title, then select Copy.
Step 5:
Set the Navbar to active.
To set the Navbar to active, select the copy you just made from the Active Navbar list and click Apply. Your new Navbar should appear at the top of your course. 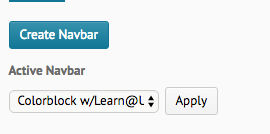
Modify or create a Navbar
Step 1:
Click on the Course Admin drop-down menu in the Navbar, then select Edit Course.
Step 2:
Select Navigation & Themes. On the Navbar page you will see a list of the Navbars you can access. Your active Navbar is the one selected in the Active Navbar drop-down list.
Step 3:
Click on the aqua blue Create Navbar button to create a new Navbar.
Step 4:
Or, to modify a Navbar, choose a Navbar and make a copy. To make a copy click the little arrow next to the title, then select Copy.
Step 5:
Name the Navbar then click Change the Theme.
Step 6:
From the Select New Theme pop-up window, choose the desired theme. When finished click the Update button. See below.
Step 7:
The navigation bar links are divided into four separate areas. See below.
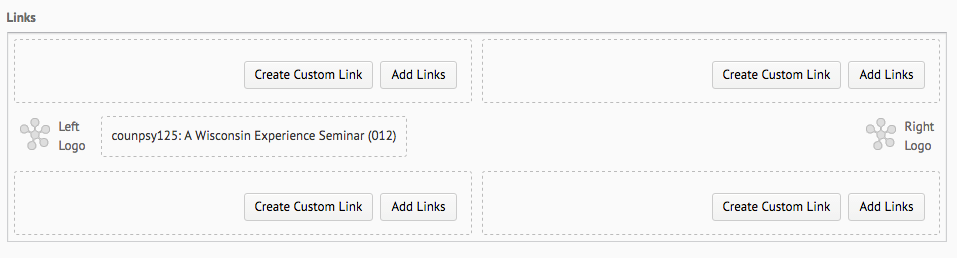 Click Add Links to add a link to a tool. A list of available tools will be displayed in a pop-up window. Click on the check boxes next to the tool(s) to select them. Then click Add. To add a custom link (i.e. to an external website), click Create Custom Link. Enter the information for the link, then click Create.
Step 8:
Set the Navbar to active. To set the Navbar to active, select the copy you just made from the Active Navbar list and click Apply. Your new Navbar should appear at the top of your course.
