
Lab 5: BACKGROUND
Minipreps of Plasmids
In order to screen the bacterial colonies for a clone of interest, you need to be able to rapidly isolate small quantities of plasmid DNA from each clone. Small amounts of bacterial cells (2 mLs overnight culture) are used to obtain small amounts (often 1-5 µg) of moderately pure plasmid DNA; these are called minipreps. Miniprep procedures allow you to isolate the plasmid DNA from the more prevalent genomic DNA. The procedure involves pelleting bacterial cells in the microfuge, re-suspending the cells in buffer, precipitating cell debris and protein, and finally separating the plasmid DNA from genomic DNA. Due to time constraints, you will use a commercial miniprep kit. Such kits are widely used in research labs.
Each commercial kit generally includes a resin (specially-treated glass) that is mixed with the plasmid DNA/RNA solution. The plasmid DNA sticks to the resin in a small column. The column is washed with a solution that contains ethanol, so the plasmid remains on the resin. The plasmid DNA is then eluted from the glass resin with water or TE buffer. Sometimes the DNA is stuck to the resin with high salt and eluted with low salt (water or TE). This resin replaces the alcohol precipitation steps done in other procedures and in the purification of genomic DNA.
The steps in a mini prep are outlined below:
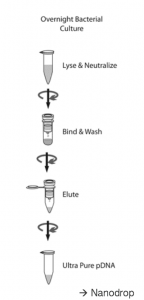
- Pellet bacterial cells, resuspend in Buffer P1 (resuspension buffer)
- Lyse for 3 minutes in Buffer P2 (lysis buffer)
- Add Buffer N3 containing high-salt (neutralization buffer)
- Pellet cell debris, proteins, and genomic DNA by centrifugation
- Add supernatant containing plasmid DNA to spin column, spin to bind DNA to resin
- Wash plasmid DNA bound to column with Buffer PE (wash buffer) to remove salts
- Spin column while empty to remove any residual Buffer PE
- Elute DNA from column with Buffer EB (elution buffer, same as lab 3)
For additional information about minipreps, please see the appendix: Appendix 3: Additional laboratory details
Master Mixes
A Master Mix is a convenient tool you can use when running multiple samples that include many of the same components. It works by preparing a large solution that contains all the common components across the reactions. You then pipette the appropriate amount of this master mix into each reaction tube, then add any components that differ between reactions individually. Using a Master Mix is beneficial because it:
-
- reduces pipetting error
- increases reproducibility
- saves time
See sample Master Mix below.
Example Master Mix Calculation
The example reaction contains the following components: DNA, buffer, enzyme, and water. My final reaction volume will be 10 μL. Each of my DNA samples has a different concentration and would therefore require a different volume. To make the Master Mix easier, I will start by making dilutions of each of my DNA samples so that they are at the same concentration. In this example I’ve chosen to make them all 25 ng/ μL. The final volume of these stocks doesn’t really matter, I’ve chosen 20 μL.
| DNA Sample | Concentration | Stock volume for dilution | Water volume for dilution |
| A | 25 ng/μL | – | – |
| B | 25 ng/μL | – | – |
| C | 250 ng/μL | 2 μL | 18 μL |
| D | 100 ng/μL | 5 μL | 15 μL |
| E | 500 ng/μL | 1 μL | 19 μL |
Next I need to determine the volume of all of the components for each individual reaction. Water will be used to bring the volume up to 10 μL.
| Reagent | Reaction A | Reaction B | Reaction C | Reaction D | Reaction E |
| DNA | 4 μL | 4 μL | 4 μL | 4 μL | 4 μL |
| 10x Buffer | 1 μL | 1 μL | 1 μL | 1 μL | 1 μL |
| Water | 4.5 μL | 4.5 μL | 4.5 μL | 4.5 μL | 4.5 μL |
| Enzyme | 0.5 μL | 0.5 μL | 0.5 μL | 0.5 μL | 0.5 μL |
| Total | 10 μL | 10 μL | 10 μL | 10 μL | 10 μL |
Variable components
In this experiment, I am adding a different DNA sample to each reaction. Therefore, DNA is called the “variable component”. Since it varies across reactions, I will leave it out of the Master Mix.
Master Mix with unchanged components:
| Single Reaction | # of Reactions | Master Mix |
| 1 μL 10x Buffer | 5.5 | 5.5 μL |
| 4.5 μL H20 | 5.5 | 24.75 μL |
| 0.5 μL Enzyme | 5.5 | 2.75 μL |
| 6 μL total volume |
From the Master Mix, I add 6 μL to each of my labeled tubes. Then I add 4 μL of each DNA sample to the appropriate tube.
This video explains how to do a Master Mix calculation, with an example and a practice problem.
