
Lab 7: PROCEDURE
E. coli Growth
- Each pair works with ~200 mL of an E. coli culture expressing wild type HCAII and ~100 mL of an E. coli culture expressing mutant HCAII, each in mid-log phase (OD600 0.6-0.9).
The following series of videos demonstrates the process of starting a culture and monitoring its growth.
- Use the provided E. coli to set up 3 100 mL cultures in 250 mL flasks:
-
-
- 100 mL IPTG-treated E. coli + wild type
- 100 mL negative control E. coli + wild type (i.e. no IPTG)
- 100 mL IPTG-treated E. coli + mutant
- Use the sterile flasks provided on the back lab bench – DO NOT use the normal flasks in your drawers!
-
- Remove 0.5 mL from each culture as your 0 time point. Store in labeled 1.5-mL eppendorf tubes, on ice, until you are ready to process them (see below).
- Add IPTG to a final concentration of 500 μM to each culture, and then immediately place each flask in a 37ºC water bath.
Collect samples for SDS-PAGE
Throughout this protocol, there are several steps where small samples are taken and processed for future analysis via SDS-PAGE. These steps are always boxed so that you can easily identify them.
- Collect 0.5 mL from each culture at each of the following time points: 45, 90, and 150 minutes
- Spin each sample of cells for 1 min at 4,000 rpm.
- Discard the supernatant into bleach. Do not disturb the pellet.
- Resuspend in 30 μL water. Add 30 μL of denaturing sample buffer (containing tracking dye, SDS, and β-mercaptoethanol).
- Heat the samples to 95ºC for 10 min. in the heat block.
- Spin briefly in the microfuge to remove liquid from caps.
- When all of the experimental samples have been prepared, all of the microfuge tubes can be stored in your freezer box at -20ºC until the next period when the SDS-PAGE gel will be performed.
Note that, in the box above, samples were collected for SDS-PAGE at several time points. If desired, you could measure the OD600 of these samples before preparing them for SDS-PAGE. The OD600 provides an estimate of cell number, so that measuring the OD600 over time would allow you to create a growth curve for your different cultures.
Prepare the remaining culture for purification.
- Once you have collected all of your samples, transfer your remaining wild type and mutant cultures to two separate 250 mL centrifuge bottles – DO NOT combine the wild type and mutant cultures.
- Another group will add their culture to these bottles as well, so that there will be 200 mL of wild type and 200 mL of mutant to spin.
- Be sure your bottles are well-labeled.
- Balance the two bottles against each other on a scale, using water to adjust if necessary.
- Pellet the cultures in a large floor centrifuge by spinning at 6,000 x g for 15 minutes.
Cell lysis via lytic solution
- Each group will purify either the protein from the wild-type pellet or from the mutant pellet.
- Add 8 mL BugBuster reagent to your pellet, and mix by swirling, pipetting or gentle vortexing.
- Incubate the cell suspension on a shaking platform on the low setting for 15 min. at room temperature.
Removing insoluble debris
- Transfer your lysate to a small centrifuge bottle.
- Balance your centrifuge bottle with another pair’s, adjusting with water if necessary.
- Remove the insoluble debris by centrifuging the suspension at 16,000 x g for 20 min. at 4º C in the floor centrifuge. Please make sure that you wait to run your samples until all of the slots in the centrifuge have been filled.
- Transfer the supernatant to a fresh 50 mL conical tube.
Resuspend the pellet in 8 mL H2O. Take a 10 μL sample of this resuspended pellet and combine it with 20 μL water and 10 μL SDS sample buffer. Heat the sample for 10 minutes at 95ºC. Then put the tube in your freezer box to be stored for next week.
Remove 10 μL of the supernatant and combine it with 20 μL water and 10 μL SDS sample buffer. Heat the sample for 10 minutes at 95ºC. Then put the tube in your freezer box to be stored for next week.
Packing the column
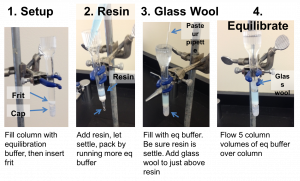
- Assemble your column. The following video demonstrates the process, and is followed by step-by-step instructions.
- Cap the column and fill it with equilibration buffer. Yes, fill it all the way. Float the frit on top of the buffer and then push it gently to the bottom of the column with the wide end of a Pasteur pipette. Remove the end cap and run the buffer out of the column into a clean flask until there is approximately 1/8 inch of buffer above the frit and then re-cap the column. The buffer is clean, so you can reuse it for equilibrating the column.
- Your TA will give you 1 mL of the Ni-NTA resin for your column.
- Slowly add the resin down the side of your column and let it settle. Be careful not to introduce air bubbles. Once the resin has settled a little, remove the end cap and allow the buffer to flow to further pack the resin. You may want to add more buffer as it is running to help pack the resin.
- After the resin has packed, and while the column is running, add equilibration buffer until the buffer reaches the line near the top of the column. If the resin is disturbed during the buffer addition, let it settle before going on to the next step.
- With the bottom of the column capped, place a small plug of glass wool into the column. Let the buffer soak into the glass wool so that there are no bubbles in the plug. Then push the glass wool into the column so that it is just above the resin but do not let the glass wool touch the resin bed. Make sure that there are no large bubbles between the glass wool and the resin.
- The glass wool will filter out any debris in your cell lysate that would otherwise clog the column. Equilibrate the column with 5 column volumes of equilibration buffer. (A “column volume” is the volume of resin you added to your column.) The following figure summarizes the column preparation steps:
- Apply your cell lysate (supernatant) to the column and let it flow into the column. Collect the flow-through in a conical tube.
- Wash the column with 7.5 mL wash buffer of choice. Collect the flow-through in 5 x 1.5 mL fractions into separate microfuge tubes.
- Elute the protein from the column with 5 mL of your elution buffer. Collect the flow-through in 5 x 1 mL fractions into separate microfuge tubes.
NOTE: This is your purified protein — be careful with it!Remove 10 μL of liquid from each fraction you collected (flow-through fraction, wash fractions, elution fractions) and place it into a clean microfuge tube (be sure to label the tube). Dilute the sample with 10 μL of SDS sample buffer. Heat the samples to 95°C for 10 min. These samples can then be stored for next week.
Spectrophotometric determination of protein concentration
- Measure the protein concentration of each elution fraction by measuring the absorbance at 280 nm on the NanoDrop.
- Be sure to mix each fraction before taking a sample to measure on the NanoDrop.
- Use the A280 to determine the protein concentration of each of your fractions. The extinction coefficient for wild type HCAII is 50,420 cm-1M-1.
- Decide which fractions contain the most protein, and dialyze those (directions in the next step). Typically protein is found in two concentrated fractions (see elution profile below) – but you could have more or less. As a general rule of thumb, use any fractions with A280 > ~0.3 that have reasonable purity. Talk to your TAs if you are unsure.
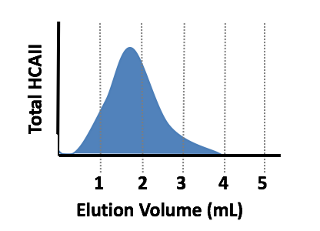
Fig. 7.14. Elution profile of HCAII being eluted into 5 x 1 mL elution fractions. In this case, most of the protein is in fractions 2 and 3, so those fractions should give the highest A280 readings. Fractions 2 and 3 should then be combined and dialyzed in the next step.
Dialysis of your elution fractions containing protein
- Prepare your protein sample for dialysis. The following video demonstrates the process, and is followed by step-by-step instructions.
- You should perform all of these steps over a clean, empty beaker in case you spill your protein. If the protein is in the beaker you can recover it. We also recommend that you practice the following steps with water before trying them with your protein to ensure that you do not lose your protein.
- Take a piece of tubing from the beaker and rinse it with dH2O.
- Place a clamp on one end of the tube approximately ½ in. from the bottom of the tube. You should label the clamp.
- Add your most concentrated elution fractions (as decided on above) to the tubing and then place the second clamp on the tubing approximately ½ in. from the end that is not clamped. The second clamp should have a piece of string tied to it.
- Hold the filled tubing over your clean beaker and gently squeeze. If protein leaks out, try again.
- If you practiced with H2O, you can simply unclamp one end of the tube, pour out the water, and reuse the tubing for your protein.
- After your protein is in the tubing and you know the tubing is not leaking, place your sample into the beaker containing the Protein Buffer (PB: 50 mM Tris, pH 7.7, 0.1 M K2SO4). Tape the string to the outside of the beaker, and label the piece of tape with your name so you will be able to easily find your tubing next week.
- A 551 staff member will exchange the Protein Buffer and you can collect your protein next week.
